In StaffsScheduleCare, the Shift Rotation menu is used to define period rules for worked time such as rounding rules that govern punches, period overtime rules (e.g. weekly, biweekly), holiday rate of pay etc.
▪Select the Config menu.
▪Select the Setup menu.
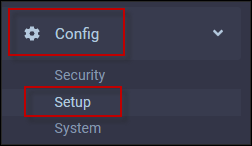
▪Select Shift Rotation.
Creating Shift Rotation Rules
To create a new Shift rotation:
▪Click on the plus symbol (+). This will add a new line to the bottom of the left-side grid.
▪In the Code column, enter the code for the rotation.
▪In the Description column, enter a description for the rotation.
▪Click Save.
The Employee column will populate automatically as employees are assigned.

To complete the configuration select each tab and populate the required options.
Shift Rotation Menu Options The Shift Rotation main menu consists of two sections. On the left side is a list of the Shift Rotations. On the right side is the detail of the highlighted Shift Rotation. The centre divider bar (noted in green) may be dragged either left or right using click and drag.
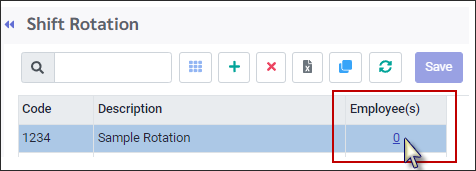
Employee link The number of employees assigned to each shift rotation is shown in the Employee column. Click on the number to open a list of the employees.
Toolbar Options
Field Visibility See the Field Visibility section for detailed instructions.
Plus Symbol (+) Create a Shift Rotation.
Red X icon - Delete Delete a Shift Rotation.
Cancel If you have not saved the record and would like to remove the data, click on Cancel.
Clone Allows you to copy (clone) a rotation.
|


| | General Shift Rotation Information |
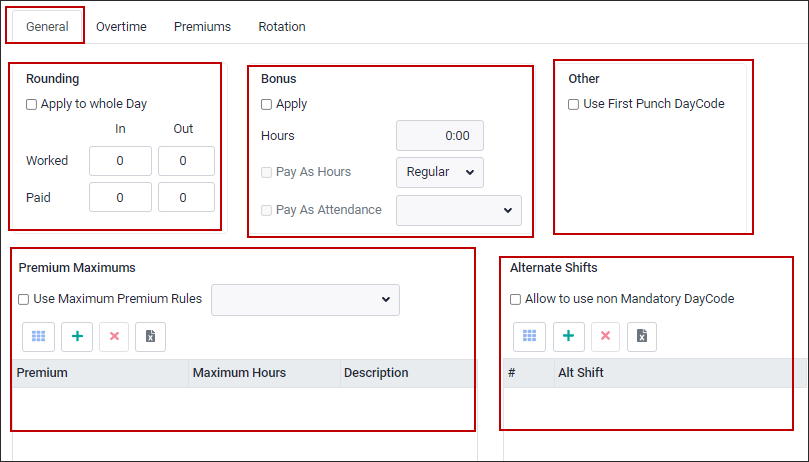
General Tab
Rounding
The rounding in punch / out punch rules are the rules that will determine how a punch is handled outside the buffers and grace times of the regular shifts (Day Codes). Rules for an in punch may be set up differently than the rules for an out punch.
Check the Apply to Whole Day flag. If this field is not checked on, the rounding rules will only apply to punches that fall in between the start and end times of the day rules.
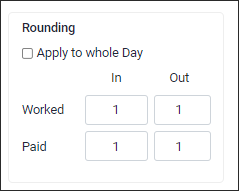
In this example, rounding is set up to adjust one (1) minute paid after one (1) minute worked. The employees will be paid for each minute they work.
In this example, you must work five (5) minutes of each 15 minute segment to get paid for the full 15 minutes.
Bonus
Click on the Apply check box to enable.
Hours field The number of bonus hours to be awarded.
Pay As Hours Defines what type of hours. In our example the hours are regular hours. These hours will show on the Time Card under Regular.
Pay As Attendance Code Click on the drop-down arrow and select from the Attendance Code list if the hours should contribute to an Attendance Code.
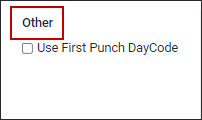
Use First Punch Day Code
Use this option if the Shift Rotation has multiple shifts on a day and you would like the Day Code rules from the first shift's Day Code to apply to all shifts on that day.
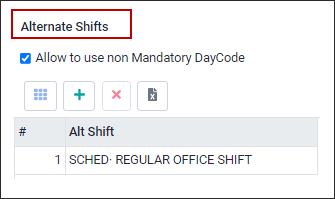
Alternate Shifts
A final option is to set up Alternate Shifts. If an employee does not always work a set schedule but may work different schedules that can change from day to day, you may use Alternate Shifts.
Set up a different Shift Rotation line in the Master Schedule for each possibility, and then in the Alternate Shift section shown above, select each Shift Rotation as a possible alternate to the main one.
It is very important to pay attention to the setup of your Day Rules if you plan to set up alternate shifts. The key is to make sure that none of the shift buffers and start times overlap.
▪Click on the plus symbol (+). ▪Click in the Alt Shift field and select from the drop-down list. ▪Click Save.
|


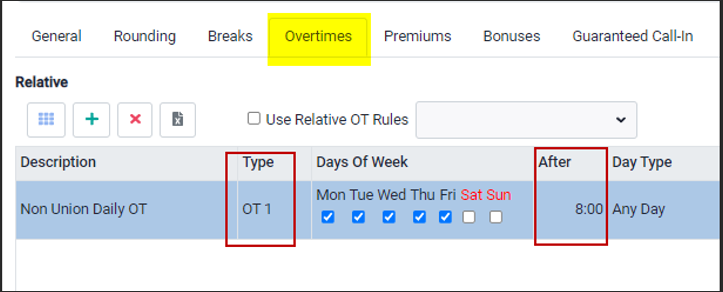
Shift Overtime
Frequency Weekly, biweekly, semi-monthly or every four weeks.
Include Holiday If the holiday pay (benefit) hours are to be included in the threshold for the overtime calculation.
Example: ▪Monday is a holiday, and the employee receives 8.0 hours of holiday pay. ▪Tuesday the employee works 8.0 hours ▪Wednesday the employee works 8.0 hours ▪Thursday the employee works 8.0 hours ▪Friday the employee works 8.0 hours ▪Saturday the employee works 4.0 hours (Is this paid as overtime?)
OT Start Date Is the next day for the previous payroll end date. It will only be different if your overtime period and your pay period are different.
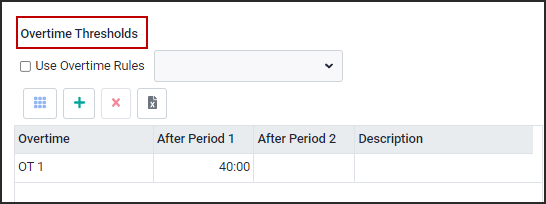
Overtime Thresholds
The After value represents the number of accumulated hours the employee needs to work to receive the overtime value. For example, if the employee will receive overtime after 40 hours worked in a single week, you enter 40:00 in the After field next to OT1 and check off Weekly in the Frequency section.
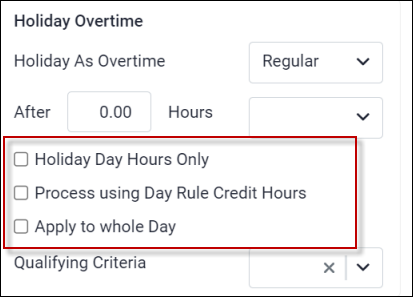
Holiday Overtime
The Holiday as Overtime section determines at what overtime rate the hours that are worked on a stat holiday will be paid. This section also defines the Qualifying Criteria an employee must meet (if applicable) to earn this overtime rate. Any combination of these fields may be used for determining the qualifying criteria.
Holiday as Overtime This field determines which Overtime Rate will be used when the holiday is worked.
After 0:00 hours This option determines if a different rate will apply after a defined hours threshold. For example, an employee who works 8 hours at OT 3 (below, configured at 1.5x the rate), may get OT 4 (double time) after the eight-hour threshold.
Holiday Hours Only If ticked, the overtime option configured for statutory holidays will only apply to the 24-hour holiday. For shifts that cross midnight, any shift hours outside this 24-hour holiday period will not generate overtime.
Process using Day Rule Credit Hours For shifts that cross midnight, select this option to apply the Day Code Credit Hours rule, which determines whether hours are credited to the in-punch or out-punch day. All worked holiday hours will be assigned to the portion of the shift where the majority of hours fall on the statutory holiday.
For example, an overnight shift from 10:00 p.m. on December 31st to 6:00 a.m. on January 1st , with the above rule crediting to the in-punch, will count all eight (8) hours as statutory holiday worked. However, if the same shift occurs from 10:00 p.m. on January 1st to 6:00 a.m. on January 2nd, all hours will be treated as regular time.
Apply to Whole Day Similar to the Process using Day Rule Credit Hours option, this setting combines all worked hours before and after midnight for shifts that span two days. However, the outcome is reversed. For example, a shift from 10:00 p.m. on December 31st to 6:00 a.m. on January 1st will be treated as regular time, while the same shift on January 1st to January 2nd will be processed as statutory holiday overtime. This option should be used independently of the other two holiday hours options.
Please also see Holiday Configuration for additional information.
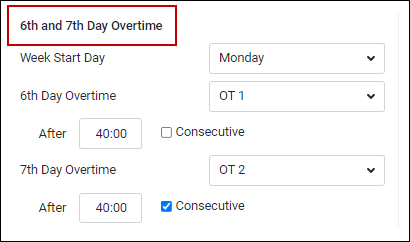
6th and 7th Day Overtime
Week Start Day Identifies which day of the week is the 1st day used to calculate the 6th or 7th day. In the example above, Monday is the Start Day, therefore Saturday would be day 6th and Sunday would be day 7th. If the Start day was Tuesday, Sunday would be the 6th day and the Monday would be the 7th day.
6th Day Overtime Click on the drop-down arrow and select the Overtime Rate to be applied.
6th Day After hours Enter the number of hours needed to have been worked before receiving overtime (cannot be 0:00).
7th Day Overtime Click on the drop-down arrow and select the Overtime Rate to be applied. Enter the number of hours needed to have been worked receiving overtime (cannot be 0:00).
Consecutive If ticked, you are telling the system that to meet the overtime criteria the days must be consecutive.
Consecutive Weekend OT
Define your consecutive weekend parameters in this section.
Week Start Day Identifies which day of the week is the 1st day used to calculate when the weekend starts. In the example above, Monday is the Start Day, therefore, Saturday would be the 6th day and Sunday would be the7th day. This would define a weekend for the consecutive weekend count.
Consec Weekends Worked This is the number of weekends in a row an employee may be scheduled for before overtime. In the image above this number is set at two. If employees work two weekends in a row, they cannot be scheduled for a third weekend without causing overtime.
Must Work Hours This is the threshold employees must work per day of the consecutive weekend before their hours are converted from regular hours to overtime hours. If the threshold is 7.5 hours, and they only work 6.0 hours. the hours remain as regular. If they worked 7.5 hours or more, then they would get overtime for the 7.5 hours worked as part of the consecutive weekend setup. Using the image above, this rule would only apply to the second consecutive weekend worked.
To Convert Regular into OT Click on the drop-down arrow and select the Overtime Rate you would like the hours to be applied to.
Count Holidays as a Shift If ticked, shifts worked on a holiday that fall on the defined weekend days, count towards the consecutive weekend worked.
Weekend Definition From the drop-down menu, select the day option that defines a worked weekend, either both days or any single day.
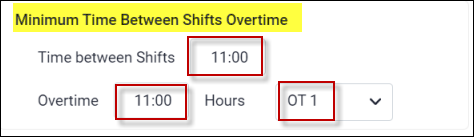
Minimum Time Between Shift Overtime
Use this option to define the number of hours between shifts that should receive overtime. In this example, the time between shifts must be 11 hours. The time between shifts is calculated from the end of the first shift to the start of the next shift. If, for example the time between shifts is only eight hours, this feature would be configured if you only want overtime to be calculated on the remaining three hours that make up the required 11 hours instead of overtime calculating on the entire second shift (default rule).
Example: ▪Sara worked from 2pm - 10pm on March 16th. ▪She also had a shift starting at 6am on March 16th leaving only eight hours between the two shifts. ▪With the above configuration, the time from 6am to 9am should be overtime, since these first three hours make up the remaining hours to meet the 11 hour requirement. ▪Notice the shift on March 17th calculated three hours overtime and the remaining 4.5 hours regular time.
See section below on Shift Rotation Overtime - Banked Time for configuration.
|


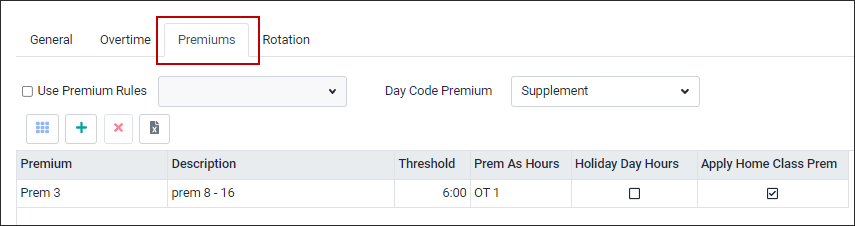
Premium Tab
The Maximum Premium section is used if the employees can only earn a maximum amount of premium time. Enter the applicable values in the applicable fields and the system will stop earning the premium time when the employee has reached the maximum.
|

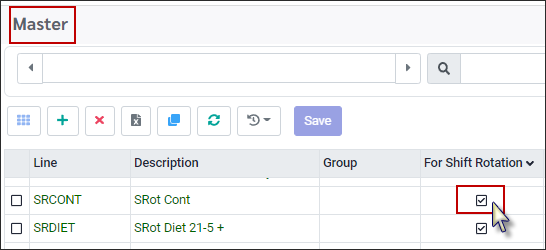
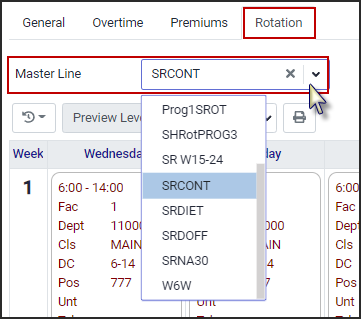
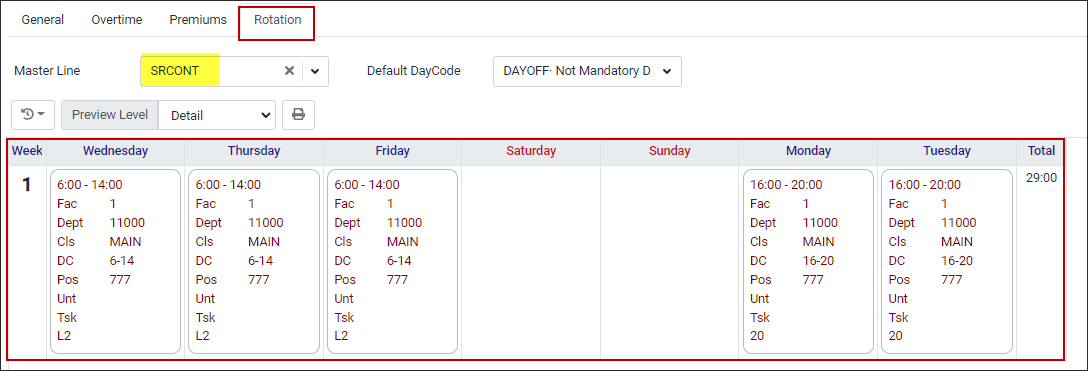
Shift Rotation lines are defined in the Master Schedule.
Using the Master Schedule menu, create the rotation. It is important to remember to tick on the Shift Rotation option when creating the new line.
Once you have created the rotation, it will now appear on the Master Schedule drop-down list. In the image above we tick on line SRCONT, below it appears on the Master Schedule drop-down menu.
▪Click on the Master Schedule drop-down arrow. ▪Select the Shift Rotation Line. ▪Click Save.
The rotation grid will now be populated with the Shift Rotation line.
If you have days that an employee is not actually expected to come to work, choose a default Day Code that is not checked off as a Mandatory Scheduled Day. In the example above the code called OFF has been used.
|
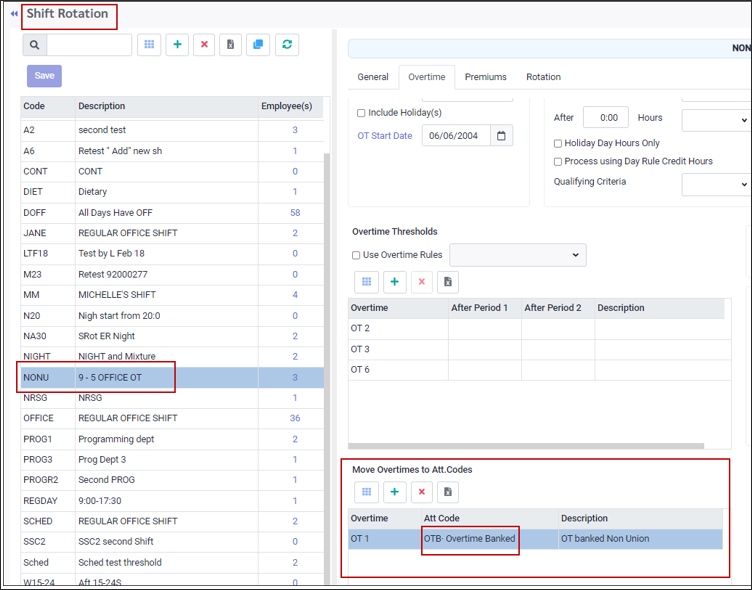
On the Shift Rotation main menu you have the option to automatically bank any overtime hours that are generated on the Time Card. You may choose which overtimes will be converted to an Attendance Code, and which codes will be used to bank the time.
▪Select the Config menu. ▪Select the Setup menu.
▪Select Shift Rotation.
Attendance Code Configuration ▪Ensure the bank overtime Attendance Code is configured without restrictions, and that employees are assigned correct time banks to avoid warnings. Error examples are, Forced Comment, No Scheduling AC, or not assigned correct time bank. During poll and processing Attendance Codes with warnings will not be processed. ▪Select the Shift Rotation that the managers/non-union employees will be assigned to. ▪Add the Attendance Code to the Move Overtimes to Att. codes section.
In our example we are using OT1 as the overtime and OTB as the Attendance Code.
Day Code Setup
The Day Code must be set up so that any hours over the shift length will earn overtime. Use this is the Day Code when creating the Shift Rotation shifts. The example below is set for daily overtime to OT1 after eight hours any week day.
Time Bank Earn Setup
On the time bank, set the new Attendance Code that will be used to add to overtime (earn) time. This is the same Attendance Code used in the Shift Rotation section Move Overtimes to Att. Code.
In our example we have used OTB-Overtime Banked code.
|

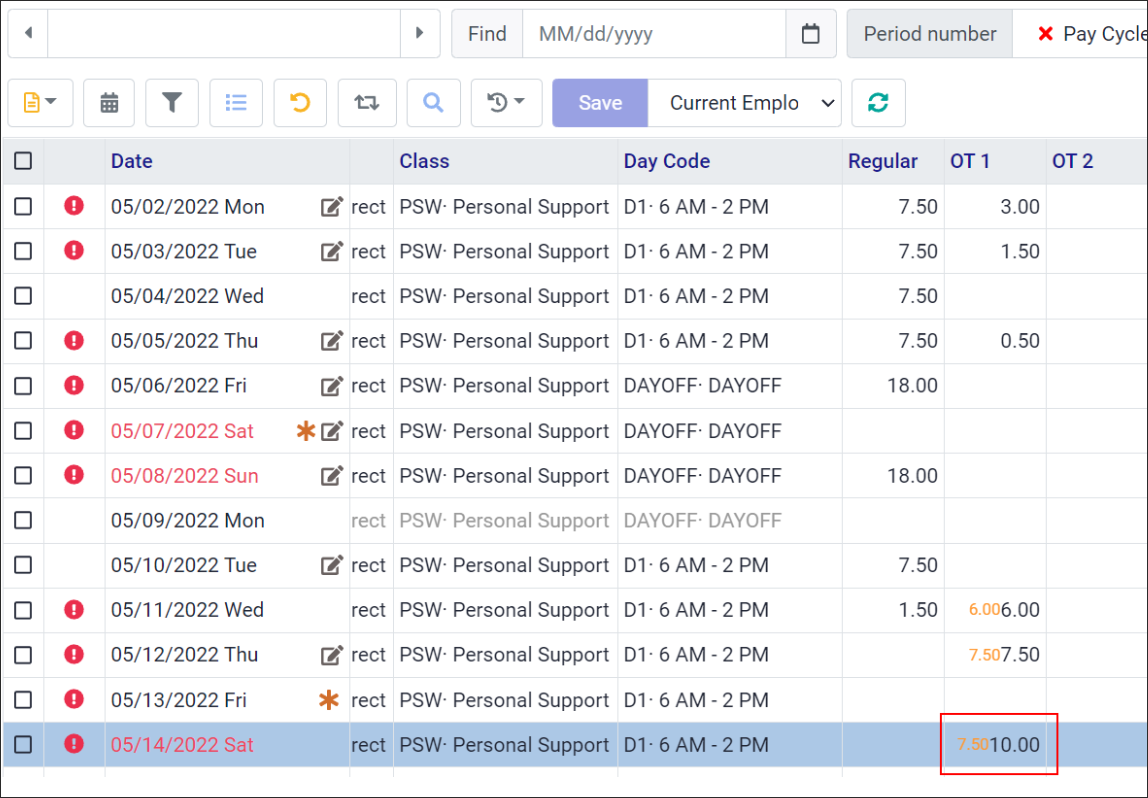
The Shift Rotation overtime will calculate up to the duration of the shift. If the regular hours entered surpass the Shift Rotation overtime threshold the hours are converted into the Shift Rotation overtime. If Move Overtimes to Attendance Code is configured, the overtime then converts to an Attendance Code for the employee to bank and use later.
If the Shift Rotation overtime and daily overtime share the same overtime field, the Shift Rotation overtime will cap at a maximum value that matches the daily overtime threshold. Any hours greater than that threshold are lost when the hours are converted from overtime to an Attendance Code.
Example: The Move Overtimes to Attendance Code feature is off. If you enter 10.0 hours, it results in Shift Rotation overtime. The Shift Rotation overtime only displays 7.5 hours despite all 10 hours being over the 75.0 hours threshold set up in the Shift Rotation.
Notice that the 7.5 hours matches the daily overtime threshold of the Day Code for OT1. If the threshold was changed to 10.0 hours. The Shift Rotation overtime will also show 10.0 instead of 7.5. If Move Overtimes to Attendance Code is on, the Attendance Code will only show 7.5 hours even though 10 hours was entered into regular hours. 2.5 hours would be lost.
|

Employees may be assigned to a Shift Rotation either from the Shift Rotation Setup menu or from the Personnel menu.
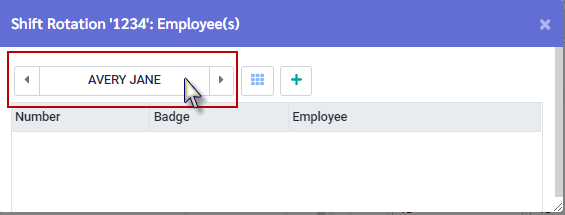
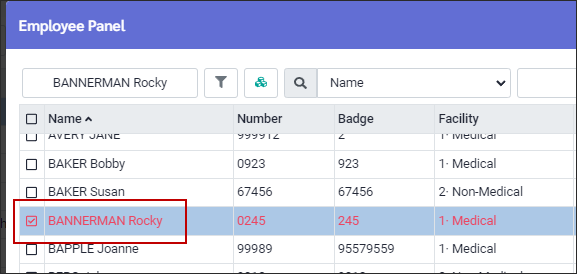
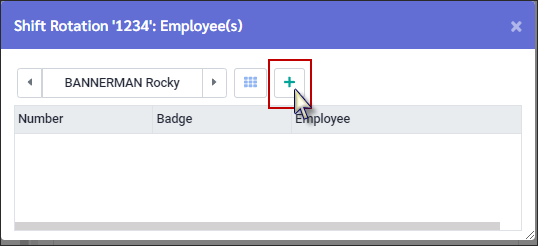
Shift Rotation Setup ▪Click on the Shift Rotation you would like to assign an employee to. ▪Click on the employee link in the Employee(s) column. This will open the Shift Rotation employee window.
▪Click in the employee name field to open the Employee Panel.
▪Click on the employee(s) to be assigned to the Shift Rotation. ▪Click Apply.
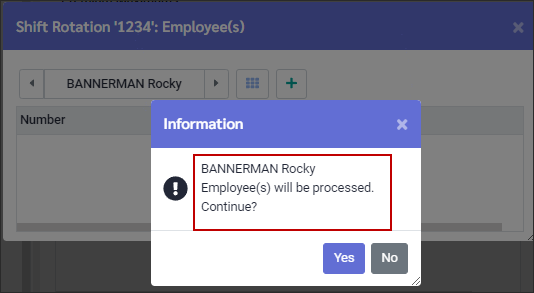
▪On the Shift Rotation window click on the plus symbol (+).
▪The Information window will display the employee(s) being assigned the Shift Rotation.
Employee Personnel Information Employees can be assigned to a Shift Rotation through their profile.
▪Select the Personnel menu. ▪Select Personal Information. ▪Select Shift and Schedule. ▪Select Shift Code ▪Click on the drop-down arrow and select the appropriate Shift Rotation. ▪Click Save.
|

See Also:
Overtime & Premium Configuration