The employee Personnel menu contains all data pertaining to individual employees, including all personal information, payroll and pay rate information, shift and schedule information, training and evaluation information etc.
Once an employee is added to your database, maintenance of their data is ongoing i.e. name change, address change, department or class change, etc.
|
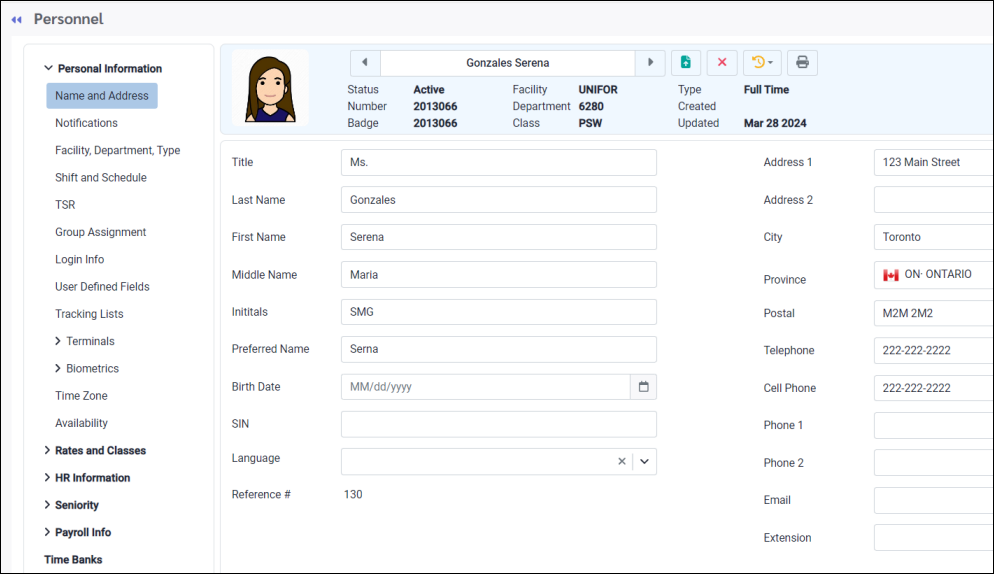
The main Personnel menu appears as shown below:
The Personnel menu includes the following:
Personal Information
Name & Address Notifications Facility, Department, Type Keep record of facility, department, employee type and any notes, by date.
Shift & Schedule
TSR Shadow employee 1, 2, 3, signed collective agreement, employee agreement expiration date.
Group Assignment Type, type code, status (please see Deleting Employees for further information on employee status changes), union, pay cycle, holiday group, hire & termination dates, lieu rules, system exception group, self scheduling group, probation expiration date.
Login Info Login, password, expiry date, security access group, security restriction group, IP restriction, must change password in (days), password changed, email, account locked, must change password at next log in, link to managers.
User Defined Fields Unique fields created specifically for your facility.
Tracking Lists Additional unique tracking options for your facility.
Terminals Defines which time clocks employees may access, all or specific.
Biometrics Finger scan information i.e. which finger, security level, quality of the scan.
Time Zones Used to define time zone differences between where the database is located and where the employee works.
Rates & Classes
Employee Rate Hourly and salary rates by date or for tracking employee rates when classes are not being used.
Employee Class Home class assignment, historically by date. For hourly employees using a custom rate, the Hourly Rate field would be used to define a rate by class which overrides the pay grid.
Probation A list of home and worked classes, along with the employee's corresponding probation level and rate based on the Labour Class rate grid configuration.
HR Info
Emergency Contact Names and numbers of all emergency contacts.
Discipline Processed or manually added violations to discipline rules.
Excused Discipline Excuse Exception Codes included in discipline violations.
Performance Evaluations Annual and semi-annual performance evaluations.
Skills Tracking list of an employee skills.
Training Tracking list of employees scheduled and completed courses.
Licenses Tracking list of the details of any licenses held by the employee.
Accidents Tracking list of on-site accidents and follow-up, such as doctor visits or therapy sessions after an at work accident.
Benefits / Deductions Tracking list of selected company benefits.
Dependents
Vehicle Make, model, colour and plate information. An employee may have more than one vehicle, however, one must be assigned as the primary.
Seniority
Standard Active, posted, history and current seniority values.
Worked Class Hours - Active Hours breakdown by all classes worked, active, posted and current.
Payroll Info
Ceridian Data specific to Ceridian payroll exports.
Payroll Additional data specific to Ceridian payroll exports. Also includes the Gross Wages and Vacation (OESA) pay fields for use with theTime Banks.
PBJ General Keeps track of an employee's old and new employee number.
Allocation Tracking an employee's allocation percentage by class.
Pay Types Track pay type by date i.e. non-exempt, exempt etc.
Time Banks Defines the time banks assigned to employees including general and detail tabs outlining the time bank data.
|

The main Personnel menu appears as shown below:
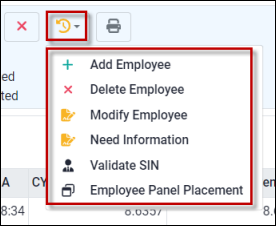
To add, delete or modify the employee, click the Actions icon and select the appropriate option (Add Employee, Delete Employee or Modify Employee) from the drop-down menu.
To select different employees from the list, click the Previous or Next arrows located the left or right of the employee name. You may also use the Employee Panel by clicking in the employee name window.
If you need to find an inactive employee, open the Employee Panel and click on the Filter option (shown below). Untick Active Only. This will present the employee list with EVERY employee in your database regardless of their status (active, inactive, quit, etc.).
▪Click Save to save your data. ▪Click Refresh to restore data to originally existing values (before you save).
Actions Menu Options
Use the Actions menu to activate the options shown above. The Actions menu will appear on other menus within StaffScheduleCare as well.
|