Labour Classes Overview
The labour classes may be used in the following ways:
1.To allow for additional employee groupings below the department level.
An example of using Labour Classes for a manufacturing plant would be to have a department called Assembly, and multiple classes such as Line 1, Glue, Line 3, Paint and so on. This is especially helpful when employees switch between the different lines, and you wish to be able to track where the hours in a department are being worked.
An example of using Labour Classes for a nursing home environment would be to have a department called Nursing, and multiple classes such as Registered Nurse, Registered Practical Nurse, Personal Support Worker and so on. This is especially helpful when employees are scheduled in different labour classes, and you wish to be able to track where the hours are being worked.
2.Determining employee rates (optional). When rates are configured, the wage grids are used to determine the level of wage progression based on criteria such as years, days, hours, hire date etc.
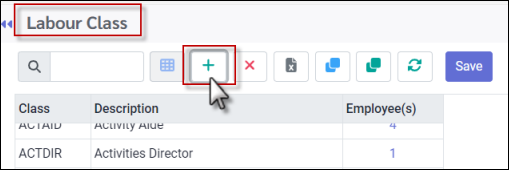
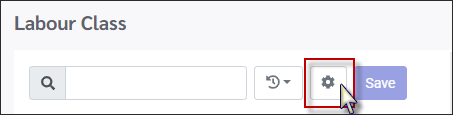
To access the Labour Class configuration:
▪Select the Config menu. ▪Select the Setup menu.
▪Select Labour Class.
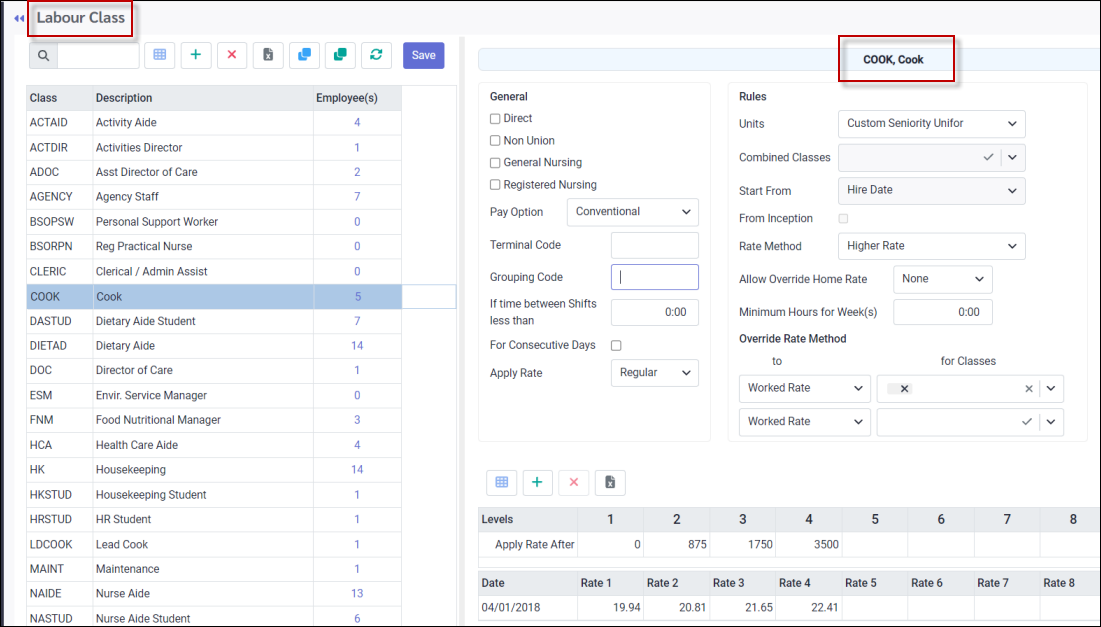
The Labour Class menu is divided into two sections.
1.The left side is the for the Labour Class code and description. 2.The right side is for the Labour Class rate configuration.
The first step in setting up Labour Classes is to define the basic information for each class. Since class codes may not be duplicated and should not be deleted or edited once in use so that historical data will not be lost, it is very important to carefully review the best way to structure the classes prior to configuring them.
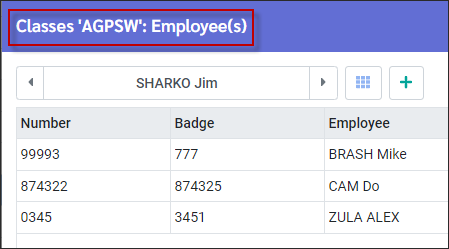
Once your classes are set up, you will be able to view the list of employees within a certain class designation (see the RN row with 2 employees, highlighted blue below):
▪On the left-hand side of this menu, select the class line by clicking anywhere on it. ▪Click on the number under the Employees column (3) and the list of all employees within that class will appear.
|

▪Select the Config menu. ▪Select the Setup menu.
▪Select Labour Class.
The Labour Class screen will appear.
▪Click on the plus symbol (+).
. A new blank line will appear at the bottom of the grid:
▪Under the Class column, enter a class name of 1 to 6 alphanumeric characters. ▪Under the Description column, enter a description of the class, from 1 to 25 alphanumeric characters, which should effectively describe the Labour Class you are creating. ▪The Employee column number will auto populate as employees are assigned the class. Employees may be assigned to the class either through the Personnel Class menu or the Employee Dependency feature in the column.
|

▪Select the Config menu. ▪Select the Setup menu.
▪Select Labour Class.
The Labour Class menu will appear.
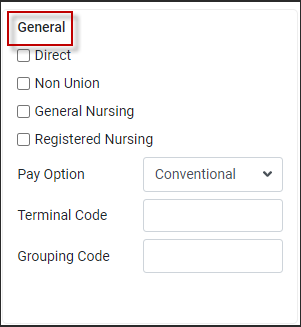
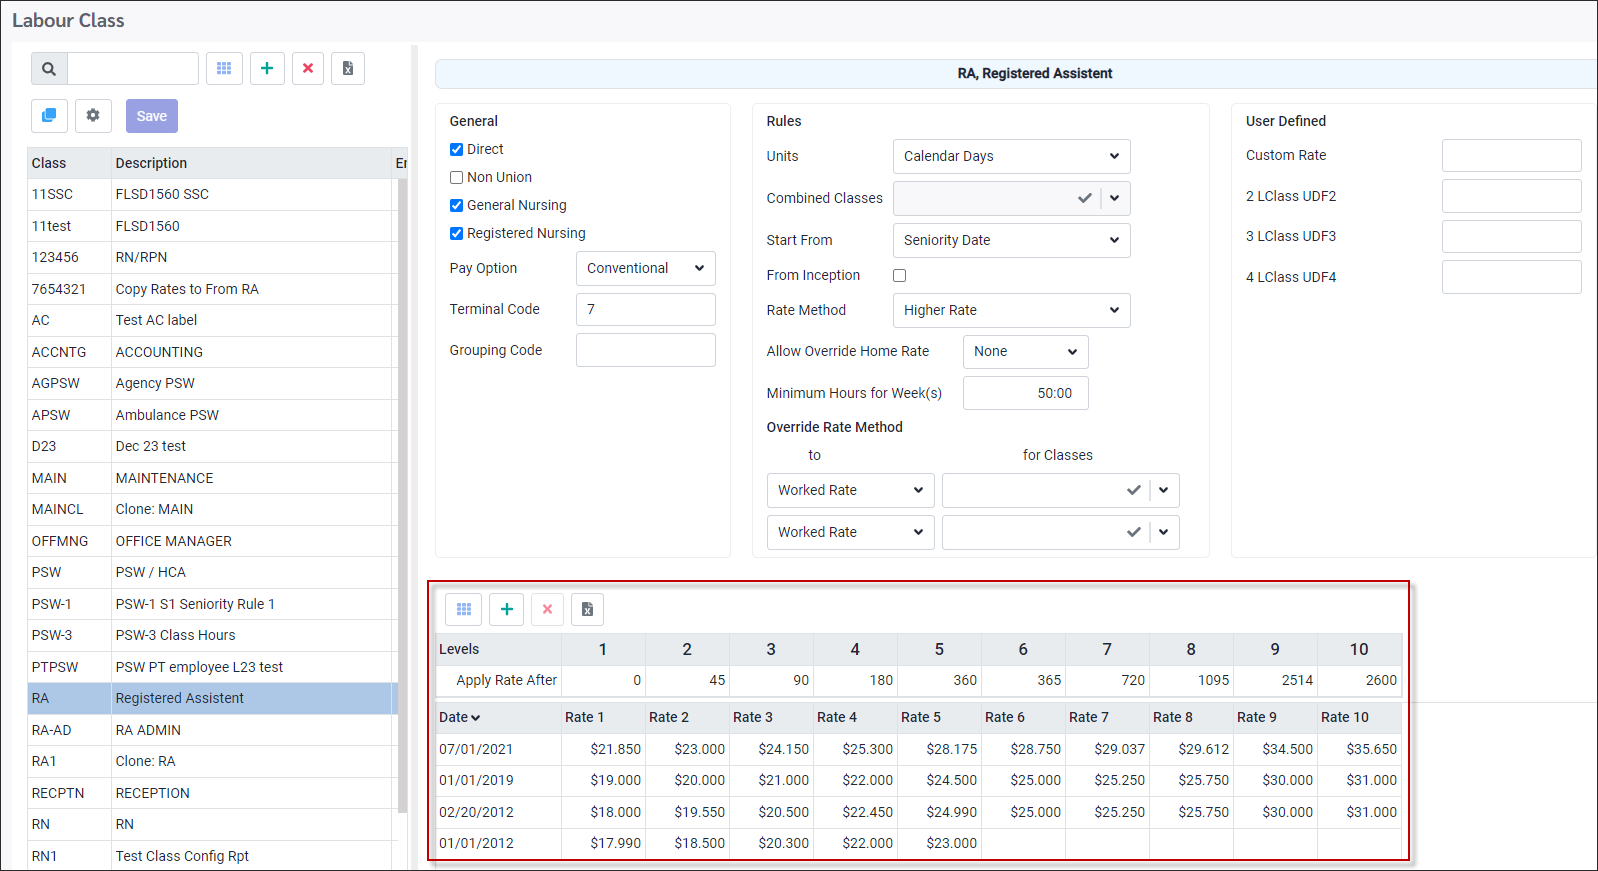
General Settings
▪If you are tracking direct and indirect labour and the Labour Class you are setting up is a component of direct labour, click in the Direct check box. If the labour class is indirect labour, leave the check box blank. ▪Select the Pay Option for this class using the drop-down menu:
Pay Options
Conventional Standard class rules apply for rate application.
Pay Rate Only Uses the employee pay rate for that day.
Class Rate Only Uses the employee class rate for that day.
Piece Rate Only (custom option) Uses an hourly rate of $0.00, but during payroll calculations determines the actual Piece Rate to be paid.
Custom Rate Only (custom option) Uses an hourly rate of $0.00 except where a Custom Rate function has been setup.
General Nursing and Registered Nursing These are for use with PBJ and Five Star (USA)
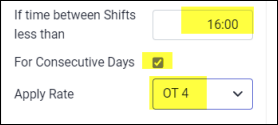
Setting Time Between Shift Overtime Rules by Class
If you have more than one set of rules for overtime generated by an insufficient number of hours between employee shifts, you may set up individual overtime rules by class. The system will first look at the Labour Class table before checking the general Company Profile / Time Card setup. If a rule has been defined in this section, it will override the general setup.
In the example below the union rules for the required minimum time between shifts for registered nurses is 16 hours, while the general setup for other unions is 12 hours. To configure the RN class:
▪Select the class you wish to edit by clicking anywhere on the row to highlight it blue. RN has been selected below:
▪Add the required time between shift (16:00 hours below). ▪Tick Consecutive Days. ▪Apply the rate that will apply (OT4 below). ▪Click Save (top left).
|


You will now be assigning how class rates will be paid, what the rates are, and what the probationary levels are that determine when employees in each class will step up on the pay grid.
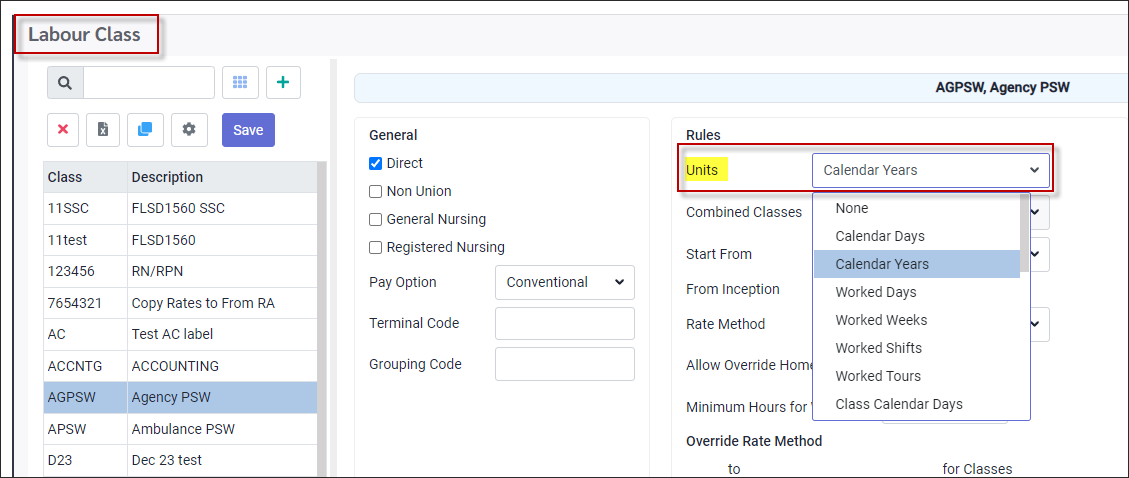
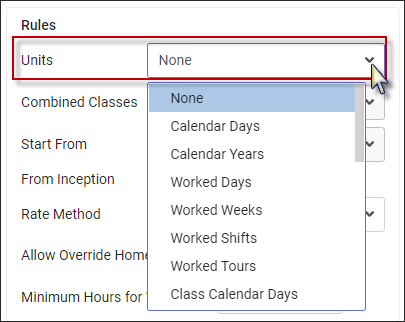
Units
The first thing to decide is the unit of measurement which will determine on what basis each class will move up the rate grid. Select the option from the drop-down list.
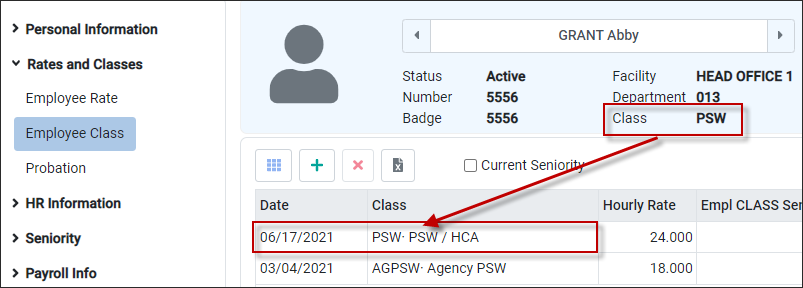
If an employee temporarily works in a different class from their home class, however, these hours will be added to the employee's home class hours. An employee's home class is the most recent class (by date) added to the Personnel menu, Rates and Class option as shown in the example below where 06/17/2021, PSW represents this employee's home class.
The Attendance Codes that are to pick up the worked class rate must have a Class assigned to the hours. The Units for this database are configured to appear as follows (not all options shown or described below):
None No unit of measure is defined.
Calendar Days Calculates based on hire date. Units are counted from the latest Seniority update. Also see From Inception further down in this section to setup without dependency on seniority updates.
Calendar Years Calculates based on hire date. Units are counted from the latest Seniority Update. Also see From Inception further down in this section to setup without dependency on seniority updates.
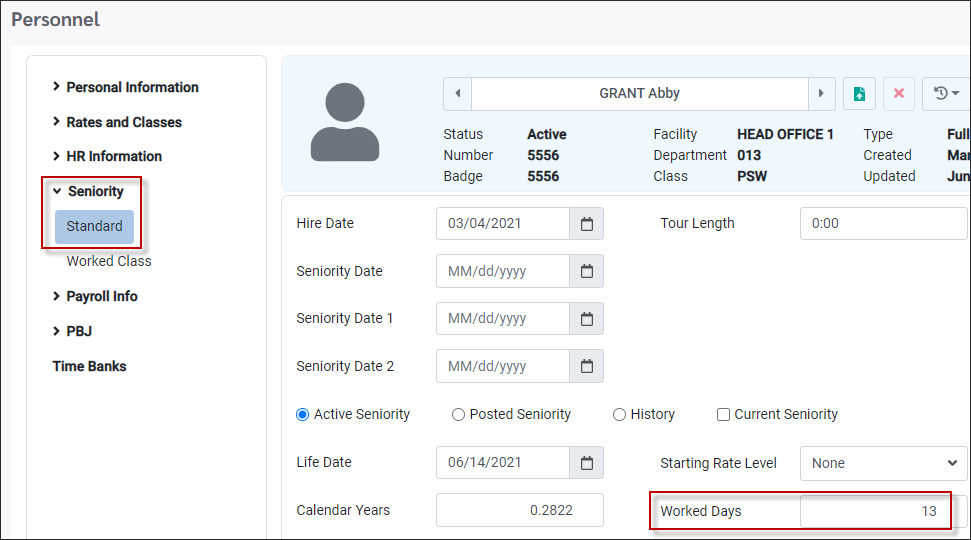
Worked Days This option is comparable to the seniority Worked Days field shown below. For wage progression the default calculation is based on regular and overtime hours but can be edited in the seniority configuration. These hours are divided into days based on how many hours a Day is comprised of (defined on the Day Code configuration screen). An employee's wage progression will be in real time i.e., once the hours are added to the Time Card. This option is a cumulative total of hours by days worked in all classes.
Seniority For seniority purposes (scheduling) the calculated days will appear under the employee's Worked Days field once the seniority calculation has been run, if this field is made visible in Personnel / Seniority.
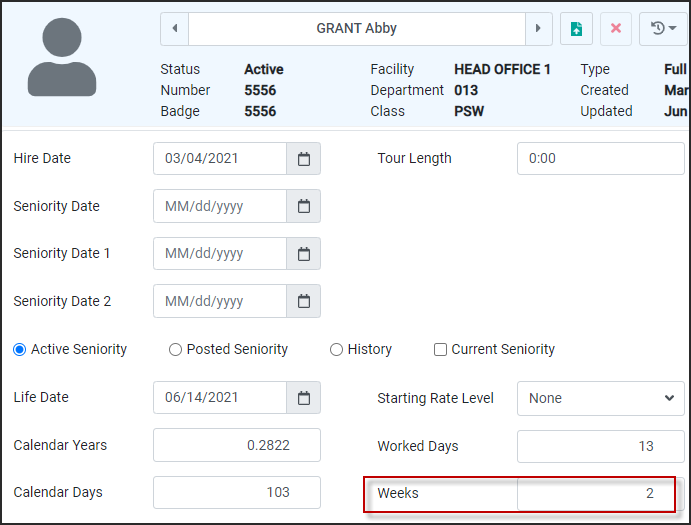
Worked Weeks This option is comparable to the seniority Weeks field (below). For wage progression the default calculation is based on regular and overtime hours but can be edited in the seniority configuration. These hours are divided into weeks based on how many hours a Week is comprised of, which is also defined in the Labour Class section as shown (below right). Here you can define the minimum number of hours an employee has to work in a week to be credited for a week of work.
An employee's wage progression will be in real time i.e. once the hours are added to the Time Card. This option is a cumulative total of hours by weeks worked in all classes.
Seniority For seniority purposes (scheduling) these hours by weeks will appear under the employee's Weeks field (based on the same hour's calculation as above) once the Seniority Update has been run, if this field is made visible in Personnel / Seniority.
Worked Shifts To follow
Worked Tours To follow
Class Calendar Days To follow
Class Worked Days To follow
Class Worked Weeks To follow
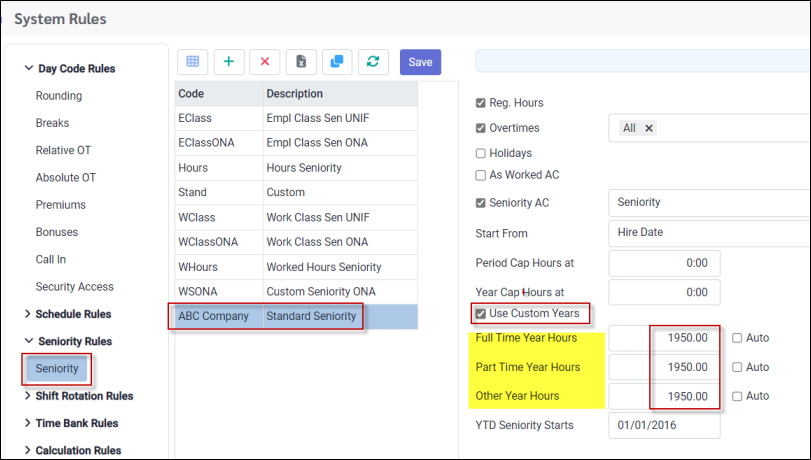
Custom Years Calculates based on any seniority configuration that includes the Custom Years setup. In the example below, the total number of seniority hours, including regular, overtime and seniority attendance code hours, will be divided by 1950 to calculate the number of Custom Years. This is a cumulative total of Custom Years for all classes. An employee's wage progression will be in real time i.e., once the hours are added to the Time Card.
Seniority Once the Seniority Update has been run the Custom Years field will be populated as described above, if this field is made visible in Personnel / Seniority.
Worked Class Hours Calculates based on the hours defined in the Worked Class Seniority setup. For wage progression the default calculation is based on regular hours, overtime hours and hours against the Attendance Code, Class Rate but can be edited in the seniority configuration. An employee's wage progression will be in real time i.e., once the hours are added to the Time Card. The hours will be totaled within each worked class and this total used to determine the employee's wage progression for each class individually.
Seniority When the seniority calculation is run, the Hours field for each class will be populated based on the hours described above, if this field is made visible in Personnel / Seniority.
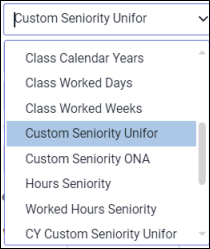
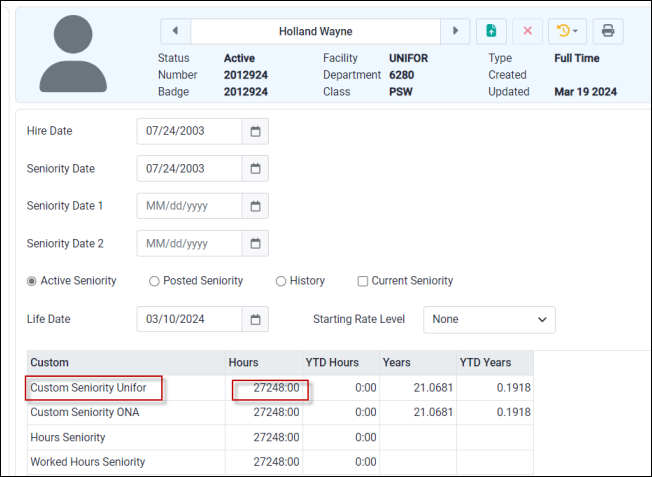
Custom Seniority Calculates based on the hours defined in the Standard Seniority setup. For wage progression the default calculation is based on regular hours, overtime hours and hours against the Attendance Code, Seniority but can be edited in the seniority configuration.
An employee's wage progression will be in real time i.e., once the hours are added to the Time Card.
Seniority Once the Seniority Update has been run, the hours described above will be added to the Standard Seniority field, which in this case has been named Custom Seniority Unifor.
Hours This option is comparable to the seniority Hours field shown below (red). For wage progression the default calculation is based on regular hours, overtime hours and hours against Attendance Codes checked As Worked but can be edited in the seniority configuration. An employee's wage progression will be in real time i.e., once the hours are added to the Time Card. This option is a cumulative total of hours worked in all classes.
Seniority For seniority purposes (scheduling) these hours will appear under the employee's Hours field (based on the same hour's calculation as above) once the Seniority Update has been run, if this field is made visible in Personnel / Seniority.
Worked Hours This option is comparable to the seniority Hours field shown above (green). For wage progression the default calculation is based on regular and overtime hours (worked only) but can be edited in the seniority configuration. An employee's wage progression will be in real time i.e., once the hours are added to the Time Card. This option is a cumulative total of hours worked in all classes.
Seniority For seniority purposes (scheduling) these hours will appear under the employee's Worked Hours field (based on the same hour's calculation as above) once the Seniority Update has been run, if this field is made visible in Personnel / Seniority.
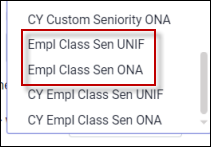
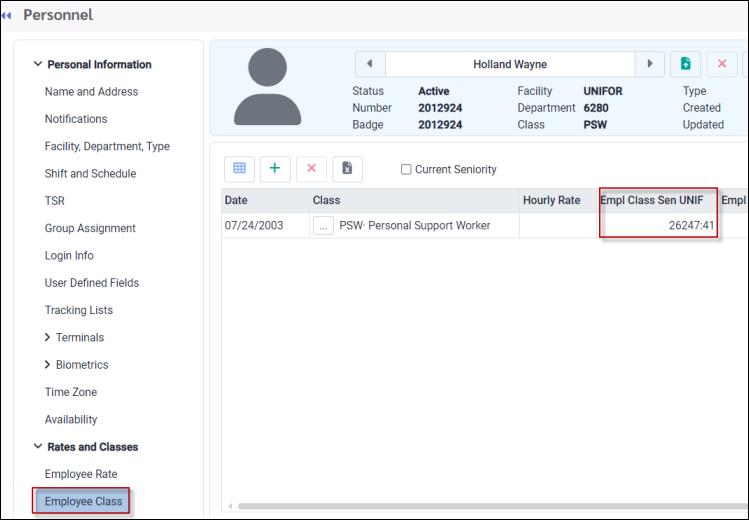
Employee Class Seniority Calculates based on the hours defined for the Employee Class menu. For wage progression the default calculation is based on regular hours, overtime hours and hours against the Attendance Code, Class Rate but can be edited in the seniority configuration.
The Employee Class options must be the Unit selection if the employee's hours calculation must start new (over again) each time the employee permanently changes classes. An employee's wage progression will be in real time i.e., once the hours are added to the Time Card. All worked hours, regardless of class worked during each pay period, will be totaled within each new home class to determine the employee's wage progression for that class. Hours from previous home classes will not be included.
Seniority When the Seniority Update is run, the Hours field for each class will be populated based on the hours described above, if this field is made visible in Personnel / Seniority.
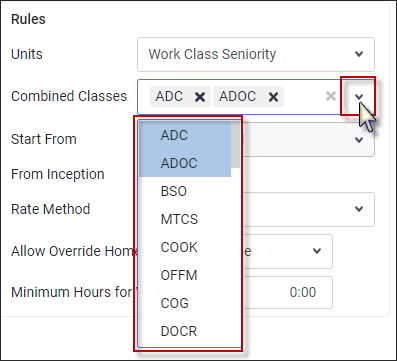
Combined Classes
Use the Combined Classes option if you use the Worked Class Seniority for wage grid progression. Example: Employee worked class 2105, 2106, and 2107. Classes 2106 and 2107 should be paid based on their combined worked class seniority hours. This will combine the selected worked class seniority to give a total which determines where employee falls on wage grid. You may select which worked classes are used to determine the rate for the home class. It is possible to use completely different classes and exclude the home class in your combined selection. If no Combined Classes are selected, the rate is determined by the home class only.
The Combined Classes option is only active when Work Class Seniority, or Custom Years Worked Class Seniority is selected.
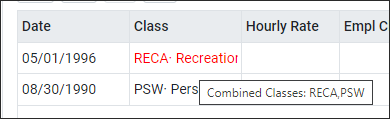
The Employee Class and Worked Class menus in Personnel shows the combined classes in red with a tool-tip visible indicating the classes included in the setup.
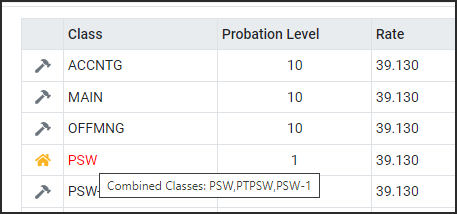
Combined classes show in red with a hint on the Probation screen.
From Inception
This option was developed for Calendar Days, Calendar Years, Employee Calendar Days, Empl Calendar Years and allows you to count Units in Labour Class without dependency on seniority updates. When it is not ticked, the units are counted from the latest seniority update.
When ticked (activated), Units are counted from the "inception point". It could be hire date, seniority date, etc.
For Employee Class Calendar Years or Days, the reference point is the date when employee was assigned to the Class.
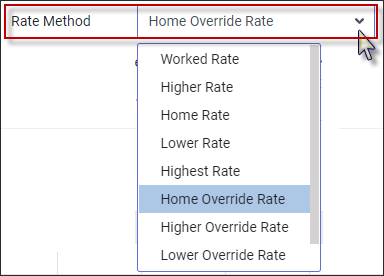
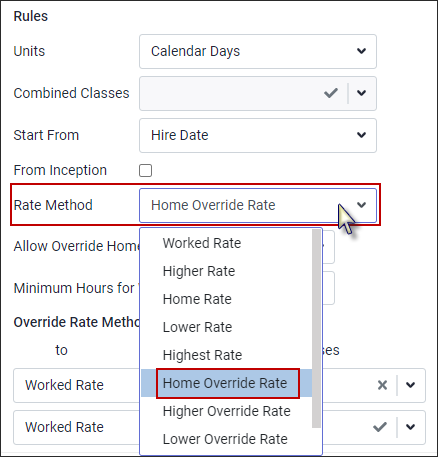
Rate Method
The next step is to select the Rate Method to be used. Employees who work in non-home labour classes can be paid either their home rate or their worked labour class rate. The rate method of an employee's home class is the rate method applied to each employee in this class. In this way different labour classes can be configured for different Rate Methods. The following options are available:
Worked Rate Employees will receive the rate for the class they are working.
Higher Rate Employees will receive the higher of their home rate and worked rate.
Home Rate Employees will always receive their home class rate.
Lower Rate Employees will receive the lower of their home rate and worked rate.
Highest Rate Employees will receive the highest of their worked class rates.
Home Override Rate Allows the home rate to be overridden. Employees will receive the worked class rate, not their home class rate for the classes that allow Home Override Rate.
Higher Override Rate See Override section below.
Lower Override Rate See Override section below
Daily Rate Highest See Override section below
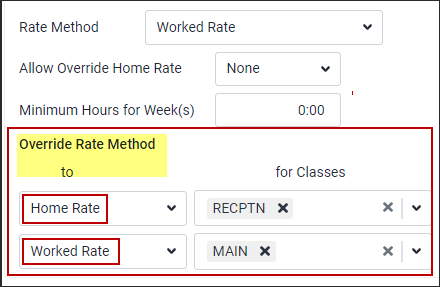
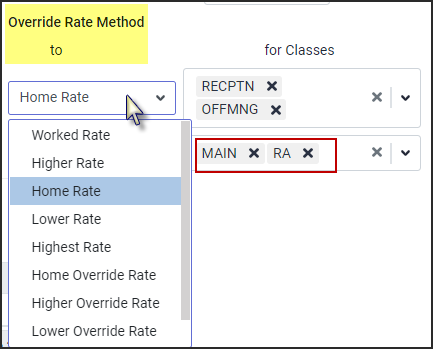
Override Rate Method
Use this feature to override the Rate Method setup for specific classes for this Labour Class. Example: If the same class is chosen for both lists, the second option will take precedence in determining the rate the employee gets.
Different Override Rate Methods may be selected from the drop-down lists and applied to multiple classes.
|


Click on the Labour Class you are going to add rates to.
You will now be assigning what the rates are, and what the probationary levels are that determine when employees in each class will step up on the pay grid.
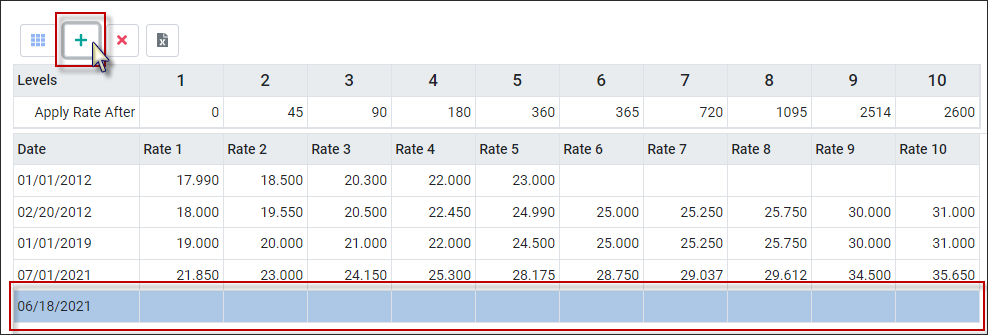
Apply Rate After & Adding Rates
In the Apply Rate After section, if not already entered, enter in the value that must be reached in each of the fields to get paid the corresponding rate defined in the Rates section. The Units selection in this case is Calendar Days. In the example above, the employee's probational level starts at Rate 2. Once the 45 calendar days of probationary level has been satisfied, the employee will move to Rate 3, after 90 days, the employee will move to Rate 4 and so on.
To add a new rate line, click on the plus symbol (+). A new line will appear at the bottom of the grid.
Under the Date column, enter the date the rates become effective. Probationary periods and class rates must be set up for each individual class.
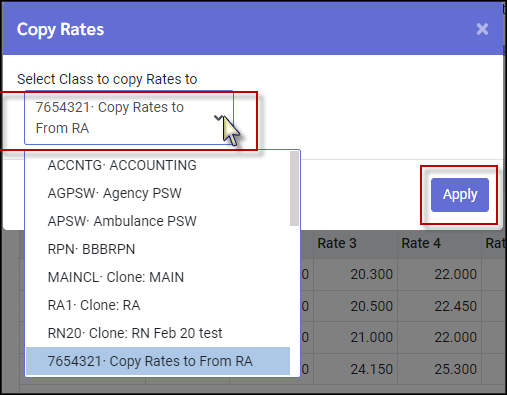
Copy Rates You may copy rates from one class to another. ▪Click on the Labour Class with the rates that you want to copy. ▪Click on the Copy Rate icon.
▪In the Copy Rates window, select the class the rates are to be copied to.
Class Rate History If a future rate increase is scheduled for a labour class, the new rates can be entered with the date they become effective. Employees scheduled to the labour class with the new rates will be paid the new rates on the date they become effective.
|

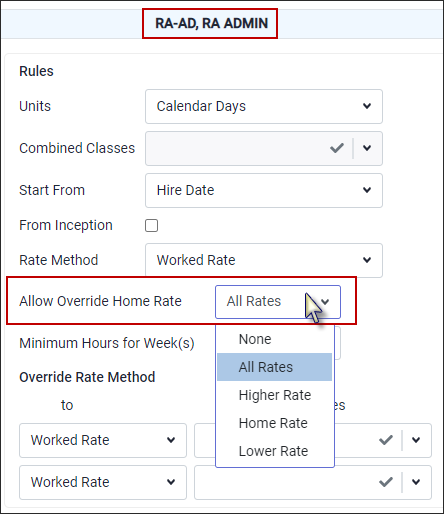
The Allow Override Rate Option uses both the Rate Method and the Allow Override Rate fields. Use these features to allow overriding rates between Home Class and Worked Class within the system. The setup needs to be done in both the Home Class and Worked Class.
In the home class set up the Rate Method and in the worked class set up Allow Override Rate option. The system will take the home class Rate Method and compares to what is set up in the worked class Allow Override Rate section. If the home and worked class have the same word, example Higher (or worked Class set up as All), the rate is calculated based on seniority in worked class. NO comparison is done.
If in home class the Rate Method is set to Lower Override Rate but in the worked class, Allow Override Rate is set to Higher rate, the system compares the rate in home class and worked class and takes the lower value, since home class dictates which rate should be taken.
Examples
Home Override Rate
To override the home rate, the option is selected from the Rate Method drop-down list.
Home class PSW is set up with Rate Method, Home Override Rate. If employees are working in Class RA-AD (regardless of the Method in settings) the home rate in class PSW will be overwritten with worked in class RA-AD.
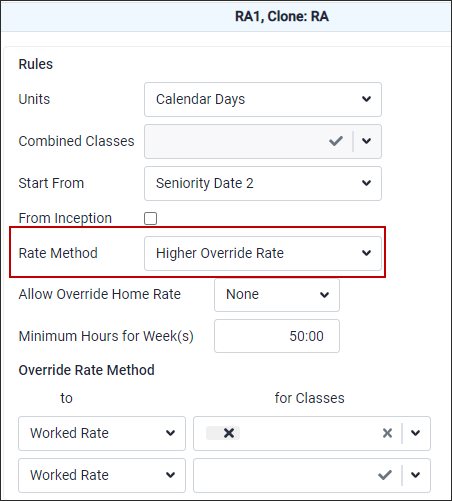
Rate Method - Higher Override Rate
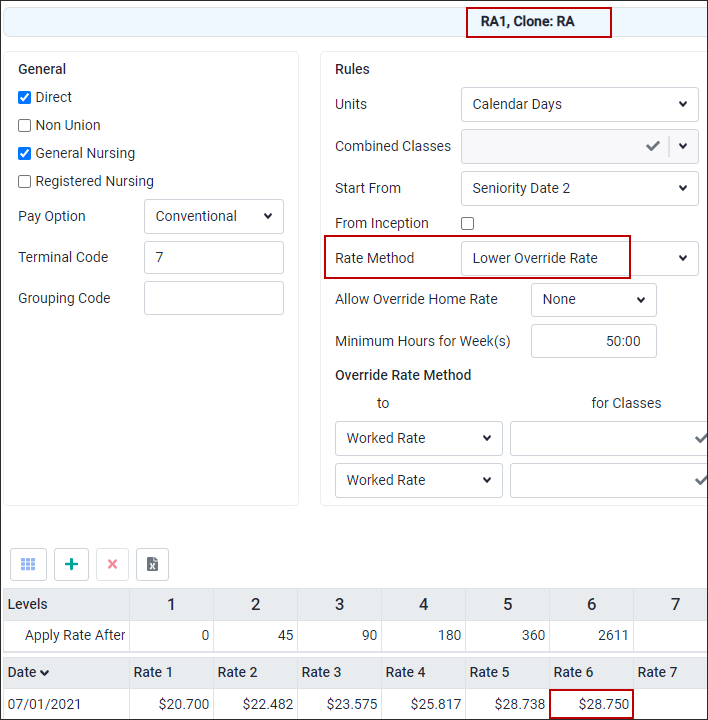
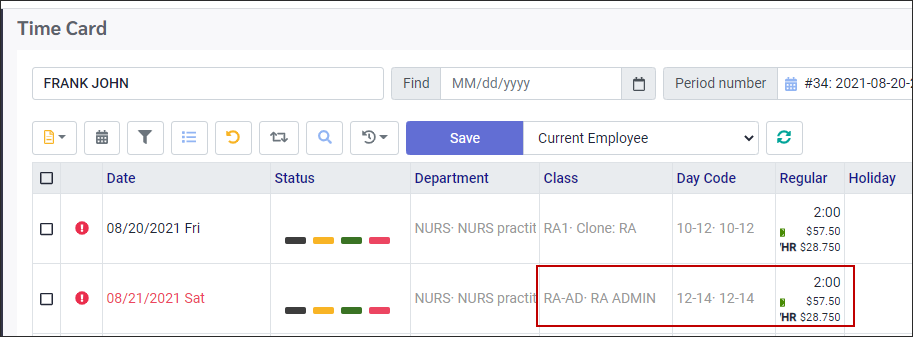
Employee Frank worked in two classes, home class RA1 and worked class RA-AD. The client would like to override higher or lower rates. Home class RA1 the field responsible for ability to override rate is set up in Rate Method.
Here the home class Rate Method is setup to Higher Override Rate.
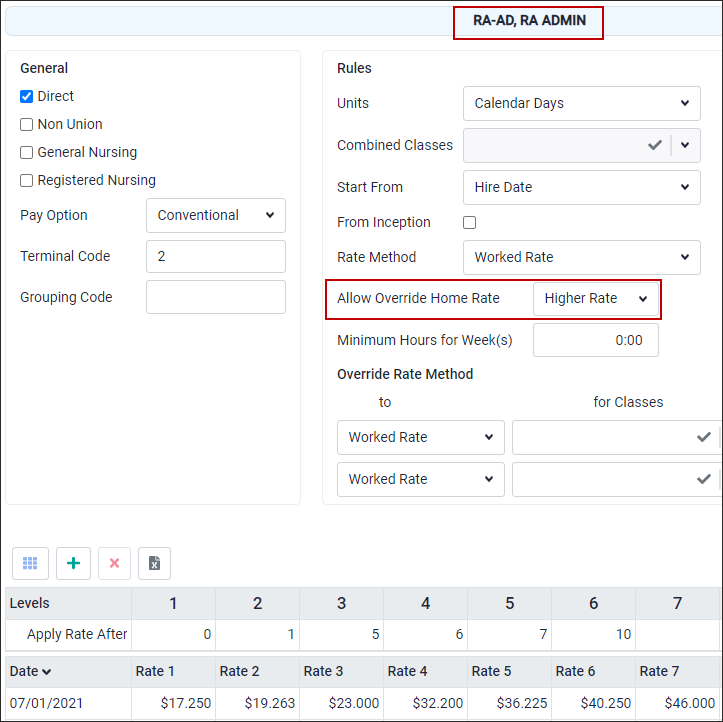
With the worked class RA-AD setup as Allow Override rate, option Higher Rate the system assigns Worked Rate in class RA- AD in specific level corresponding seniority Units (Level 6 in example $40.25)
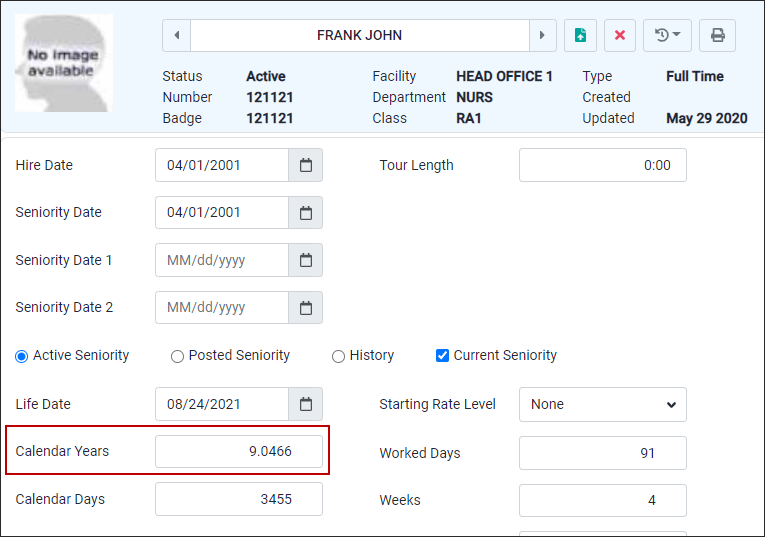
Current Seniority for home class RA1 the Calendar Days equal 3455, which is level 6 rate $40.25.
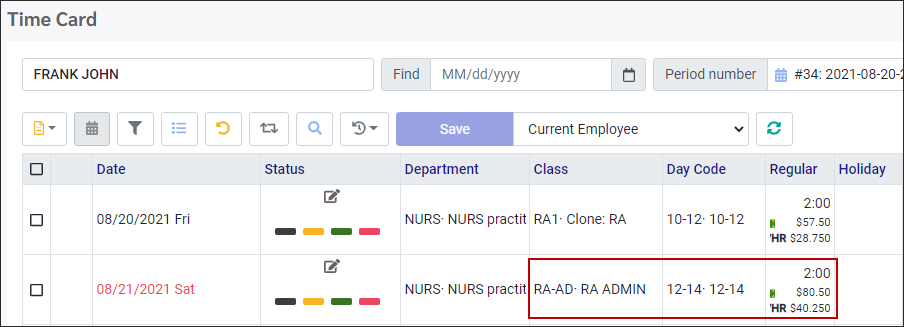
Worked class RA-AD is based on Current Year Seniority 9.0466 years / level 6 rate of $40.25.The system calculates the Paid Rate in worked class RA- AD as level 6 since the worked class is set up to Allow Override Rate = Higher Rate (same as setup in home class – see field method) On August 20th Frank worked 10am to 12pm in his home class RA1 for a rate of $28.70 and on August 21 worked from 12pm to 2pm in class RA-AD at a rate of $40.25.
The paid rate for the worked class is whatever is set up in Level 6, which in this example is $40.25.
Rate Method - Lower Override Rate
If the home class RA1 Rate Method is set to Lower Override Rate, the system will use the home rate of level 6, $28.75.
Worked class Allow Override Rate with Higher Rate. In this case the system compares the home rate $28.75 and worked rate $40.25 and takes lower value of $28.75.
The bottom line is: if the home Rate Method and worked Allow override Rate are matching in wording, or worked class is set up as All Rates , the system does not compare rates in classes, but takes the rate corresponding with the level in the worked class (home rate is overwritten). If the wording is not matching, the system compares rates and takes the rate as defined in the Method field (higher or lower).
|


This custom rate option allows overtime to be calculated using two different class rates, the home class rate for the straight time portion (1.0x), and another class rate for the overtime portion (0.5x) using a general overtime coefficient of 1.5x in this example.
▪Navigate to Labour Class menu in Config / Setup. ▪Select Pay Option – Custom Rate Only. ▪Add the second class in the User Defined field. In the image below the UDF1 has been setup with a label of Custom Rate. You must type in the second class code exactly. Any typing errors will result in no rate showing.
The coefficient is to be setup as normally done under Overtime and Premiums configuration.
Sample Calculation: ▪Employee's regular rate is $12.34 per hour. ▪The Rate for class PSWC is $30.00 per hour. ▪For an overtime calculation at 1.5x the rate, we want the 0.5 portion of this calculation to use the PSWC rate of $30.00 per hours i.e. $15.00 per hour. ▪The rate should be $12.34 per hour + $15.00 = 27.34 for OTx1.5 the rate.
When used in conjunction with the Override Rate Method, example, Worked Rate for PSW class, the system will only use the special 0.5 calculation with another class rate if the class configured in the Override Rate section is also set to Custom Rate Only with a valid second class in UDF field. In the above example. If PSW was set to Conventional. It would calculate PSW regular rate, and the PSW rate for the 0.5 section. If PSW was set to Custom Rate Only and had a second class filled into UDF1. The Time Card would show the PSW rate for the regular portion (1.0), and the second class rate (PSWC) for the 0.5 portion, creating an adjusted rate (Custom Rate Only).
UDF1 Label Setup
See User Definable Fields Labour Class section.
Click in the window for 1 LClass UDF1 and enter the label you would like displayed for this field.
|


When an employee moves to a new permanent Labour Class the manager can adjust the starting rate of pay. This can be done by selecting the starting level. First, we need to understand where rates can be entered and how they behave.
To determine which rate to apply to an employee, the system will first look at the Employee Rate option. If no rate is entered here, it will then look at the Employee Class option. If no rate is entered here, the system will look at the class rate grid and take the rate for this employee from the grid, based on what step of the grid the employee is at (probation level) i.e. step increases are automatic by tenure when no rate appears on the employee Personnel menu.
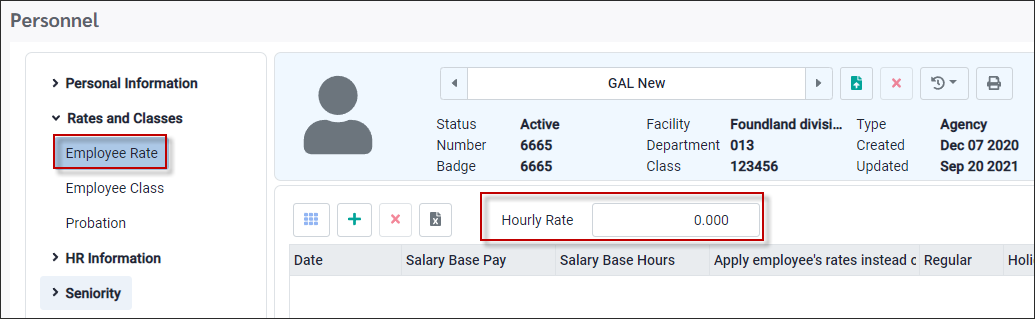
Rates entered on the Employee Rate menu override all other rates for this employee, including rates entered in the Employee Class menu. Rates entered here will NOT allow you to track an employee's historical rate information. This option would generally not be used if you are tracking employee classes.
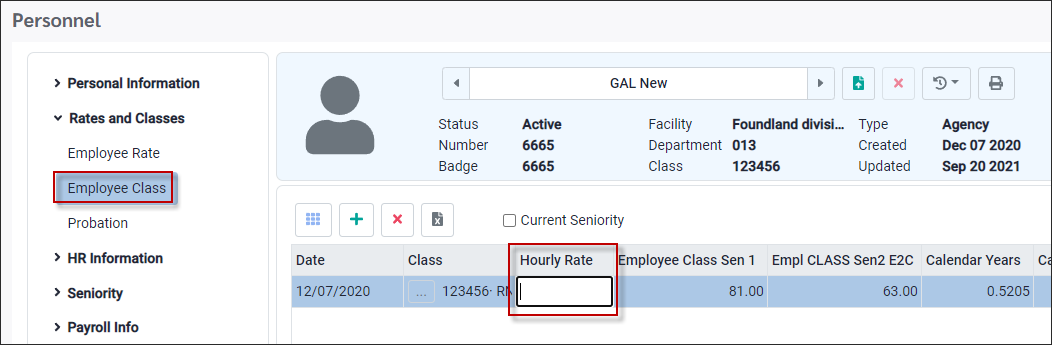
Rates entered in the Employee Class menu will override the rate grid. When employee classes are being used, this option is the best for tracking employee rates that override the grid and employee class changes, because it allows you to track an employee's historical rate and class information.
All rates in the Personnel menu are date driven, the rate with the most current date is the rate the employee will earn. Rate increases for employees who have rates on the Rates and Classes section of their personnel menu must be handled manually. We suggest, for historical tracking, that a new entry is made in this section when a rate increase is due.
Should an employee move to a new permanent Home Class and the starting rate needs to be greater than what the start should be the rate can be defined using one of the two options below.
This can be done by using the employee's seniority or by manually adding in the Units the class uses to calculate rate. It is important to remember that the system will take the employee's unit (i.e., years, days or seniority) and ADD it to the value of the selected level on the grid.
Starting Rate Levels
There are two options for setting the Starting Rate level for an employee, depending on the seniority configuration.
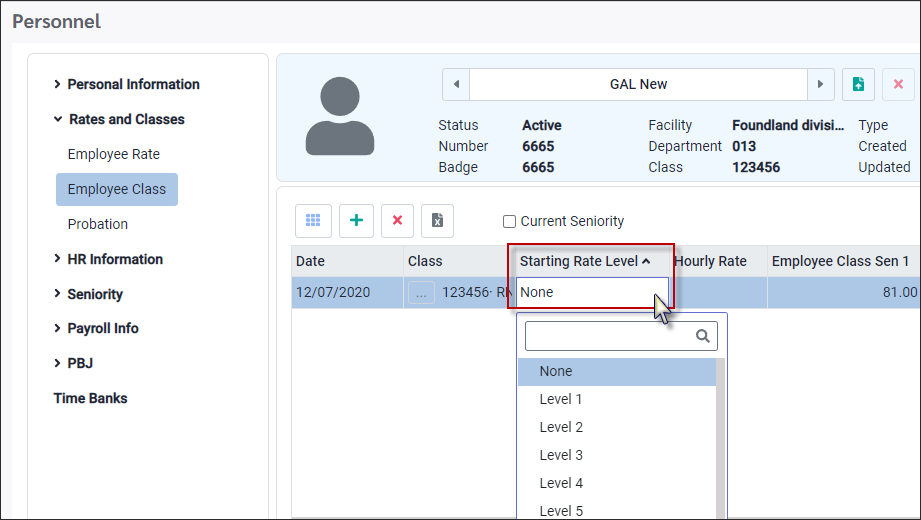
Option 1 Using the Starting Rate Level feature on the Personnel Class menu, a start level can be selected.The Starting Rate Level column allows you to select a start level from the Labour Class Wage Grid.
The units being used to move up on the grid are defined in the section, Preparing to Add Rates . If left at None, the system will not calculate a rate. There must be a unit measure selected.
If the units are years, the system will add the employee's years value to the selected level value to calculate the Start level.
Option 2 Navigate to the Personal Info / Seniority Standard menu. The Starting Rate Level for calendar years, weeks and days are based on Standard Seniority.
|