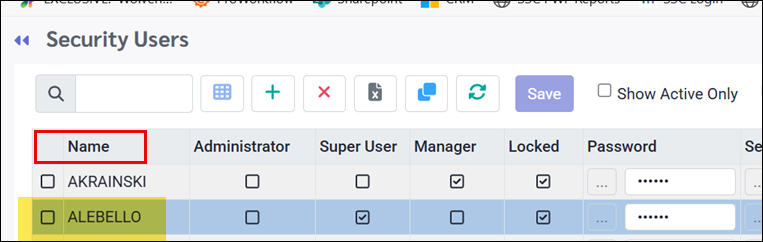
The Security Users menu allows you to add, edit, and lock out security user accounts.
You may select which areas of the system manager (user) will be allowed to access by assigning the appropriate Security Access Group.
The Security Restriction Group will define which departments, classes, facilities, Day Codes, positions etc. managers have access to. Both the Security Restriction Group and Security Access Group must be created first, then assigned the Security User.
To access the Security User setup:
▪Select the Config menu.
▪Select the Setup menu.
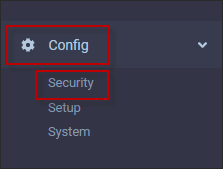
▪Select Security Users.
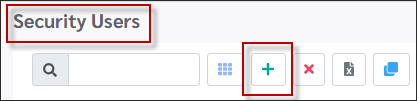
Adding a User ▪Click on plus symbol (+).
Your new account will appear at the bottom of the page.
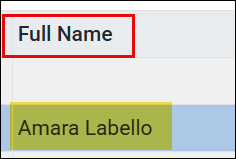
▪Type in the applicable information. You may enter a user log in name under the Name column and additional descriptive information under the Full Name column.
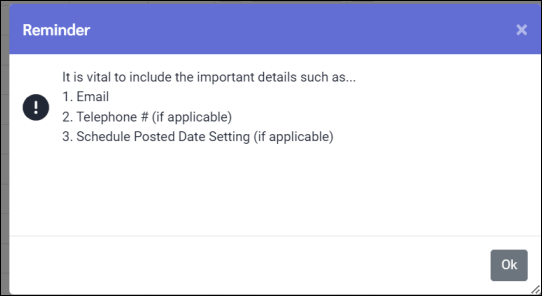
▪Where applicable, click on drop-down arrow to make selections for available fields. ▪Click Save when completed. ▪A pop-up reminder will appear to ensure the relevant information is included. This reminder will appear when creating a new user and when editing existing users. ▪Click Ok.
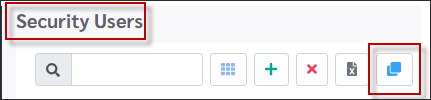
Cloning a User If the new user is going to have the same access and restriction group as an existing user, you may use the Clone function (recommended method). Only the personal information will need to be changed.
▪Select the user you would like to clone. ▪Click on Clone icon.
▪Type in the new user’s name. ▪Add any other additional details (e.g., email address) to the appropriate column. ▪Click Save.
You have the option of viewing the details of the Security Restriction Groups by clicking on the Show Me button. The Security Restriction Groups menu will then appear, highlighting the selected group.
Security User Field Descriptions
Super User If this option is ticked, this user will have access to ALL employees within your facility regardless of the employee access restrictions you have defined.
Manager If this option is ticked, this user will be included in the Link To Manager drop-down menu allowing an employee to be linked to this Security User (manager).
Password This field is not a user definable field. A password can only be assigned by setting a Default Password.
Security Access Group Assign the user to one of your predefined Security Access Groups.
▪Click on the empty line until the drop-down option appears. ▪Click on the drop-down arrow to select a Security Access Group for this user from the list.
You have the option of viewing the details of the Security Access Groups by clicking on the Show Me button, even if this field is still empty. The Security Access Groups menu will then appear, highlighting the selected group.
Security Restriction Group Assign the user to one of your predefined Security Restriction Groups.
▪Click on the empty line until the drop-down option appears. ▪Click on the drop-down arrow to select a Security Restriction Group for this user from the list.
IP Restriction Assign the user to one of your predefined IP Security Access Groups if applicable.
▪Click on the empty line until the drop-down option appears. ▪Click on the drop-down arrow to select an IP Security Access Groups for this user from the list.
You have the option of viewing the details of the IP Security Access Groups by clicking on the Show Me button, even if this field is still empty.
Time Shift / Time Zone Please see Security User Time Zone Setup for further information.
Enter the user's email address here. Email is a recommended field as it is used to alert the user/employee of a password reset, to send a payroll file as an attachment, for supervisor notification of Time Off Request and much more. If using the Two-factor Authentication the email field should be populated to allow the manager to receive verification codes by email.
Proxy User / Proxy Expiry Please see Proxy Users for further information.
IP Restriction Assign the user to one of your pre-defined IP Security Access Groups if applicable.
▪Click on the empty line until the drop-down option appears. ▪Click on the drop-down arrow to select an IP Security Access Group for this user from the list.
You have the option of viewing the details of the IP Security Access Groups by clicking on the box icon (Show Me below) even if this field is still empty.
Telephone If using the Two-factor Authentication the Telephone field should be populated to allow the manager to receive verification codes by either a text message or a phone call.
Two-factor Authentication by If using the Two-factor Authentication select the send method default for this manager. Click on the drop-down and select from the list.
|


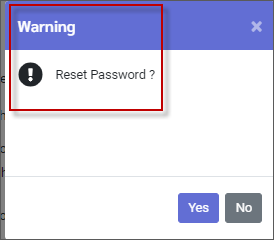
If users forgets their passwords or needs it reset, you can reset it with the detail button located to the left of the password field. ▪Click on the Detail button.
This will open the password window to a reset option and other password managing actions. ▪Click on the trash can. (reset password).
▪Click Yes to continue.
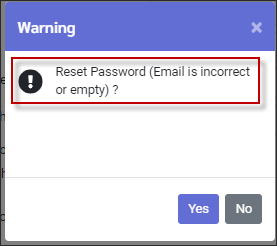
If the user has an email address in the email column, they will receive their new password via email.
If there is no email present, the system will warn you.
▪Click No to return to the password window. Close the password window and populate the email address. ▪Click Yes to continue.
The new password will be displayed.
You may enable theUser must change password at next login option to have users change temporary passwords. The Allow user to change password must also be enabled, or they will be unable to make the change.
|


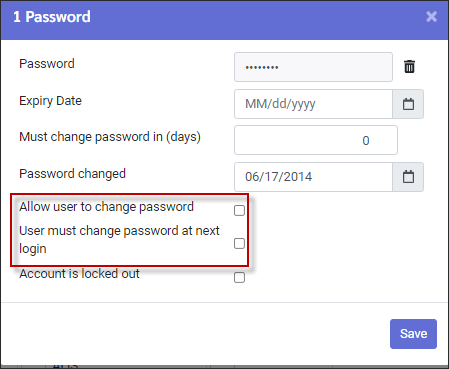
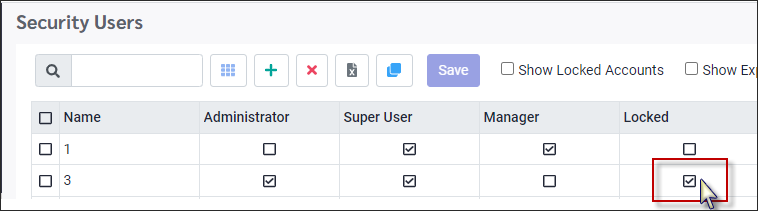
An account is locked when the check mark is present and unlocked without a check mark.
Unlocking If users mistakenly locked their accounts, or if the user is coming back from a leave during which the account was locked, there will be a check mark in the Locked field.
To unlock the account: ▪Click on the check box. (the check mark will be removed) ▪Click Save.
Locking If a user has left the facility and should no longer have access to the account, you may lock the account by adding the check mark to the lock column. This will prevent the user from logging in. Click the check box to tick on and click Save.
Show Active, Locked and Expired Accounts
You may filter the Security User list to show only Active, Locked or Expired accounts. The Locked and Expired options may be used together. The Active option may only be used by itself. Click to filter option. Remember to click again to remove the filter.
|