Shift Bidding was designed to allow managers an easy method of filling shifts for an upcoming scheduling period by assigning shifts based on bids received by employees.To fill shifts, managers may process employee bids by seniority or by the bid time stamp, using a "first-come-first-served" method.
The Shift Bidding module also allows managers to add incentives such as overtime or shift premiums to fill shifts. They may also relax specific scheduling rules where helpful. These incentives or rule relaxation options may be added to all shifts in a self-scheduling period, or individual shifts at any point within the scheduling period.
The manager creates a bidding period and a scheduling period. Employees may bid during the bidding period for unfilled shifts within the defined date range of each scheduling period.
Each employee must be assigned to a Self-Scheduling group to bid on shifts.
▪Select the Schedules menu.
▪Select the Shift Bidding menu.

Please note that custom seniority options (Sort by on the Daily Schedule) are not configured for Shift Bidding i.e., seniority by Submission Date, Floating Star, Rolling Barrel, Worked Class Hours, Seniority & Shift Hours. In cases where employees have the same seniority, they will be ordered by Queue (first come first serve). Update From Master Prior to creating scheduling periods, and Update From Master should be run for the new scheduling period. All time off requests should also be processed in advance.
If you process an Update From Master during an open bidding period, the bids will be lost. Only set up the a Schedule Period once you have completed all necessary changes and updates to the Active Schedule.
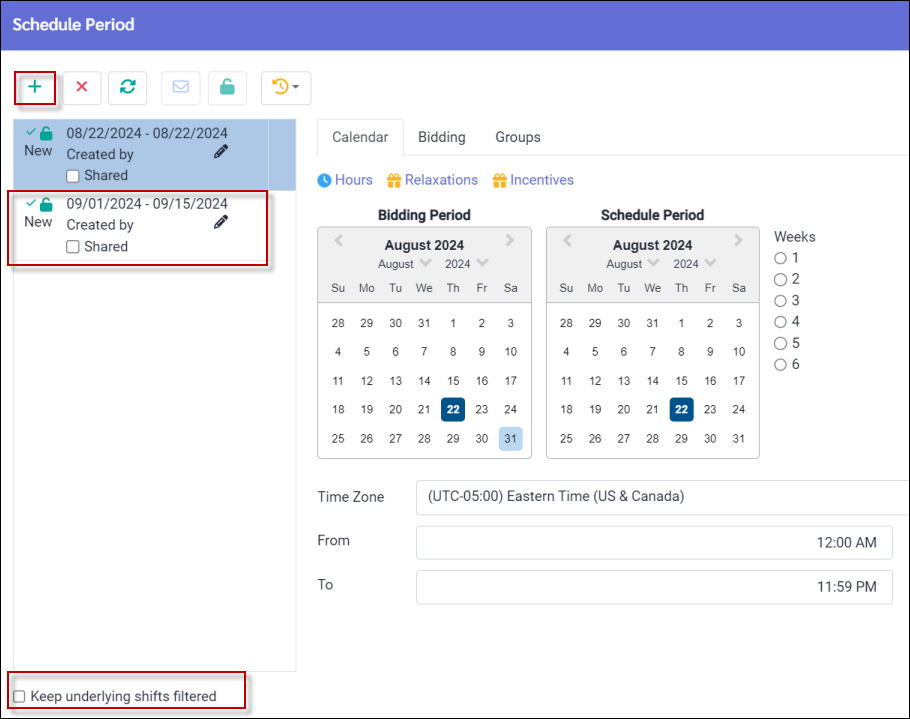
Add New Scheduling Period
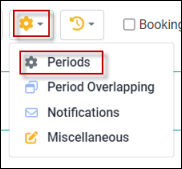
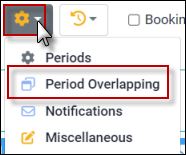
On the Shift Bidding toolbar, click on the configuration icon and select Periods.
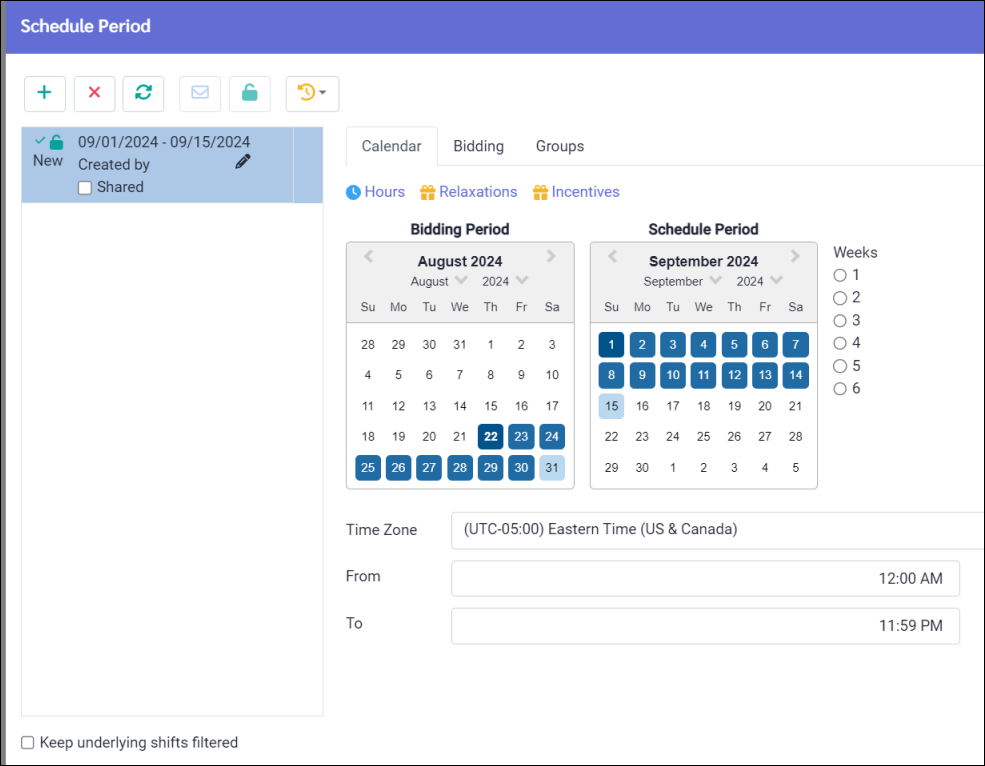
This will open the Schedule Period configuration window. For more information, please see Configuration Options.
Click on the plus symbol (+) to add a new period. A new period will be placed at the top of the period panel. Now you may start to configure the Schedule Period.
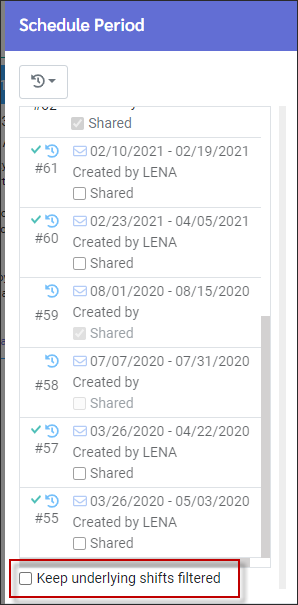
Keep Underlying Shift Filtered
When selected will show only those shifts belonging to the highlighted period. Otherwise, it will show all shifts from all schedule periods.
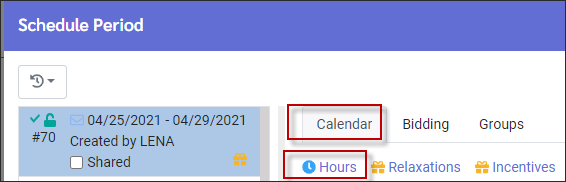
Calendar Tab
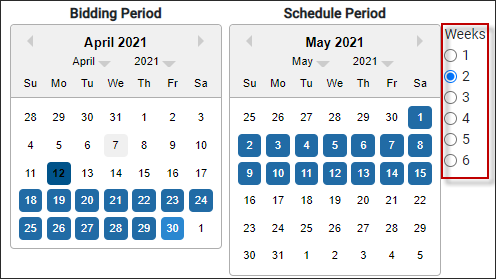
The Bidding Period calendar defines the date range for bidding. ▪Click on the first date of the Bidding Period, this will highlight it with a black border. ▪Move the cursor over top of the dates to be part of the range until you reach the last date. ▪Click on the last date to end the period.
Schedule Period Calendar Repeat the above date selection on the Schedule Period. This will define the date range of available shifts. To use the Weeks option, click on the start date and then select the number of Weeks to reach your end date.
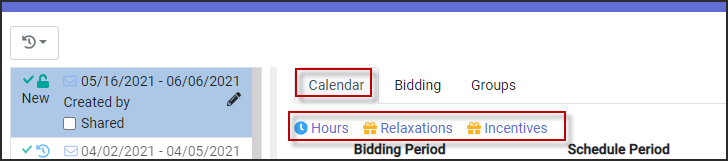
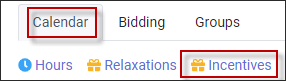
Set up Hours, Relaxations, and/or Incentives where applicable, using the links. For more information on the functions, please see Configuration Options.
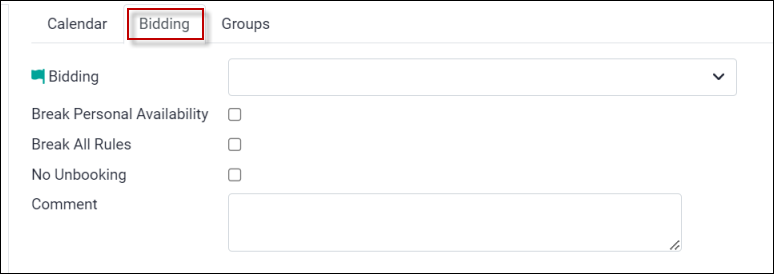
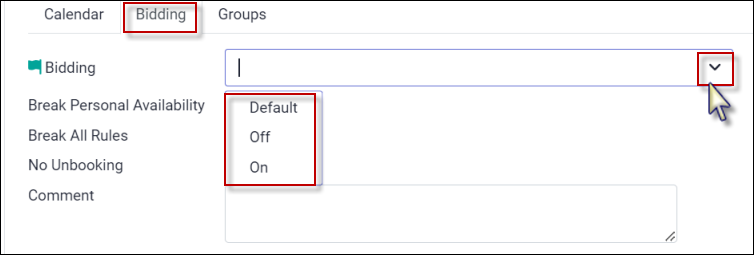
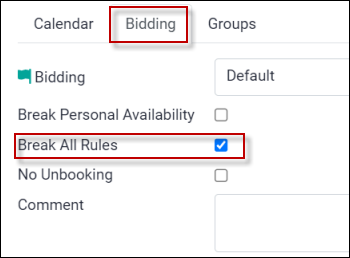
Bidding Tab
Bidding Set to Default, Off, or On. See Configuration Options for further details.
Break Personal Availability Tick this box to allow employees to break their availability settings when bidding on shifts. The default setting is determined by the Miscellaneous option and will apply to new bidding periods.
Break All Rules If enabled, this option will allow employees to break all rules including overlapping shifts when submitting bids. When reviewing bids, the manager will receive a warning message on any rules broken and will have the final say before accepting bids.
No Unbooking Tick this box to enable this option. When enabled, employees will not be able to unbook themselves from shifts.
Comment Use the Comment box for any additional information. The comment will be seen by other system Users (managers) with access to the Shift Bidding configuration.
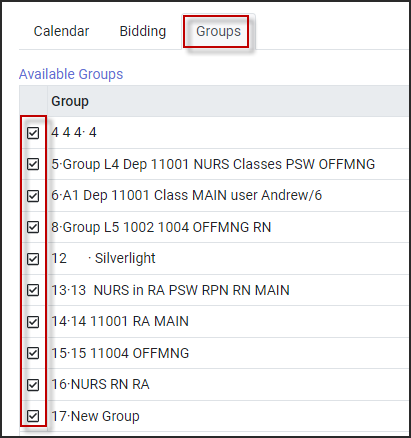
Groups Tab
Select which predefined Groups should be included in the period you have configured by clicking the applicable check box(es).
▪Click Save. Your Schedule Period has now been created.
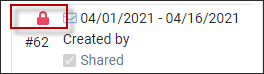
Locking and Unlocking Periods
Lock a period while creating it or waiting for a period to be released.To lock or unlock a period, hover by the Lock / Unlock icon and click. The lock icon for the period will appear red when locked. The period must be unlocked to release bidding to employees.
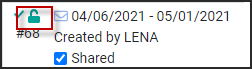
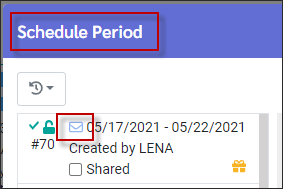
When Unlocked the icon is green.
If notifications are configured, the system displays a message reminding the manager to click the Envelope icon to send notifications.To notify employees, select envelope icon.
Select Yes to send the notification(s).
Notifications are sent as configured in the Notification pop-up. The configuration below will issue a bulletin on Welcome menu.
|


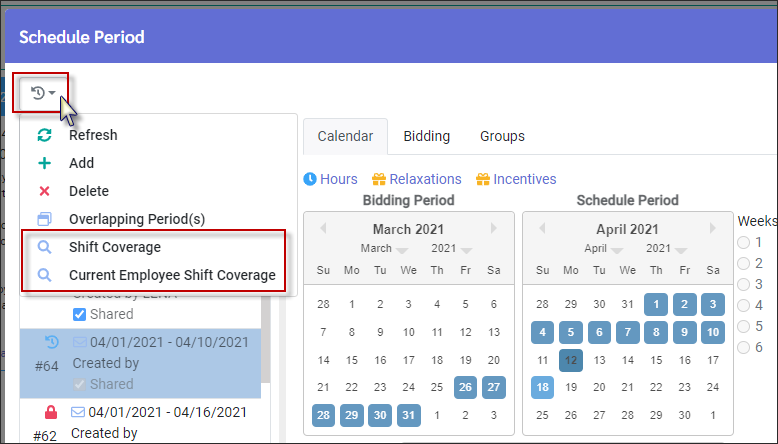
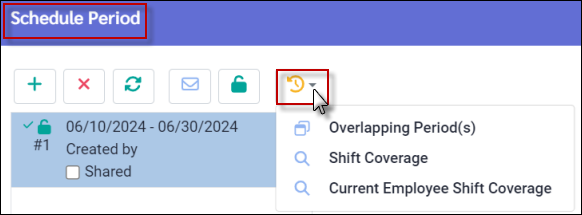
At any time during the Shift Bidding period, you may see a list of all open shifts and the number of bids against them (if applicable).
▪Select the Configuration icon. ▪Click on the Schedule Period. ▪Click on the Actions icon. ▪Select either Shift Coverage or Current Employee Shift Coverage.
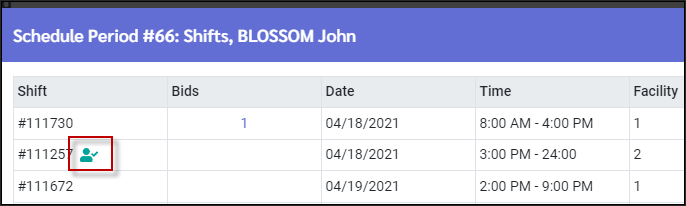
If you select Current Employee Shift Coverage, all open shifts are listed as well as shifts that the employee has been booked to. Shifts that have been booked to the employee are noted by an icon:
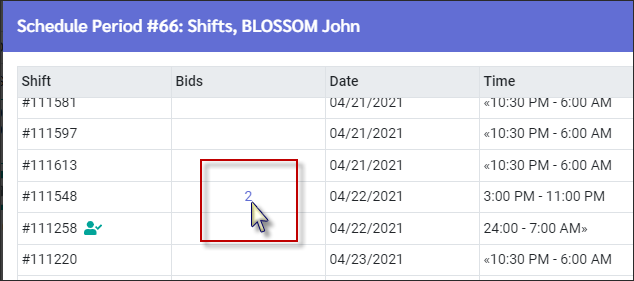
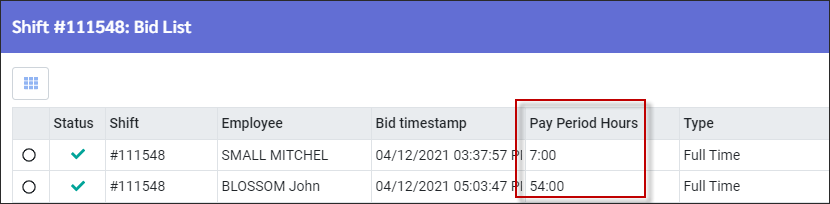
By clicking the number in the Bids column, the system will provide a list of employees who have bid on the shift.
On the Bid List, the Pay Period Hours column displays the scheduled hours for the corresponding period.
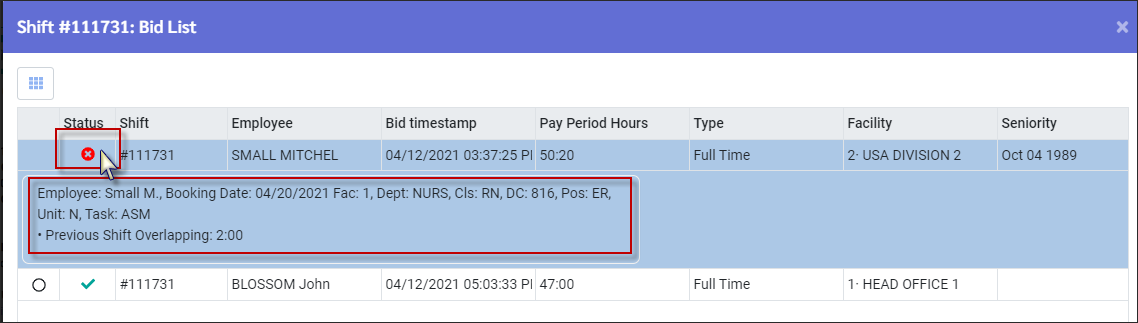
On the Bid List, the system will validate the schedule rules to see if any are being broken. Click on the Status icon to open an explanation window. Click the Status icon again to close the window.
By default, employees will show in order of bid submission. To view employees sorted by seniority according to your configuration, navigate to the Employee Panel and choose the relevant seniority option.The default setting is by Hire Date:
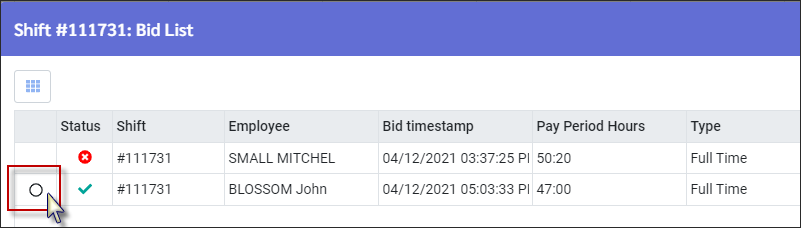
Select the employee you wish awarded the shift by clicking the button next to Status. Click Save.
You may book an employee who would break a schedule rule by selecting Apply Anyway when the system generates a warning with details on which rule(s) is being broken. The new shift will appear on the employee's Active Schedule. The Shift Bidding icon will be displayed in the top right-hand corner.
Employees who have been booked to a shift will still appear on the Shift Coverage menu, under the Booked column. This will allow managers to audit bids for all shifts, whether booked or not.
The system will display the Booked icon under the Shift column and the employee's name under the Booked column.
|


The Shift Bidding menu will display the selected employee's scheduled shifts and all shifts that they may bid on. Which shifts they may bid on is determined by the Shift Bidding group they are assigned to and by how the Shift Bidding period is configured. If employees do not belong to a Group, only their scheduled shifts will be displayed.
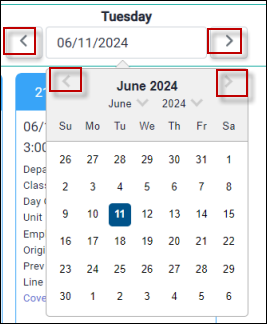
To view each day, use the left and right arrows beside the upper date window. The day of the week appears above the window. Click on the date window to view the calendar. Navigate forwards or backwards using the arrows, allowing you to choose year, month, or day.
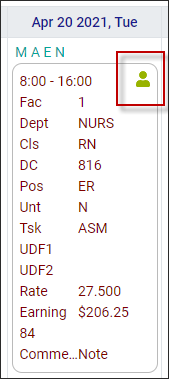
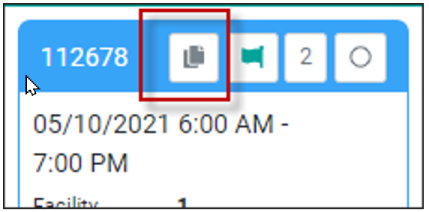
At the top of each box displaying a shift, you will find the shift number, bidding flag, number of bids for that shift, and a box for selecting or deselecting each shift. The employee's scheduled shifts are shown in green and are noted with the word Booked and a check mark icon.
|


The toolbar is where the functions for managing Shift Bidding are located.
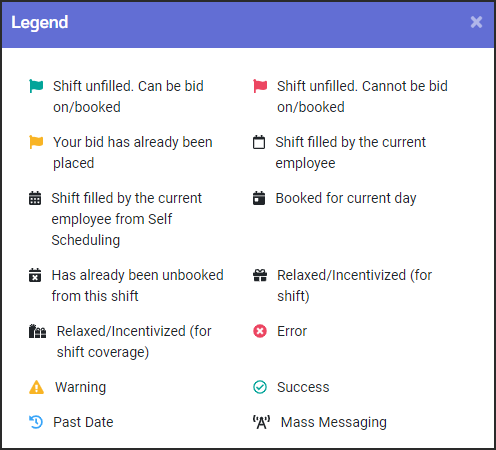
Refresh This option will refresh the page. Legend This option shows all icons and their definitions:
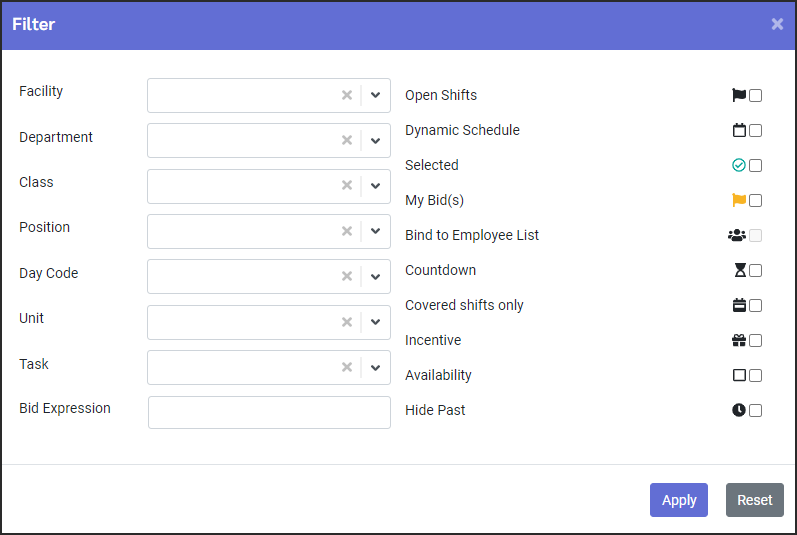
Filter The filter allows you to define different types of shifts you would like to see. If no filters are selected, you will see all the shifts that the selected employee is scheduled to and all shifts belonging to the current Shift Bidding group.
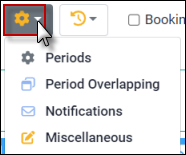
Configuration You may access the configuration options by clicking on the drop-down arrow:
Actions Click on the drop-down arrow to access all options. From this menu you may quickly select or deselect shifts and add incentives or relax rules for shifts you need to fill.
When enabled, the Booking option allows you to directly book the employee into a shift by clicking the bid / booking flag.
Employee This section shows the selected employee's name.
Group This is where the employee's Shift Bidding Group appears.
|


To start a scheduling period an Update from Master for that period must be performed beforehand. This process will update the scheduling calendar with assigned and unfilled shifts.
All the following options are global and will affect all periods.
Periods (Schedule Periods for Bidding)
This is where we create new Shift Bidding periods, view a list of existing periods, and configure settings specific to these periods. In this section the Schedule and Bidding Periods are defined, as well as Hours, Relaxation, and Incentive for these periods. Please see Creating a Scheduling Period for additional information.
Bidding Period The date range when employees can place bids on (or book to) unfilled shifts falling within the Schedule period.Please see Creating a Scheduling Period for additional information.
Staggering Bidding Periods
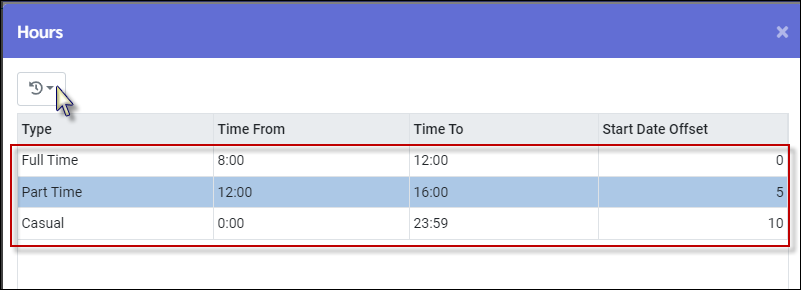
Hours If you wish to set bidding times for different types of employees (i.e., casual, part-time and full-time), the hours Offset option allows you to define the number of days from the opening of the Self Schedule period that need to pass before the different types of employees may begin bidding (or booking).
▪Click on the Calendar tab. ▪Click the Hours link.
In the Hours window, click on the Actions icon and select Add.
Example: Full-time employees may start bidding for shifts starting on the first day of bidding period (Start Day Offset is blank) only between hours of 8:00am and 12:00pm. Part-time may not bid until five (5) days (Start Day Offset) after the opening date and only from 12:00pm to 4:00pm. Casual staff may not bid until 10 days after opening date any time throughout those days.
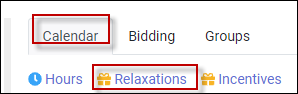
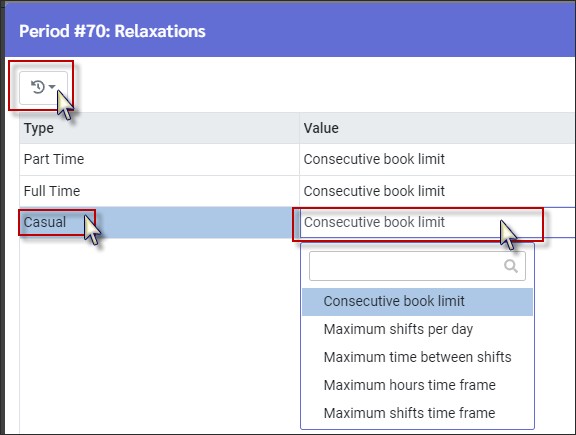
Relaxations Managers may select different scheduling rules that can be broken by employee Type. On the Calendar tab, click on Relaxations.
Example: full-time and part-time staff have the Consecutive book limit broken below.
▪Click on the Action icon and select Add. ▪On the new line, click in the Type and Value windows and select from the drop-down list. ▪Click Save.
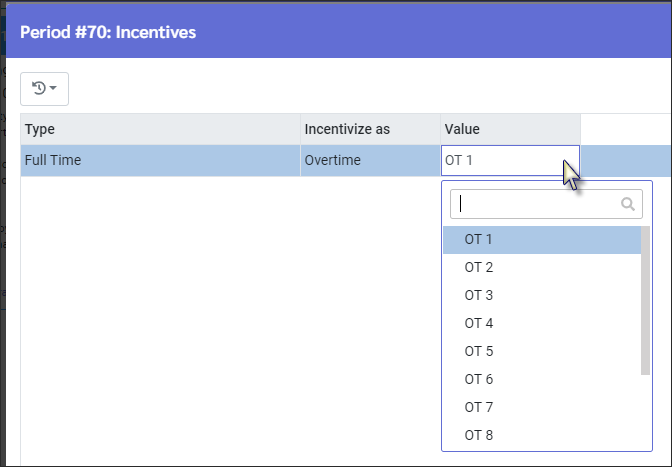
Incentives Managers may add different incentives (either overtimes or premiums) that may be assigned to different employee Types.
Example: full-time staff are given an overtime incentive to bid on these shifts.
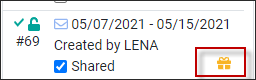
The incentive icon is displayed within the period header.
Lock/Unlock Period Please see Shift Bidding Period Configuration for additional information.
Bidding Tab
The Bidding tab has three options Default, Off and On. These determine whether employees can bid on or book directly into selected shifts.
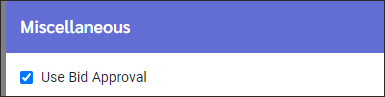
If On is selected, employees will have to place bids on open shifts. If Off is selected, employee bidding is off and they may book themselves directly into shifts. If Default is selected, the system will look at what is selected under the Miscellaneous, Use Bid Approval flag.
In this case, with Miscellaneous flagged to Use Bid Approval, the default option is same as selecting ON (described above).
Break Personal Availability Please see Shift Bidding Period Configuration for additional information.
Break All Rules Please see Shift Bidding Period Configuration for additional information.
Groups Tab
Groups are used to create lists of departments and classes that allow employees to bid on shifts outside their home department and class assignments. Once created, the Group must be assigned to the employees in Personnel Group Assignment using the Shift Bidding Group drop-down option.
Groups may then be added to the bidding period you have created by ticking on/off the check box beside the Group to select.
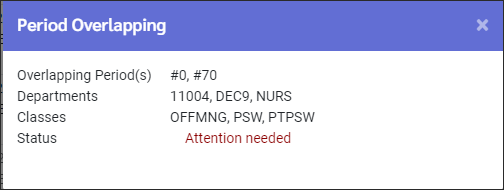
Period Overlapping
The Period Overlapping menu gives you the option to allow or deny employees the ability to bid on shifts in overlapping periods, and if permitted, which bid period supersedes for overlapping bids.
When switching configuration from Allow Overlapping to No Period Overlapping, the system will validate the active/unlocked periods for overlapping time frames. A warning will identify any periods of conflict. Once the periods have been adjusted the No Period Overlapping configuration will be enabled.
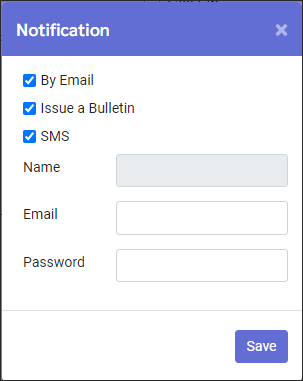
Notifications
This section is where you define how the system will notify an employee that a Shift Bidding period has been opened as per the options below. For the SMS (text message), managers use their login and password.
If the By Email option is selected, you may enter the manager's email address and password in the fields below. Once completed, the employee will see the manager as the sender of the email, rather than the default Do Not Reply sender.
When the manager is ready to send the notification to staff click on the envelope icon.
Select Yes to send the notification(s).
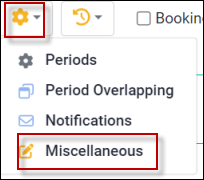
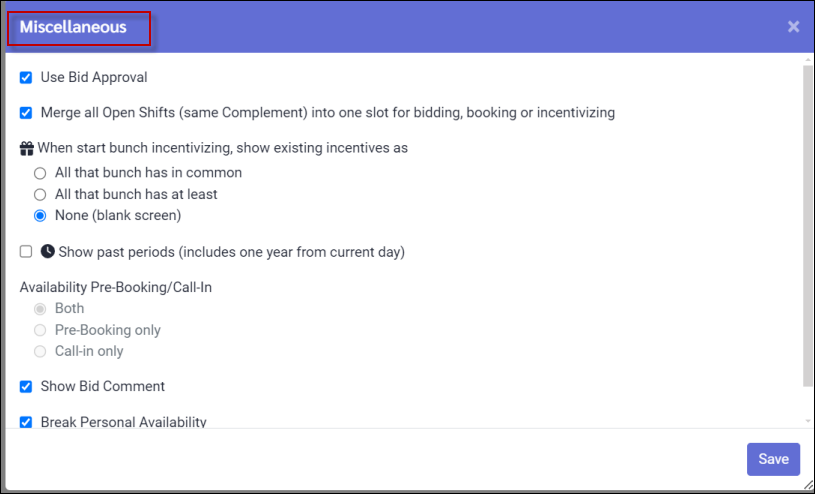
Miscellaneous
This section contains additional Shift Bidding rules.
Use Bid Approval This option determines the default setting for bid approval which will apply to new bidding periods.
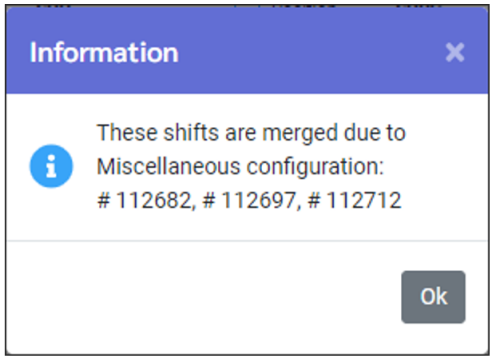
Merge all Open Shifts Use this option to combine shifts with the same complement and display them as one shift. For example if there are five shifts with the same complements (required fields), one bidding card will represent all five shifts. When employees bid on the shift, the system applies the bid to all five shifts, instead of requiring employees to bid on each shift individually.
Click on the Merged icon to view the shifts that were merged.
Show Past Periods Example: With Show past periods checked, the schedule will also include periods with shift bidding end dates from the past.
Show Bid Comment If ticked, the comment field will be enabled, allowing employees to add a comment to their bids. The comment will be displayed on the bid report.
Break Personal Availability This option determines the default setting for employee availability validation. This setting will apply to new bidding periods unless a different setting is selected on the bidding tab (Configuration / Periods / Bidding).
Schedule Period Actions Options
This menu provides information on issues arising from Overlapping Period(s) and contains the options for processing bids (Shift Coverage and Current Employee Shift Coverage).
|


Once the Shift Bidding groups are defined, they may be added to a Shift Bidding Period.
▪Click the Group name along the toolbar. This will open the Groups menu.
▪To add a new Group, click on the plus symbol (+). This will open a new line. ▪Click in the Description window to enter the new group name. ▪Click on Department and/or Classes window to open a list to select from. You may make multiple sections on both options. ▪Click Save.
You may define Groups as combinations of different departments and classes. To modify the department and class selections:
▪Click on the applicable Group so it is highlighted blue and modify the departments and/or classes. ▪Click Save when done.
To Delete a group, click on the group, and then click the X icon.
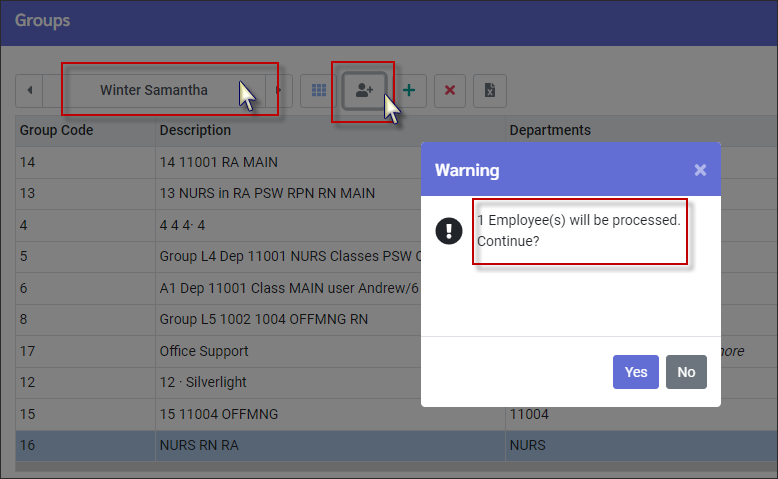
Adding Employees to Group
You may also add a group to one employee or multiple employees by selecting from the employee panel and then clicking the Add Employee(s) option.
|


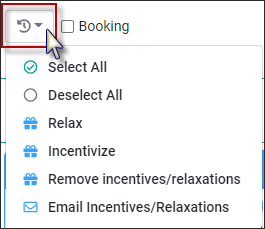
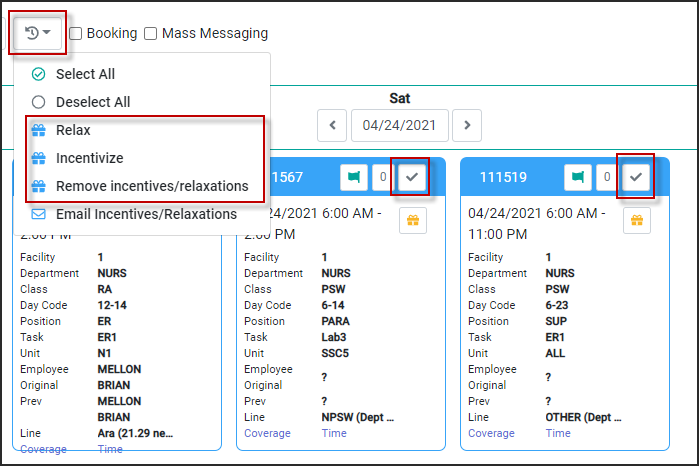
If you wish to give incentives or to relax schedule rules for selected shifts that you are finding difficult to fill, you may select a specific shift or number of shifts, add incentives or relax rules, and then send out a notification to employees about the shift(s).
▪Select shift(s) by clicking Select/Deselect icon along shift(s) header. ▪Once selected, click the Actions icon and select the action required.
Add / Remove Relaxation or Incentives from specific shifts.
Select All Select All to add/remove Relaxation or Incentive rules for all shifts on a specific day.
Deselect All Deselects all shifts belonging to that day.
Email Incentives/Relaxation This option will send out emails to all employees in the Group to inform them of changes to the Incentives / Relaxations.
|
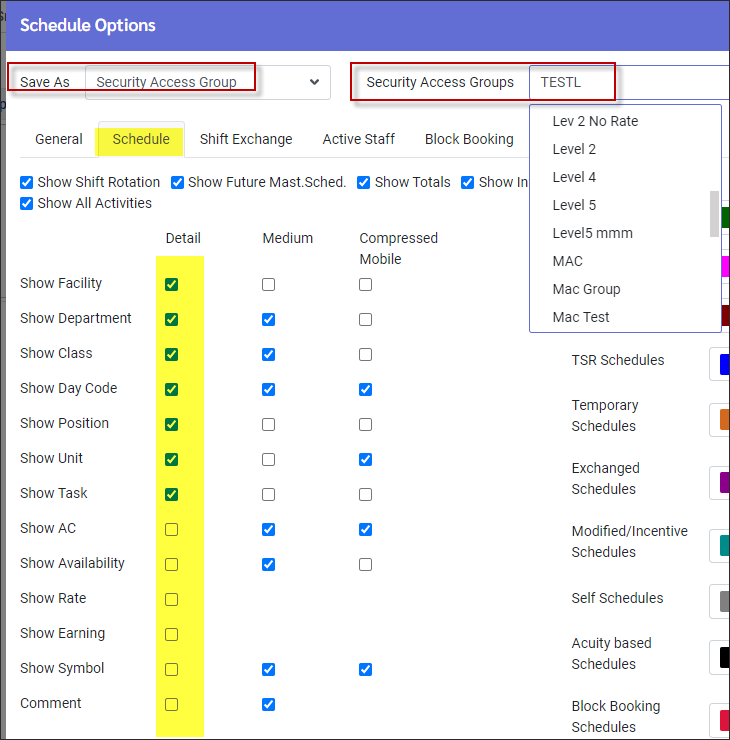
The shift details visible to the employees may be configured using settings under the Schedule Options.
▪Select the Active menu. ▪Select Options.
▪Select the Schedule tab. Please see Schedule Options for additional information.
|
See Also: