Options of Personal Information include both employment and personal information. User definable fields and tracking lists can be configured to allow for additional fields and information tracking, unique to your facility.
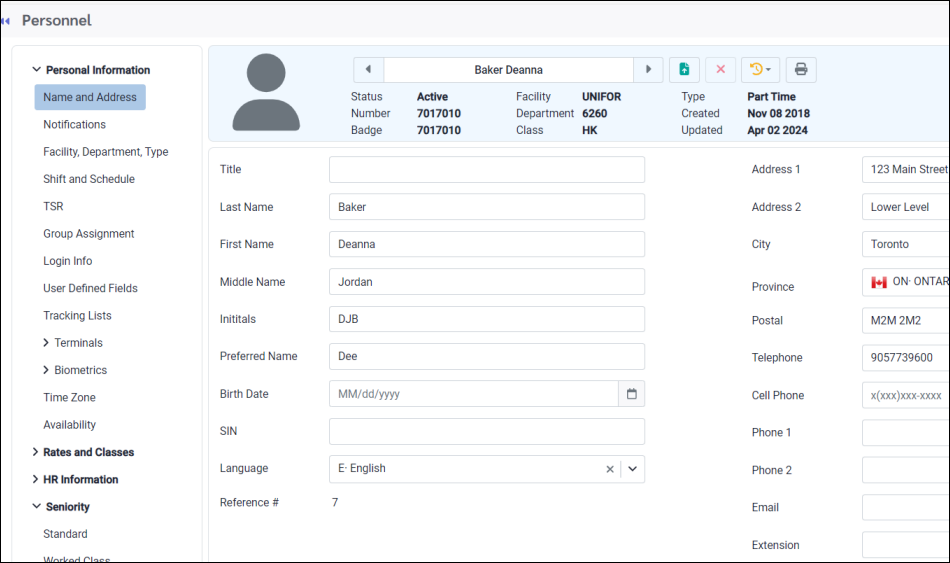
Fields include:
Title Optional - Mr. Mrs., Miss, etc.
Last Name Mandatory when profile was created.
First Name Mandatory when profile was created.
Middle Name Optional.
Initials Optional.
Birth Date Use the calendar drop-down or key in.
SIN/SSN (Social Insurance or Social Security Number) Optional.
Optional, but required if you want to send notifications to this employee by email.
Extension Office phone number extension.
Language Optional choices based on your facility's configuration.
Address 1 Home address.
Address 2/City Apt. #, floor, etc.
Province In what province or state.
Postal Postal or zip code.
Telephone Home phone number.
Cell Phone Mobile phone number. Mandatory if using Automated Call Outs.
Phone 1 & 2 Additional numbers for contact.
|
Regular Tab
To use the text messaging feature in StaffScheduleCare, this section is used to define the employee’s cell phone provider information and willingness to receive SMS (Short Message Service) text messages from call outs using the text option from the Daily Schedule.
Fields include:
Cell Phone Number Employee’s cell number. If the cell phone number has been entered on the Name and Address menu it will appear here as well.
Receive SMS Ticked = yes, agree. Not ticked = no, do not agree.
Provider Name Mobile phone service provider the employee uses.
Mass Messaging (Automated Call Outs) Tab
The Mass Messaging tab is where employees may set up their notification preferences to receive either a phone call or a text message when shifts become available through Mass Messaging.
Cell Phone Number
Employees must enter their cell phone numbers in the box as shown. The system will allow multiple formats without incident:
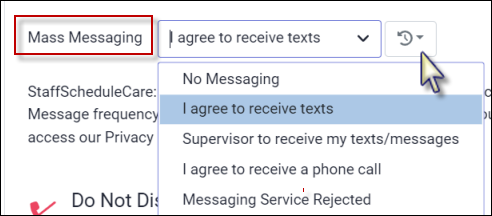
(416) 555-5555 Mass Messaging (Automated Call Outs) Permission The permission section defines how the employee will (or will not) be contacted by the Mass Messaging system. If employees would like their supervisor to receive the text messages while they are on the floor working, be sure that the Scheduler feature has been configured. Please contact your StaffScheduleCare client care team to have this configured for you. ▪Click on the drop-down arrow in the Mass Messaging window and select the appropriate permission. ▪Click Save (not shown).
Mass Messaging / Automated Call Outs Opting Out Please note the consent information in the paragraph shown below. You may click the link (shown in yellow) to access our privacy policy for further information. If employees text STOP, they will receive a confirmation that they have opted out of messaging. They may text HELP for assistance.
Permission settings will automatically change to Message Services Rejected, when employees opt out.
To re-enable text messaging, employees must complete both steps below:
1.Text START or UNSTOP. This notifies the employee’s mobile carrier that messages from this number are allowed again. 2.Text RESUME. This confirms to your facility's provider that the employee is opting back in to receive communications.
Acknowledgment Texts When employees opt out of messaging, they will receive messages similar to the one shown below:
Push Notification This tab displays the push notification statuses of employees who use the mobile application. The date of the most recent status update appears below the notification statuses.
Other Notification Acceptance Employees are asked to select their preferred method(s) of receiving system notifications, for features such as Shift Bidding, Time Off Requests, and other broadcast communications such as Announcements. You may choose one or both notification methods. Where applicable, you may receive both a phone call and a text message. Please note that some features, such as Shift Bidding, support text messages only and will not deliver notifications via phone call.
Do Not Disturb Tab
Employees may define the day(s) of the week as well as the time period(s) within each day that they do not wish to be disturbed.
▪Select Add, Add Overnight or Clear All as required.
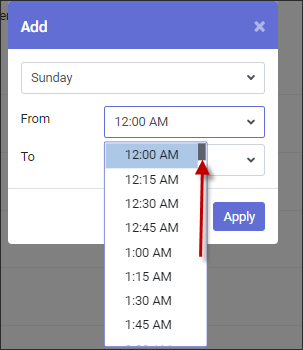
▪Click on the drop-down arrow and the applicable day of the week. ▪The From / To window select the from and to times. Use the scroll bar to move up/down the time list. ▪Click Apply for each entry. ▪When done entering all DND time periods, click Save at the bottom to complete .
Once you click Save, the screen will refresh with the DND you entered. In this example the DND period is for Sunday, from 9:00pm to 12:00am.
To set up an overnight DND:
▪Click Add Overnight.
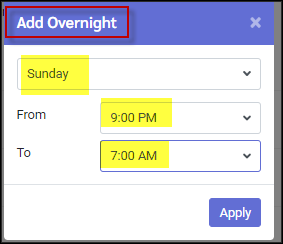
In this example we are going to set up a DND period from Sunday at 9am to Monday at 7:00am.
▪Select the start day. ▪Select the From start time (on Sunday). ▪Select the To end time (on Monday) ▪Click Apply.
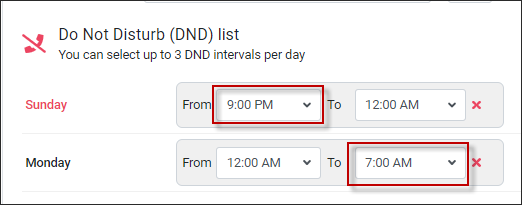
The period will be divided into two blocks, Sunday from 9:00pm to 12:00am (midnight) and Monday from 12:00am (midnight) to 7:00am.
Alternate Method to Add DND Periods.
DND periods can also be added by clicking on the weekday. Populate the template using the drop-down arrows to select times.
This method can be repeated up to three times per day:
Clear DND Periods
▪Click Clear All to clear the From / To window(s) or click the red X to remove individual selections. ▪Click Save at the bottom of your menu.
|
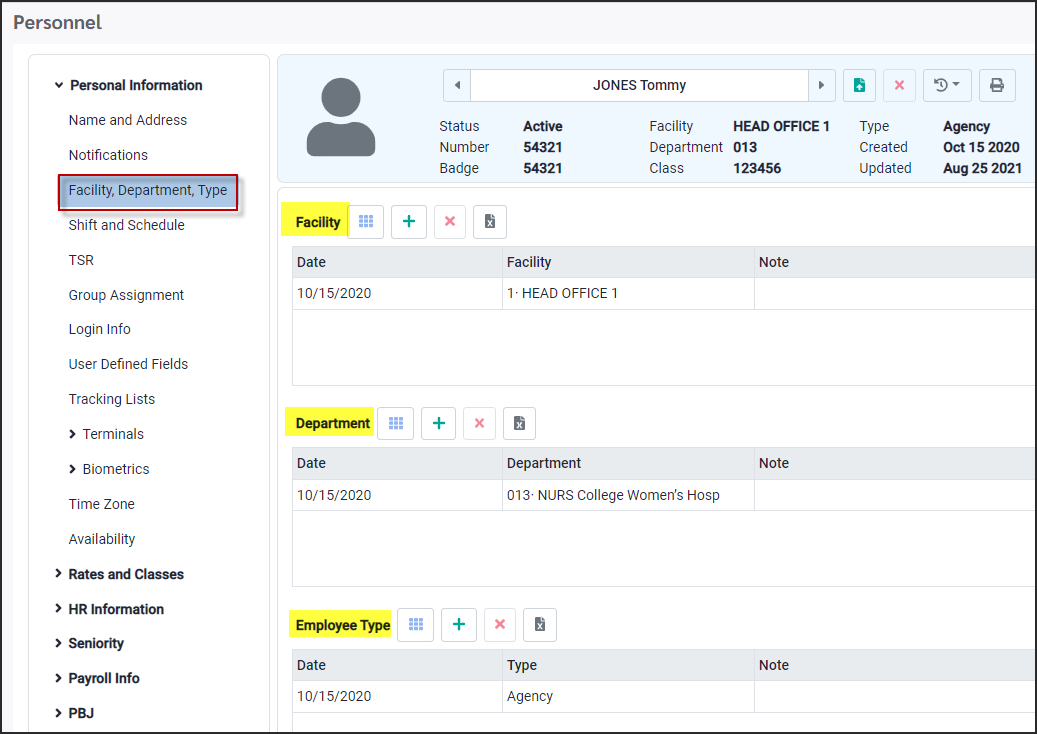
This section is to add the employee's Facility (if applicable), Department and Type (full-time, part-time, casual etc.).
Fields include:
Facility Select the correct Facility from the drop-down menu (if applicable).
Department Contains employee's Department (required).
Employee Type Select employee's Type from the drop-down menu (required).
|
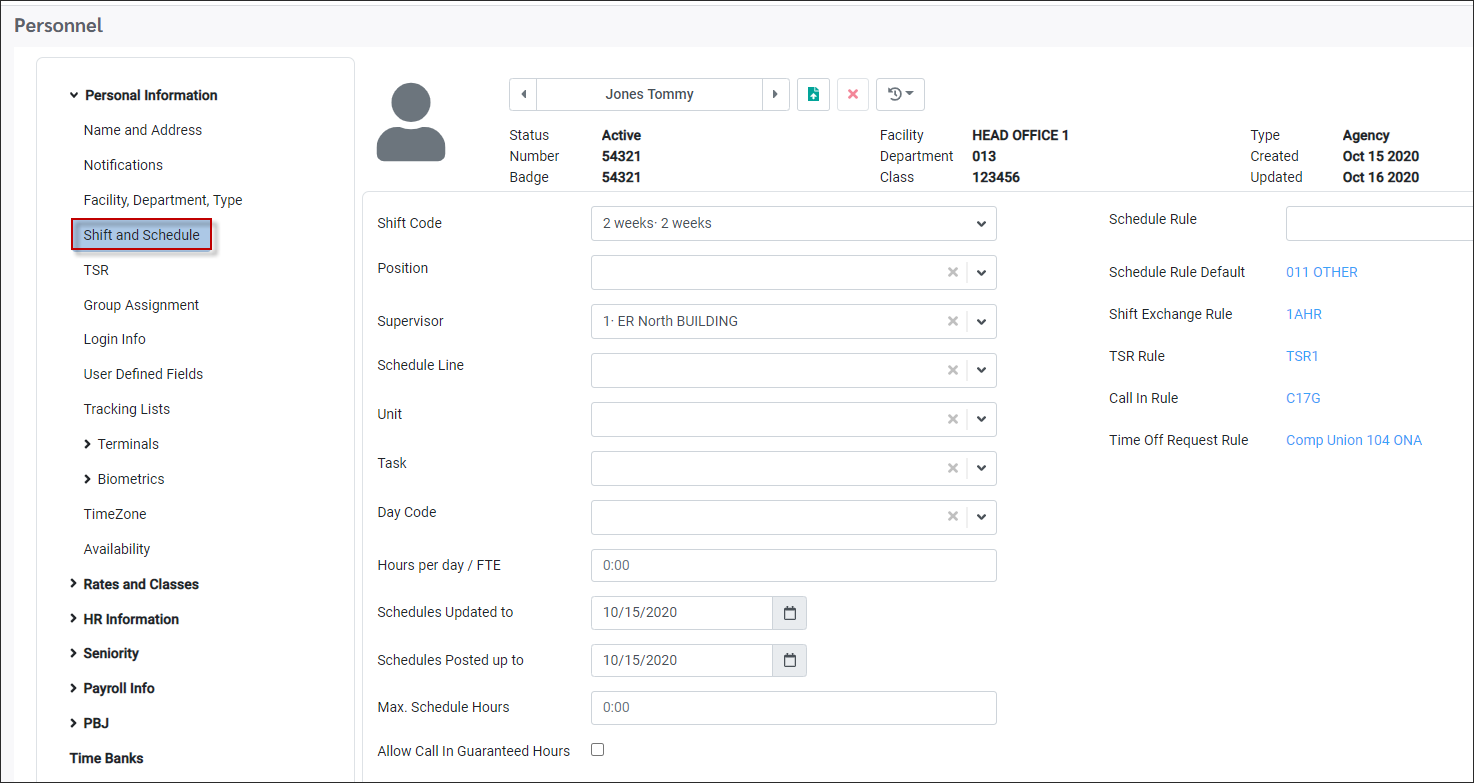
This option is used to define the employee's default assignments related to scheduling. In many cases these options may be selected from predefined drop-down lists created during configuration. Some fields will be automatically assigned based on default system configurations. You may drill down on each default rule by clicking on the blue link where you will see a pop-up view of the configured setting.
Shift Code Mandatory when profile is created. A Shift Code is a collection of Day Codes that defines how worked days will be calculated. We also use Shift Codes to define rounding, overtime and worked holiday rules.
Position Optional unless set up as a mandatory part of scheduling.
Supervisor Optional unless security restrictions are by supervisor and/or if you will be printing reports by supervisor.
Schedule Line Employee’s Master Schedule line (if applicable). You may remove employees from their Master Schedule lines from this menu.
Unit Employee’s home unit. This field is only used if employees have fixed units required for reporting purposes, where all units worked must appear in one section of the report under the employee name. If no unit is assigned, the report may still be done by unit, but the employee may appear multiple times on the report under each each worked unit heading.
Task Employee's home task. See Unit description above for further information of assigning "home" tasks.
Day Code Employee's normal Day Code (shift worked daily). See Unit description above for further information of assigning "home" day codes.
Hours per day (FTE) Used with Time Bank accruals and/or statutory holiday time to determine how many hours constitutes a day (full time equivalency) when time is awarded in days.
Schedule Updated up to Displays the last date that the employee's Active Schedule has been updated to.
Schedule Posted up to Displays the last date that employees can see their updated schedule to.
Max Schedule Hours Allows a max hours override in the scheduled hours time frame. Example: enter the number of "modified duty" hours the employee may be booked within each defined schedule time frame.
Schedule Rule This field will be populated based on the Schedule Rules configured for the employee Class, Type (full-time, part-time, casual etc.) or general Company setup.
Shift Exchange Rule This field will be populated based on the Shift Exchange Rules configured for the employee Class, Type (full-time, part-time, casual etc.) or general Company setup.
TSR Rule This field will be populated based on the TSR Rules configured for the employee. This rule will only be configured if you require specific Shadow (replacement) employee(s) to cover shifts for employees with a schedule line, who may be taking a long-term leave.
Call In Rule This field will be populated based on the Call In Rules configured for the employee.
Time Off Request Rule This field will be populated based on the Time Off Request rules configured for the employee.
|
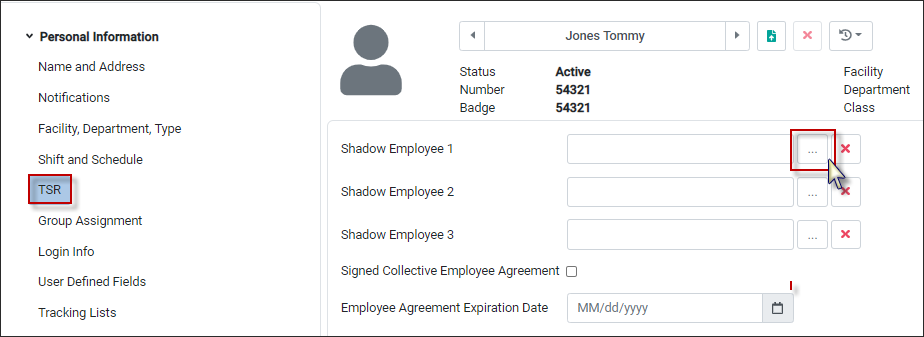
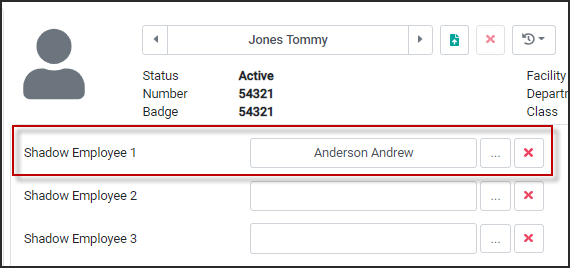
This option is used to define temporary shift replacement rules for individual employees. Shadow Employees are specific employees identified to fill shifts for the current employee. You may select up to three shadow employees in the order in which they appear to fill vacated shifts by this employee. If your system is not configured for the shadow employee feature, please contact the StaffScheduleCare client care team.
Adding a Shadow Employee
Click on the icon containing three dots as seen in the image below:
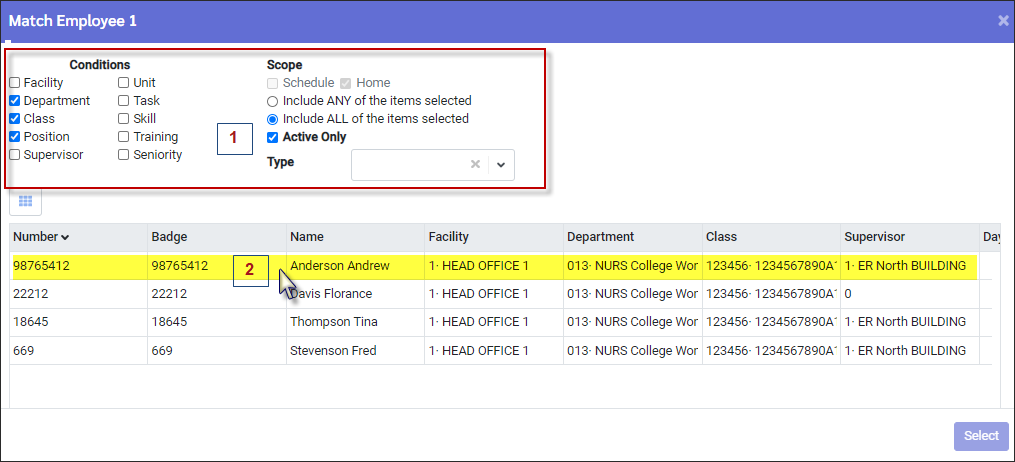
The following menu will appear:
1.Choose the criteria the employee must meet in order to be selected as a Shadow. As you chose your criteria, the employee list narrows. 2.Select the Shadow Employee by clicking directly on the employee. 3.Click Select. Andrew Anderson has been selected as seen below. Follow the same steps to add more shadow employees for a maximum of three.
|
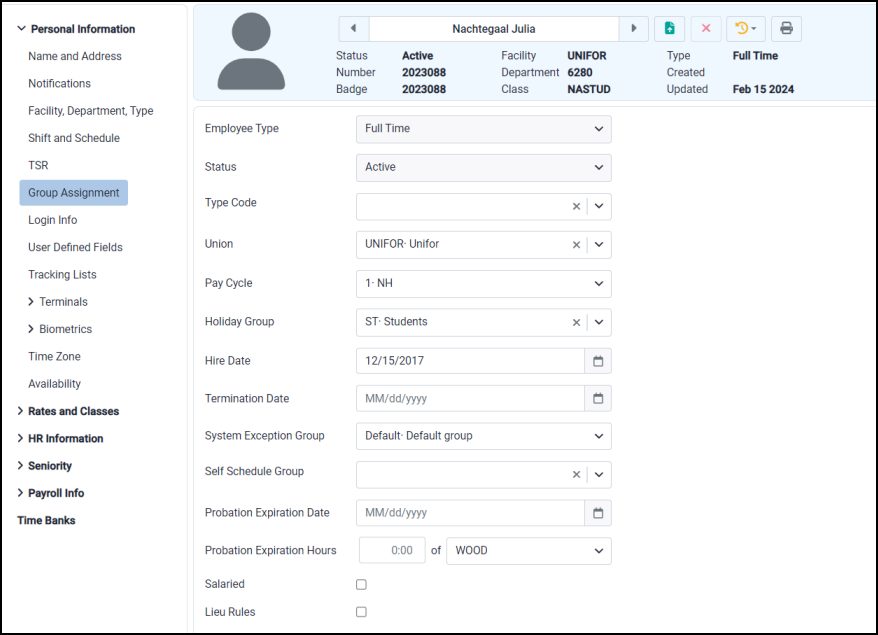
This option is used to define Type, Union, Pay Cycle, Holiday Group, Hire and Termination dates etc. When the employee is originally entered into the system, based on a previously configured template, some of these field will be auto populated.
Employee Type Optional when adding a new employee, but mandatory if you will be sorting/printing reports by this value. Options include Full-time, Part-time, and Casual. User defined options may be added as well. This field is view only.
Status Mandatory when adding a new employee. Options include: Active, Inactive, Quit, Retired, Laid Off, Termination and Permanently Terminated. This field is view only.
Type Code Optional when adding a new employee, but mandatory if you will be sorting/printing reports by this value.
Union Optional when adding a new employee, but mandatory if you will be sorting/printing reports by this value.
Pay Cycle Mandatory when adding a new employee. Holiday Group Optional when adding a new employee, but mandatory if you pay benefit time for non-worked hours, or if employees are able to bank their time worked on a holiday. Also, mandatory if you pay differently for hours worked on a holiday, i.e., all OT1 or OT2.
Hire Date Mandatory when adding a new employee.
Termination Date Mandatory when changing an employee status to inactive. This field is automatic; if you do not fill it in when you change the status of an employee to inactivate, the system date will be used.
System Exception Code Group If different Exception Code groups have been configured, for example, if a Missing Punch Exception would not apply to certain groups of employees, this is where you would assign the applicable group. This is a required field.
Shift Bidding Group If Shift Bidding is configured, then groups have been set up as well. In this section you can apply the self scheduling group to each employee.
Probation Expiration Date The probation expiration date may be added in this field (optional) to allow managers to report on completed probation. The HR / End of Probation report may be run to provide this data.
Probation Expiration Hours The probation hours threshold may be added in this field (optional) to allow managers to report on completed probation. The probation hours are based on the seniority hours and visible field configuration selected from the drop down list. The HR / End of Probation report may be run to provide this data.
Salaried If checked this field indicates that an employee is configured as salaried (for visual purposes only).
Lieu Rules If checked, any holiday lieu rules that may be configured will apply to this employee.
|
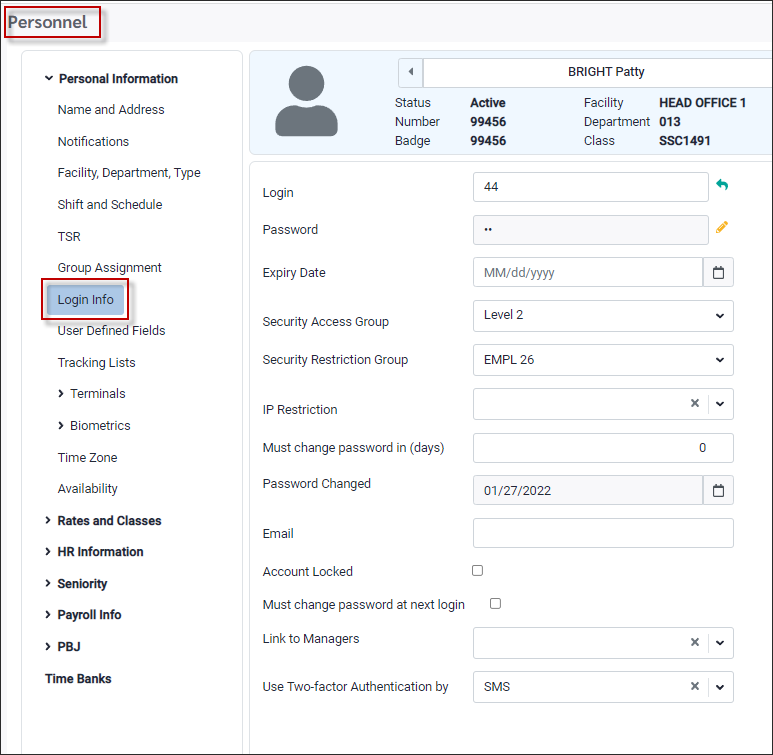
This option is used to assign employee login, ID, and password information into the system, as well as the type of security access.
Login This field is where employees Login ID is configured to allow access to their own personal information using employee self service.
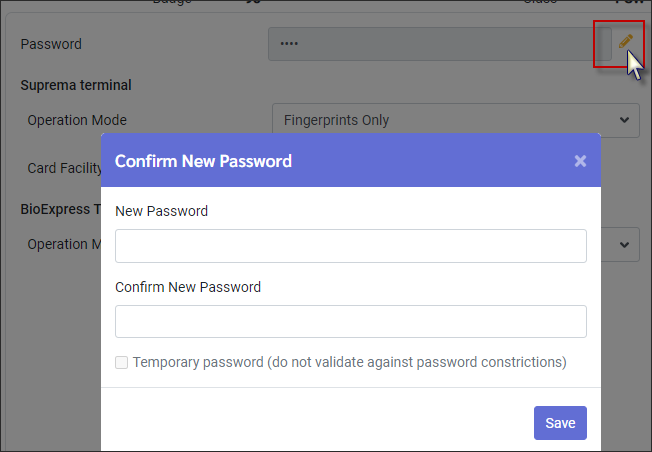
Password The password that employees will use with their login ID. Clicking the Pencil icon opens a change password window.
Expires Date Optional – the date the password will expire.
Security Access Group Determines what security access group (menu access) this employee belongs to. This is a mandatory field.
Security Restriction Group Determines what security restriction group (data access) this employee belongs to. This is a mandatory field.
IP Restriction Allows manager to set up employee-specific IP restrictions for accessing the software.
Must Change Password In Number of days in which employees must be change their passwords, e.g., every 90 days.
Password Changed Automatic field that indicates the date on which the password was last changed.
Employee email. Optional unless you will be using email notification.
Account is Locked This option serves two purposes: 1.Managers may LOCK employees out of the system. 2.Locks automatically if employees violate defined login parameters, i.e., three tries against their password.
Must Change Password at Next Log In Normally used for new employees when you define a generic password for their first log in and you want them to set their own personal password.
Use Two-factor Authentication by If using the Two-factor Authentication select the send method default for this employee. Click on the drop-down option and select from the list.
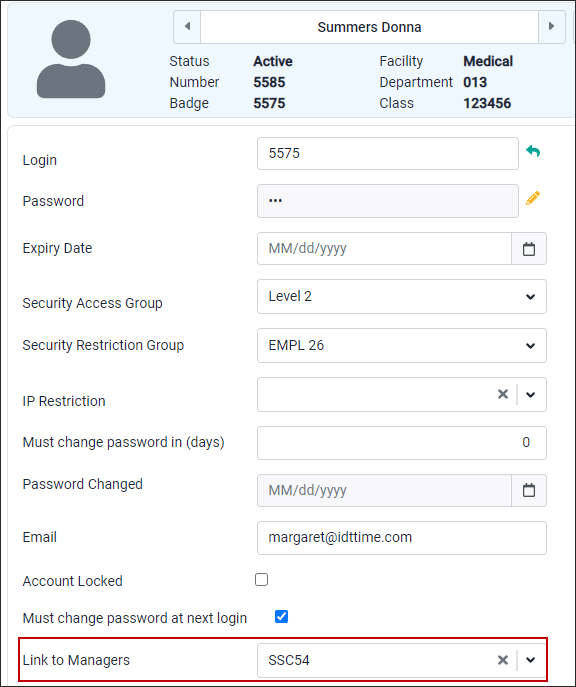
Link to Managers When this option is configured, an employee's status change will automatically set the employee's manager login (Security User login) to expire at the same time. The employee below has been linked to SSC54 Security User login.
When the employee is deactivated, the user login will also expire.
|
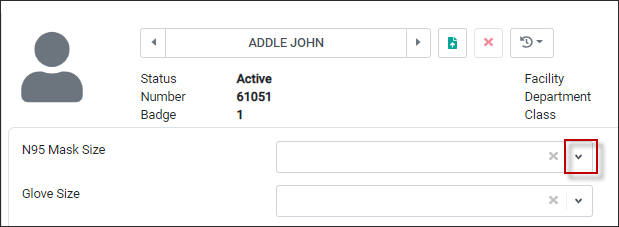
Twenty user definable fields, unique to your facility, may be defined in this section (optional). If a user defined table has been assigned to the field, a value may be be selected and saved by clicking on the drop-down arrow. For further details see User Definable Fields and Tables.
Tracking Lists
Allows you to track additional fields of information by setting up lists of anything specific to your facility and then assigning them to employees. To run a report, navigate to Reports / HR Reports / Employee Tracking List Report.
▪Click on the Actions icon to Add or Delete lines. ▪Click on the Configuration option to create new Tracking Lists. For further details see Tracking List Setup.
|
Terminals
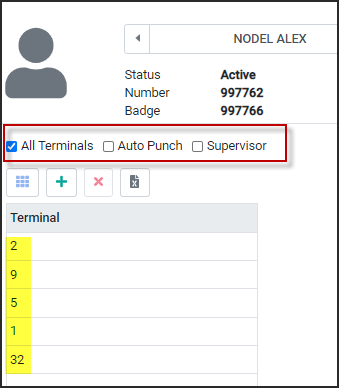
This option defines which terminals employees may access, i.e., all clocks or specific ones (if you have multiple clocks). This employee is restricted to the clocks highlighted in yellow.
Fields Include:
All Terminals Employee can punch at ALL clocks.
Auto Punch Employee does not punch, the system auto punches based on employee's schedule or shift rotation.
Supervisor This option enables a badge as a Supervisor badge for use in performing supervisor functions at the clocks, i.e,. enrolling for biometrics, etc.
Biometrics
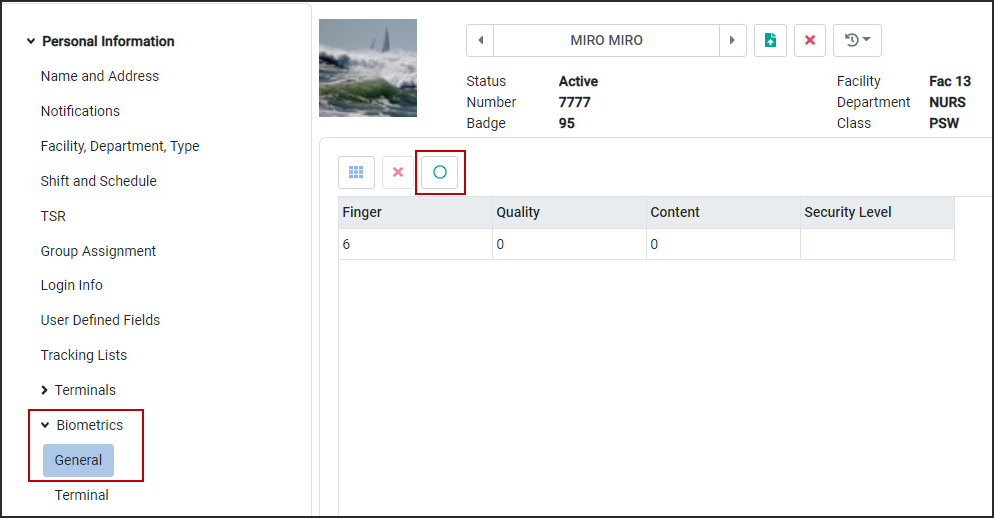
Used with Biometric terminals, and will contain the finger scan info, which finger was scanned, the quality and content of the scan, and the security level assigned to the scan i.e. High, Medium, Low or No Security (bio-impaired).
Finger Which finger was scanned; each one has a corresponding number from 1-9.
Quality Automatic field indicating the quality of the scan when the employee was enrolled at the terminal.
Content Automatic field indicating the quality of the scan when the employee was enrolled at the terminal.
Security Level Defaults to Medium but can be modified manually for higher security on the finger scan or no security for bio-impaired employees.
Bio-impaired Ticked when, for whatever reason, an employee’s finger(s) will not scan.
To add a PIN number for an employee who is bio-impaired, perform the following:
▪ Select the Terminal option (more info on this option below).
▪Click on the Modify icon
▪Add a new password (PIN) number (must be four digits, leading zeros are acceptable). ▪Confirm new password in the next box. ▪Click Save. ▪For the PIN # to take effect, you MUST download this information to the terminals(s). ▪To delete the password, click on the red X.
Terminal Tab
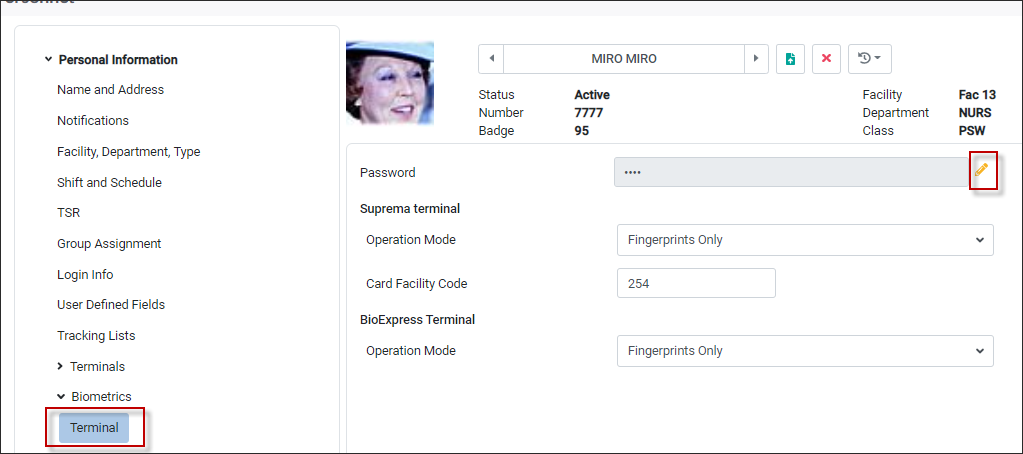
This section contains fields that work with the biometric terminals.
Password Contains the unique password for the bio-impaired employee to use at the terminal when scanning in and out.
Operation Mode Determines how the terminal will be used. Options include Both (finger scan & swipe card), Fingerprint Only (finger scan), Card Only (Swipe Card).
Card Facility Code The Facility Code that was included in the encoding of the swipe card. For example: Facility 1 = Code 123 and Facility 2 = Code 345.
|
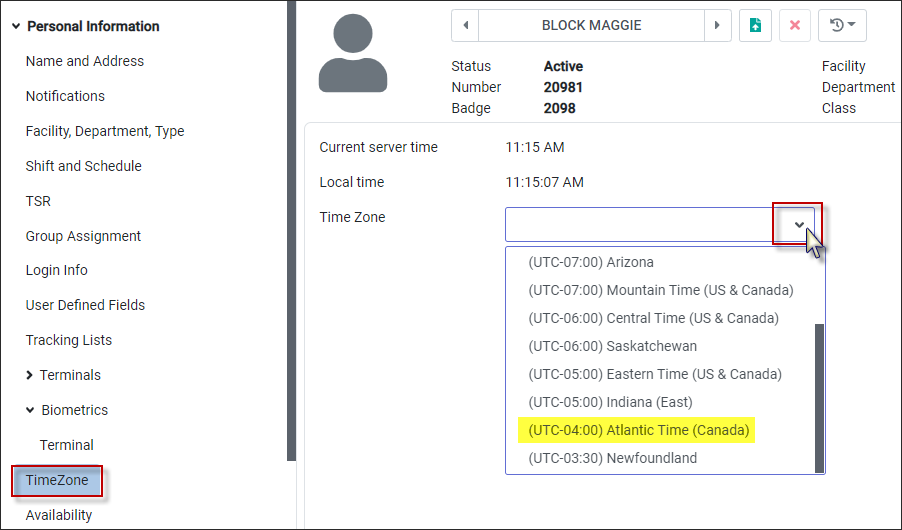
This option is used to define the time zone the employee / user will be using the system., e.g., Eastern Time Zone versus Central or Pacific Time Zone.
▪From the drop-down menu in the Time Zone field, we will choose the time zone of Atlantic Time.
The individual employee time zone setting in this section overrides all other time zone settings which may be configured in the system. These time zone options may be combined and used together.
The logic in which a time zone will be applied for an employee is as follows:
The system will first look in this section to check if any time zone information is entered for this employee. If these fields are blank, the system will look at the facility setup to see if this employee is assigned to a Facility with a specific time zone. If no facility time zone is assigned, the system will then look at the general Company Profile setup to see if a unique time zone has been set up company wide.
|
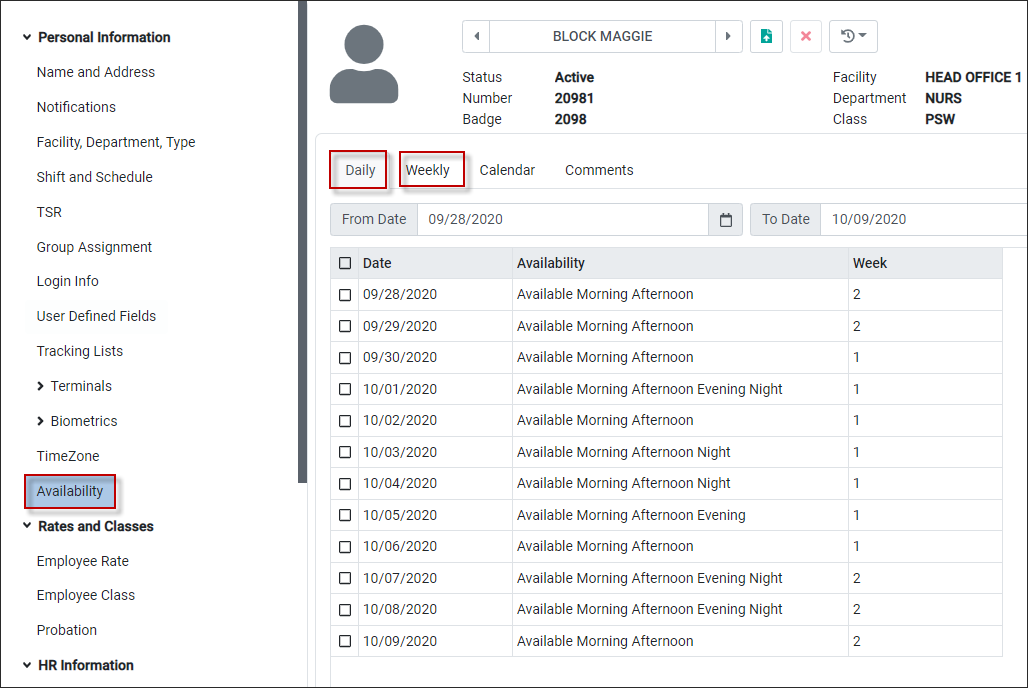
Employee Availability is used to define what shifts employees can work. Availability requests may be made by the employee or by the manager on the employee's behalf. Availability may be configured by date or by week.
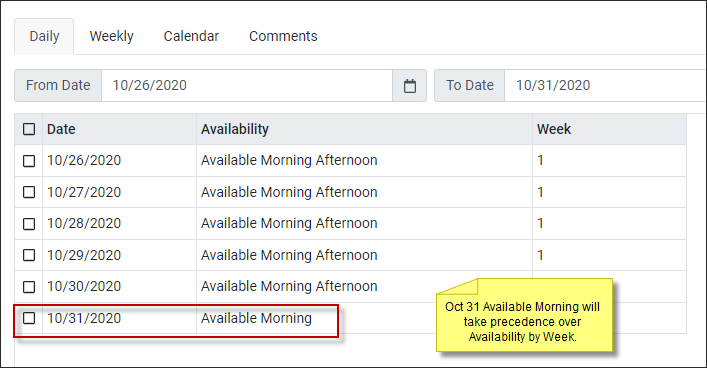
If you have Availability by Week configured (by the employee or manager), you may also configure Availability by Date but where there is duplication of dates, the Availability by Date setting will take precedence over the Availability by Week setting.
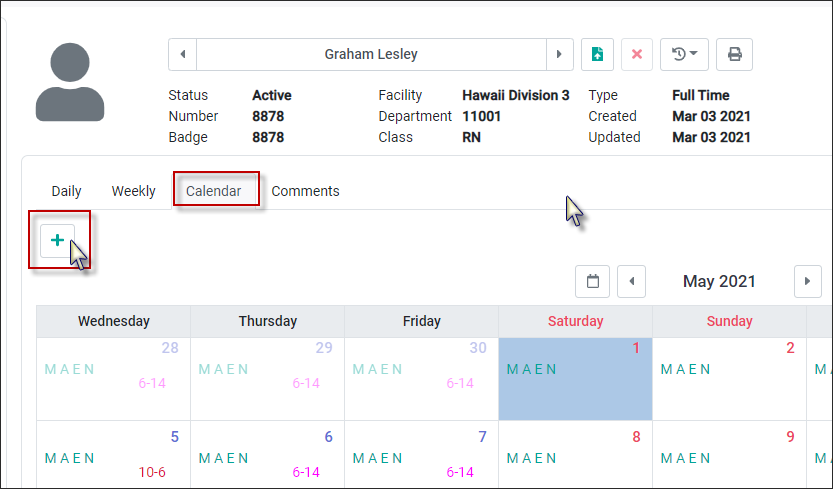
To create a new daily request for Availability, click on the Calendar tab. Click on the date you would like to submit an Availability Request. Click on Plus icon
.
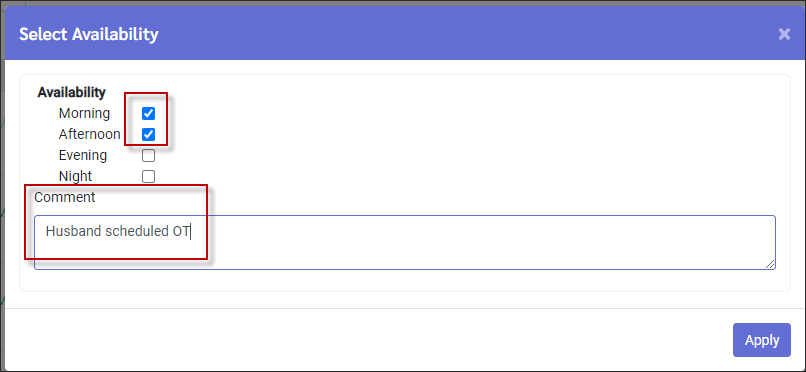
Select your Availability choice from the pop-up menu and click Apply.
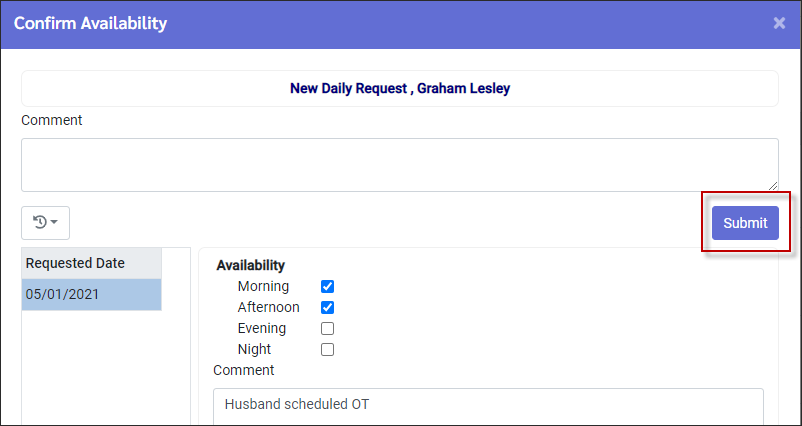
Confirm your Availability by clicking Submit.
Your new Availability will now show in the calendar menu i.e. May 1, 2021 now shows morning and afternoon availability.
|
See Also:


