Time off requests may be made and submitted for approval by both employees and their manager/supervisor. This section deals with the manager function of time off requests.
The Enter Pay Out Amount option may be turned off in the Company Profile. Please contact the StaffScheduleCare client care team to assist you.
Managers may set Restrictions and/or Blackout Dates for time off requests in their departments. Blackout Dates are used to prevent employees from requesting time off on specific dates, i.e. during peak season, etc. Blackout Dates may be set for ALL departments and classes, or for specific departments, classes or department/class combinations.
Setting Time Off Restrictions allows you to control how many hours or how many employees may be scheduled off per day. You may also define the number of days in advance in which employees must submit their time off requests.
You may set Time Off Restrictions using Time Off Rules.
| Email Notification to Supervisor & Employee Notification |
Email Notification to Supervisor
You may configure the system to email the employee's supervisor when an employee submits an time off request. To enable this feature, supervisors must be configured and assigned to the employees.
Configuring Supervisors If you have not already configured supervisors see Supervisor Setup. This configuration will allow the supervisor to receive email notifications.
Assign Employees to Supervisors To assign employees to supervisors, please see Supervisor Setup.
System Configuration Configuration is required to enable Supervisor Notification.
Employee Notification
Select the Show Settings option to notify the employee by email or message. When either option is ticked, when the status of the request is changed and saved, the employee(s) will receive notification of the change in status.
|


Once requests for time off have been made by either the employee or by the manager / supervisor on behalf of the employee, these requests need to be processed by the manager/supervisor.
Managers / supervisors may access time off requests in one of two ways:
1.Through the Welcome Menu Widget by clicking on the number beside Unprocessed or Pending (1). The Collection Period (days) may be set up to a maximum of 365 days.
2.Through the Time Off Requests menu:
▪ Select the Requests menu. ▪ Select the Time Off Requests menu.
Using either method, the Time Off Requests menu will appear:
Using the calendars, select the date range to be reviewed.
The requests may be filtered by the Status. Click on the Show Filter option and select the requests you wish to see based on the status. If left unselected you will see all records regardless of status.
If you have many requests that have been canceled, but you don't want them to appear among your requests that still need processing, tick Not Cancelled and the system will filter out any requests with a Canceled or a Cancellation Accepted status, for ease of processing.
By using the Reason By filter manager may select which requests are shown based on the Attendance Code used in the request. Multiple codes may be selected.
To manage requests, select the request you want to process by clicking anywhere on the request row to highlight it in blue. Click on the Actions icon and select Process Request:
The Process Request menu will appear. Choose the required action from New Status:
New Status Choose from Pending, Approved, Reviewed, or Denied.
Pay Options The default for this field is part of the company setup. You may select other options by using the drop-down arrow.
Vacation Rate Please see OESA Configuration for further information.
Regular Rate: Uses their Class rate value. This option may use up Vacation Pay faster if the rate is higher than the Vacation rate.
OESA Current Rate: Please see OESA Configuration for further information.
Comment This field is entered by the employee when submitting the request (optional).
Feedback You may enter up to 100 characters (optional).
Save Click to apply your changes.
The Status column icon for requests will vary depending on where the request stands in the approval process. Hover with your mouse near the Status icon and the description will appear beside it (see below).
|


The system will not allow managers to delete Approved time off requests but they may delete requests through the Time Off Request menu if they have not yet been approved.
▪Select the Requests menu. ▪Select the Time Off Requests menu.
▪Click on the request you wish to delete. ▪Click Actions icon and select Delete.
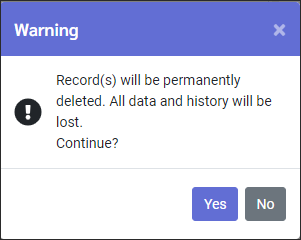
A warning message will pop-up reminding the manager that record(s) will be permanently deleted. Click Yes. The time off request will be gone.
|

There are times when a request will need to be edited. The system will allow both employees and managers to modify a request.
▪Select the Request menu. ▪Select the Time Off Requests menu.
In this image we see that the employee requested several dates in August, but the manager is not going to approve August 28th and 29th.
To edit the unprocessed request, perform the following steps:
▪Select the request to edit. ▪Click on the Actions icon and chose View / Edit Request.
The Time Off details window will open.
▪Untick the days that will not be approved, which in this example are August 28th and 29th (green). ▪Click Save.
▪Review the confirmation pop-up to verify changes. ▪Click Apply anyway (not shown) on the confirmation menu.
▪If email is used, the employee will receive notification. The manager may now proceed with approving the remaining days in the request.
|


An Approved Time Off Request may be canceled, however, only by a manager. The Attendance Code is removed from the Active Schedule and the time / dollars (if applicable) added back into the Time Bank.
To cancel a time off request:
▪Click on the request to be canceled. ▪Click on the Actions icon and select Cancel Request.
▪A response is required in the Feedback window in order the activate the Save button.
In the Cancel Status column a green circle with a check mark will be displayed showing this request was successfully canceled.
The employee will receive an email notification similar to the one below.
|


Also see: