Schedule notifications, along with general notifications, are a vital part of communication between managers and employees. The system allows notifications to be sent in multiple ways depending on the menu option selected, including text messages, phone calls, emails, and mobile app push notifications.
For convenience and cost savings, your facility can also be configured to use push notifications only.
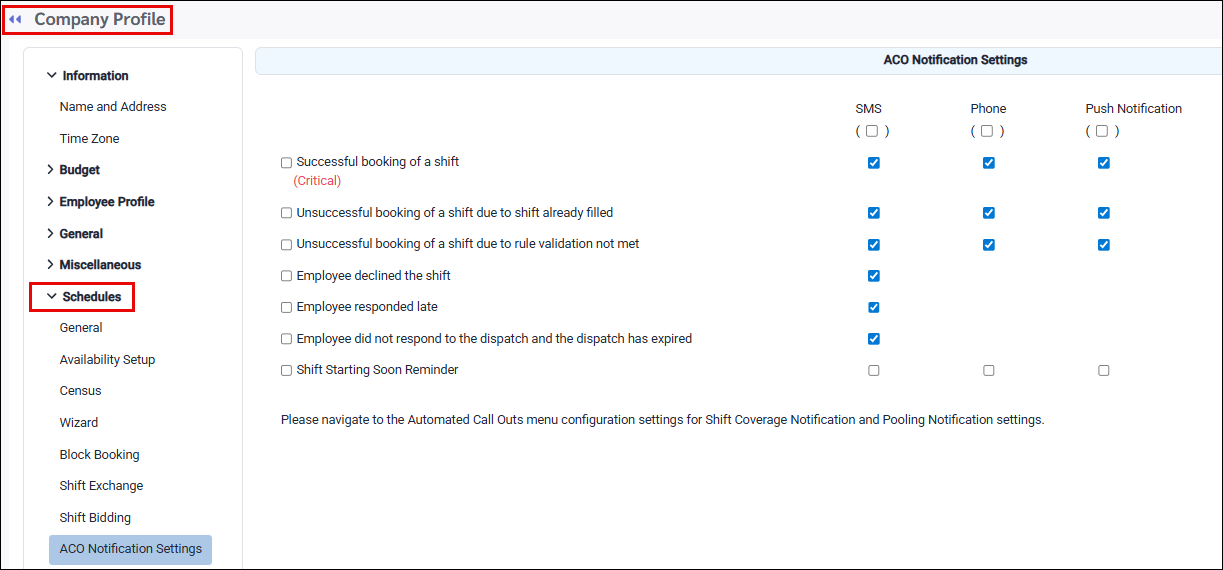
Automated Call Outs notifications can be configured globally under the Company Profile, applying to all employees. Employees can then enable or disable these global notifications based on their individual preferences.
Managers can also trigger notifications as needed, either to a single employee (for example, Time Off Requests) or to groups of employees (such as for Shift Bidding). These notifications can be sent via email, text message, or bulletin.
The system includes a variety of customizable email and text templates for shift offers, general notifications, and Do Not Reply email formats.
| Notifications / Do Not Disturb (DND) Employee Setup |
Regular Tab
To use the text messaging feature in StaffScheduleCare, this section is used to define the employee’s cell phone provider information and willingness to receive SMS (Short Message Service) text messages from call outs using the text option from the Daily Schedule.
Fields include:
Cell Phone Number Employee’s cell number. If the cell phone number has been entered on the Name and Address menu it will appear here as well.
Receive SMS Ticked = yes, agree. Not ticked = no, do not agree.
Provider Name Mobile phone service provider the employee uses.
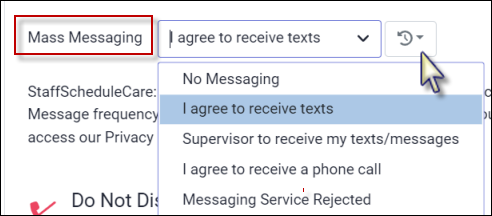
Mass Messaging (Automated Call Outs) Tab
The Mass Messaging tab is where employees may set up their notification preferences to receive either a phone call or a text message when shifts become available through Mass Messaging.
Cell Phone Number
Employees must enter their cell phone numbers in the box as shown. The system will allow multiple formats without incident:
(416) 555-5555 Mass Messaging (Automated Call Outs) Permission The permission section defines how the employee will (or will not) be contacted by the Mass Messaging system. If employees would like their supervisor to receive the text messages while they are on the floor working, be sure that the Scheduler feature has been configured. Please contact your StaffScheduleCare client care team to have this configured for you. ▪Click on the drop-down arrow in the Mass Messaging window and select the appropriate permission. ▪Click Save (not shown).
Mass Messaging / Automated Call Outs Opting Out Please note the consent information in the paragraph shown below. You may click the link (shown in yellow) to access our privacy policy for further information. If employees text STOP, they will receive a confirmation that they have opted out of messaging. They may text HELP for assistance.
Permission settings will automatically change to Message Services Rejected, when employees opt out.
To re-enable text messaging, employees must complete both steps below:
1.Text START or UNSTOP. This notifies the employee’s mobile carrier that messages from this number are allowed again. 2.Text RESUME. This confirms to your facility's provider that the employee is opting back in to receive communications.
Acknowledgment Texts When employees opt out of messaging, they will receive messages similar to the one shown below:
Push Notification This tab displays the push notification statuses of employees who use the mobile application. The date of the most recent status update appears below the notification statuses. By default, these notifications will be enabled.
Other Notification Acceptance Employees are asked to select their preferred method(s) of receiving system notifications, for features such as Shift Bidding, Time Off Requests, and other broadcast communications such as Announcements. You may choose one or both notification methods. Where applicable, you may receive both a phone call and a text message. Please note that some features, such as Shift Bidding, support text messages only and will not deliver notifications via phone call.
Do Not Disturb Tab
Employees may define the day(s) of the week as well as the time period(s) within each day that they do not wish to be disturbed.
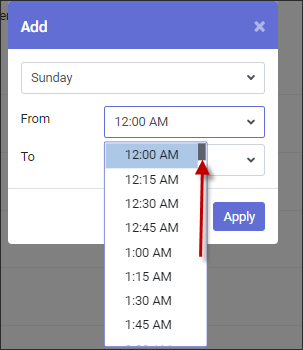
▪Select Add, Add Overnight or Clear All as required.
▪Click on the drop-down arrow and the applicable day of the week. ▪The From / To window select the from and to times. Use the scroll bar to move up/down the time list. ▪Click Apply for each entry. ▪When done entering all DND time periods, click Save at the bottom to complete .
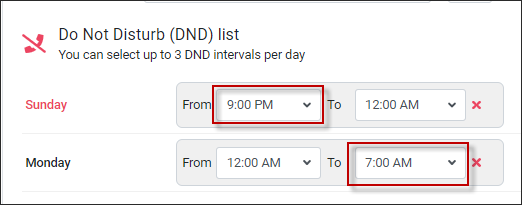
Once you click Save, the screen will refresh with the DND you entered. In this example the DND period is for Sunday, from 9:00pm to 12:00am.
To set up an overnight DND:
▪Click Add Overnight.
In this example we are going to set up a DND period from Sunday at 9am to Monday at 7:00am.
▪Select the start day. ▪Select the From start time (on Sunday). ▪Select the To end time (on Monday) ▪Click Apply.
The period will be divided into two blocks, Sunday from 9:00pm to 12:00am (midnight) and Monday from 12:00am (midnight) to 7:00am.
Alternate Method to Add DND Periods.
DND periods can also be added by clicking on the weekday. Populate the template using the drop-down arrows to select times.
This method can be repeated up to three times per day:
Clear DND Periods
▪Click Clear All to clear the From / To window(s) or click the red X to remove individual selections. ▪Click Save at the bottom of your menu.
|


Managers can control which automated notifications are sent to employees and select the communication methods used to ensure compliance with union agreements. These settings apply company-wide and are enforced for all Automated Call Out dispatches. Employees cannot modify these settings individually. Please see ACO Notification Settings for more information.
|
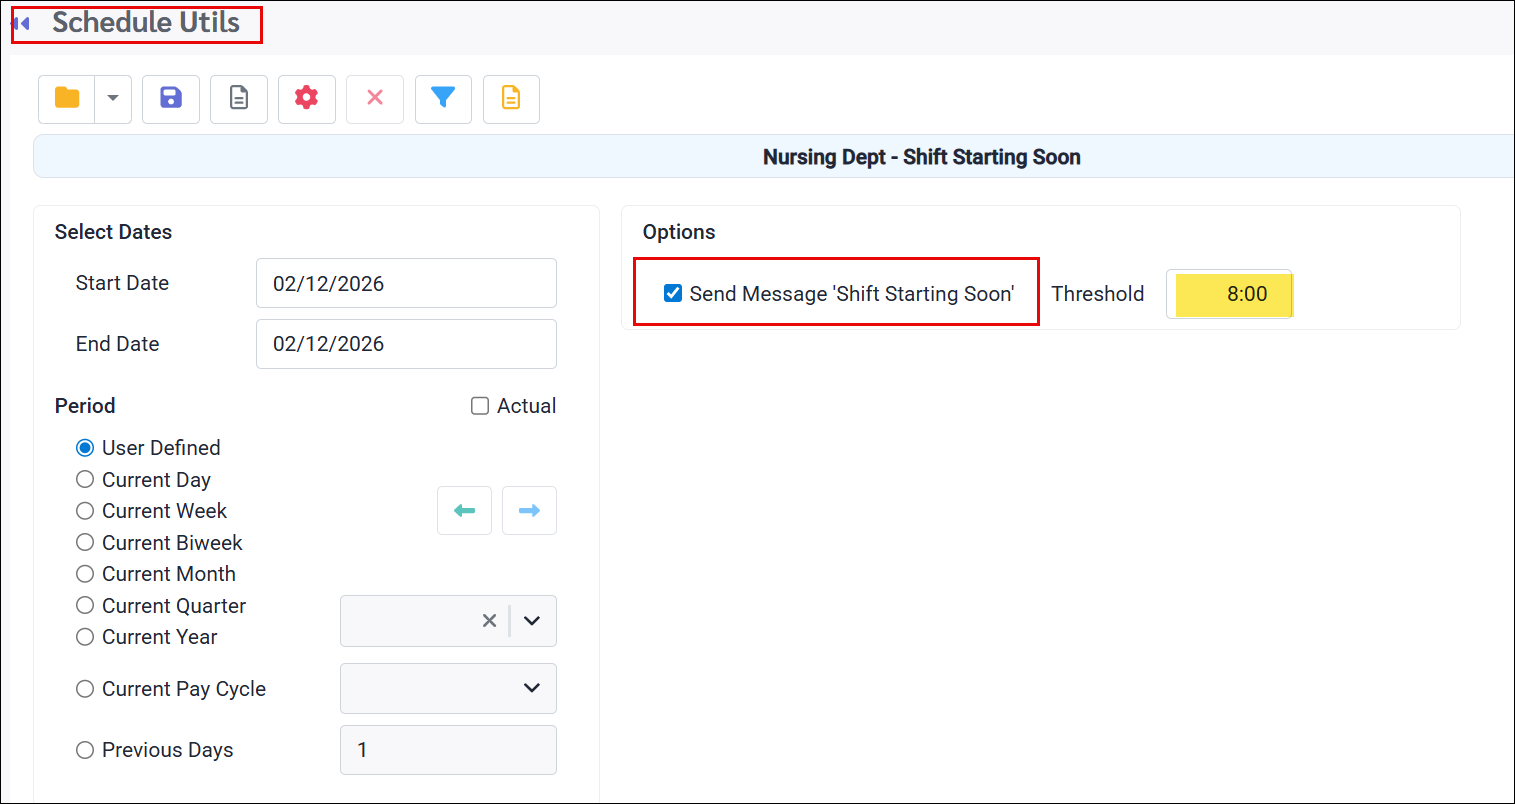
Notifications can be sent to remind employees of upcoming shifts. Scheduling managers can run a process to send these reminders, with the timing set to occur up to 24 hours before the shift start time. The process can be initiated manually or configured to run automatically in the background using the Task Scheduler at user-defined intervals.
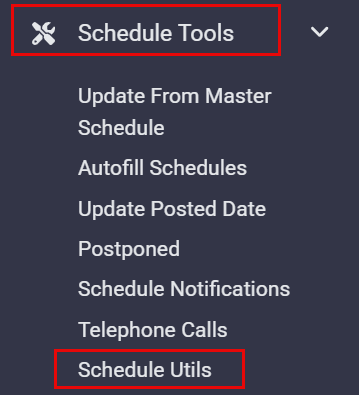
▪Select the Schedule Tools menu. ▪Select the Schedule Utils menu.
The following menu will appear:
The example above shows a process configured to run for the next day’s date, notifying employees eight (8) hours before their shift begins.
When the task runs, it sends a Shift Starting Soon notification for any shift within the hours threshold that hasn’t already received one. If a shift was notified in a previous run, it will not be notified again.
|
See Also: