

Mass Messaging Personnel Configuration |

|

|

|
|
Mass Messaging Personnel Configuration |
|
|

|
Mass Messaging Personnel Configuration |
|
|
|
|
Mass Messaging Personnel Configuration |
|
|
|
Before starting with Mass Messaging, the employees need to be setup to receive either text messages or phone calls.
Employees will be required to add their mobile numbers and provide permission to receive notifications.
They also have the option of defining Do Not Disturb time periods for when they do not receive notifications.
▪Select the Personnel menu.
▪Select Notifications.
▪Select the Mass Messaging tab.

The following menu will appear. For configuring Mass Messaging, we will only use the Mass Messaging tab.
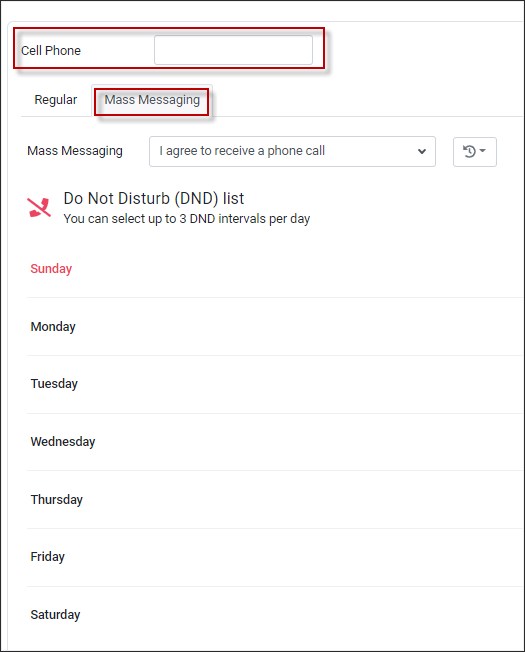
Mobile Number
Employees must enter their cell phone numbers in the appropriate box as shown.
The system will allow multiple formats:
![]()
(416) 555-5555
(416) 555 5555
416-555-5555
416 555 5555
4165555555
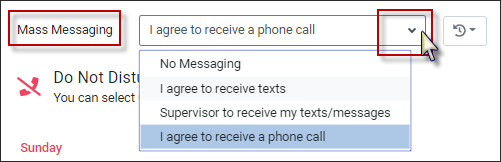
Permission
The permission options define how the employee will be (or will not be) contacted by the Mass Messaging system.
If the employee would like their supervisor to receive the text messages be sure that the Scheduler feature has been configured. (Please contact your StaffScheduleCare Client Care Team to have this set up for you.)
▪Click on the drop-down arrow in the Mass Messaging window and select the appropriate permission.
▪Click Save at the bottom of the screen.
Do Not Disturb
Employees can then define the day(s) of the week as well as the time period(s) for each day that they do not wish to be disturbed.
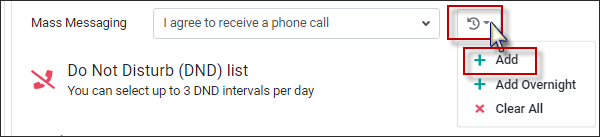
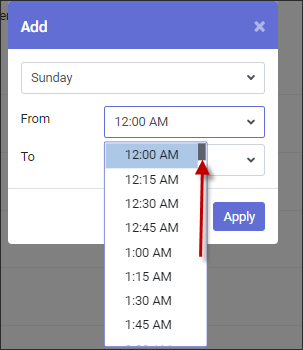
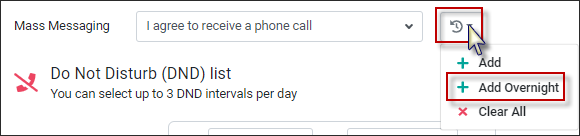
▪Click on the Actions icon and select Add from the drop-down list.
▪Click on the drop-down arrow and the applicable day of the week.
▪Click in the From / To windows, select the From and To times.
▪Use the scroll bar to move up/down the time list.
▪Click Apply.
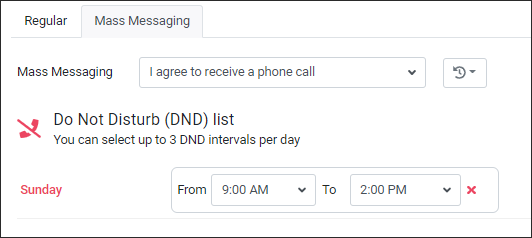
When done entering all DND time periods click Save at the bottom of the screen.
.
Up to three entries can be done for each day.
Once you click Save, the screen will refresh with the DND you entered.
In this example the DND period is for Sunday, from 9:00am to 2:00pm.
To set up an overnight DND time period.
▪Click on the Actions icon and select Add Overnight.
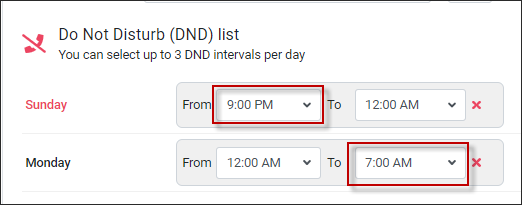
In this example we are going to setup a DND period from Sunday at 9:00pm to Monday at 7:00am.
▪Select the Start Day.
▪Select the From (to start on Sunday)
▪Select the To time (to end on Monday)
▪Click Apply.

The period will be divided into two blocks.
Sunday from 9:00pm to 12:00am (Midnight) and Monday from 12:00am (Midnight) to 7:00am.
Alternate Method to Add DND Periods.
DND periods can also be added by clicking on the week day.
▪Click on the day of the week to add the DND.
A DND template is opened. Populate the template using the drop-down arrows to select times.

This method can be repeated up to three times per day.

Clear DND Periods
▪On the Actions icon and click Clear All or Click the red X to remove individual ones.
▪Click Save at the bottom of your screen.
