This section will describe how to submit, review and approve individual or multiple employee Time Cards.
Submit/Review/Approve - Individual Days
The Reviewed and Approved options are used to confirm that the data for the selected employee has been reviewed and/or approved by the manager. Use of these options also locks the data for the day so that it will not be modified during recalculation.
▪Select Time Card. ▪Select Hours.
The following menu will appear:
Time Card Status Icons These icons represent the different stages of approval. Once each step has been completed the corresponding icon will appear within the status column. The lock icon indicates that no changes may now be made unless you have the security access to do so.
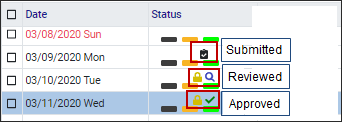
To approve/review an employee's time. ▪Select the correct row (date) by clicking on it to highlight. ▪Click the applicable (colour) button. The option and icon corresponding with each colour are shown below.
Black Submit Yellow Reviewed Green Approved Red Kicked back (configuration required)
In the example below, we have clicked on the Submit button.
The Submit icon now appears on the selected row.
Submit/Review/Approve for Multiple Days
You may also review and approve multiple dates at a time.
Selecting individual days
▪Click on the check box to the left of the rows you are reviewing / approving.
To Select All days
▪Click on the check box to the left of Date column.
Approving / Reviewing Multiple Days Selected
▪Click on the Action List icon in the top left toolbar.
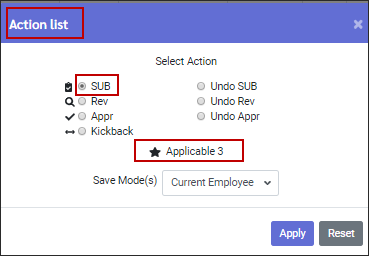
The following window will appear:
▪Select the desired function. Once the action has been selected the Application number will indicate the number this applies to. ▪Click Apply.
Submit/Review/Approve - Multiple Employees
You may also review and approve multiple employees at a time. This option can apply for single or multiple days.
▪Open the Employee Panel.
You must also include your current employee (shown in red) when selecting multiple employees or the system will skip this employee. Below we have selected our current employee (shown in red) as well as two additional employees.
On the Time Card menu, we have clicked in the check boxes of two days to Submit.
Select the Action List icon.
▪Click in the Save Mode(s) field to access the down arrow. ▪Click on Selected Employees. ▪Click on the action. In this example SUB has been selected.
A pop-up will confirm that the action will apply to 3 employees.
▪Click Yes to continue or No to go and review the selections.
The three employees selected are now successfully submitted for the two selected dates (J. Nachtegaal shown below).
|


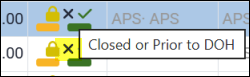
There are times when the status of a day needs to be changed. The ability to add and change statuses is based on your security access level configuration.
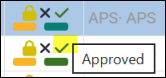
The example below displays each of the three different approval levels:
To undo any approval level, simply click on the applicable button again. In the example below, we have reversed the approval of May 8th: Notice the green check mark is now no longer visible allowing the data to be modified once again.
|


The audit trail provides you with an on-screen report of edits that have been made to the Time Card for the selected employee.
▪Select Time Card. ▪Select Hours.
To view the audit trail:
▪Select the date you wish to audit by clicking on it to highlight it. ▪Click on the Audit icon.
On Screen Audit
The audit trail window for the date May 11th appears.
The audit headings reflect the fields that were edited. The example above shows edits to the Punch, Hours, Hours OT, and Attendance fields. Each audit entry displays who made the change (manager or employee), the time of the edit, and what was modified. Click the arrow to expand a heading and view the detailed activity. Additional audit reporting is available under Admin Reports.
Trace Audit
The Trace feature allows further audits as required. Please see Time Card Options for additional information.
|


See Also: