The schedules are used to maintain the daily and weekly complement of shifts needed in your facility. The Master Schedule consists of lines created and assigned to the employees, which in turn are used to populate the Active and Daily schedules.
The Daily Schedule may be used to fill shifts that have become unfilled due to employee illness, vacation etc., or shifts that are part of your regular unfilled Master Schedule lines.
Shifts may be filled on the Daily Schedule either with or without using the Call In Mode option. The difference is in the way the system responds to your booking. With Call In Mode on, a window will appear with phone number(s) for the employees, and call response options (accept, decline, left message etc.) If you are not in Call In Mode, when you select an employee, the booking process is going to immediately assign them to the shift being filled.
▪Select the Schedules menu.
▪Select the Daily menu.

The Daily Schedule will appear:

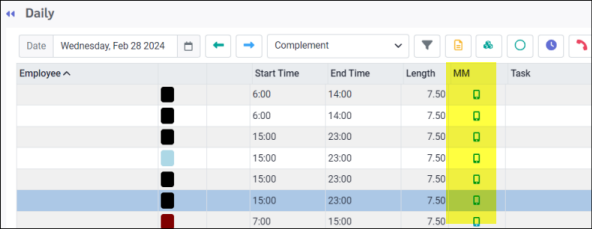
A Mass Messaging dispatch may also be initiated from the Daily Schedule by clicking the phone icon on the row containing the shift you would like to fill (below). |

Filling Shifts using Call In Mode
To activate, click on the Call In Mode icon located on the left side toolbar.

To keep Call In Mode active:

▪Select Options.
▪Select the Daily tab.
▪Tick on Use Call In Mode.
▪Click Apply.

Once activated, the Call In screen will be visible either underneath or beside the call-in list, depending on your configuration (also shown on screen capture above).

Fill shifts as follows:
1.Click on the unfilled line you need to fill to highlight it. We have selected an unfilled LPN line that is the result of a split shift, as shown below:

You will notice which shifts are unfilled by the blank Employee Name column, meaning no one is assigned to them. You may tick Show Unfilled Only (icon shown above) to filter to unfilled shifts only.
2.From your call-in list, select the employee you will be calling by clicking anywhere on the line to highlight it (blue). You will see the employee's phone number(s) appear as described above.
The Cell Phone and Other Phones fields may be edited directly from this menu.
▪Click on the Pencil icon.
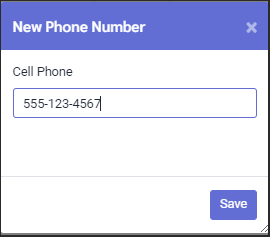
▪In the New Phone Number pop-up window enter the new number.
▪Click Save.
The menu will refresh with the new number displayed. This will also update the employee's profile information.

3.From the Response menu (predefined), select the employee's response.
4.Add a Note (optional).
5.Click Submit.

6.Click Yes to accept the confirmation message.

With standard configuration, any call response other than Accept or Decline, will put the employee on the Postponed List:

When employees are postponed, the call will be recorded on the Active Schedule with the phone icon as shown below. Hovering over the icon will display the comment.

An Accept response will book the employee to the shift and will appear on the Daily Schedule similar to shift shown below, including the manual icon (hand). The colour will be the same as the colour setting of the original unfilled shift.

Similarly, see the same accepted shift on the Active Schedule:

Filling Shifts without Call In Mode
Deactivate Call In Mode as follows:
▪Select Options.
▪Select the Daily tab.
▪Ensure Call In Mode is NOT ticked.

Follow the remaining steps described above for Call In Mode, but after selecting the employee to fill the shift, simply click Submit.

Click Yes to confirm your submission and the employee will be booked into the shift.

John Berg is now booked to the shift (below) and will appear on the Daily Schedule with the icon (hand) and colour selected for Manual Shifts.

The shift will appear as well on the Active Schedule:

See Also: