New employees may be entered into StaffScheduleCare using either the Personnel menu or the Employee Panel Actions option on multiple menus within the system, including the Personnel menu.
Example of adding an employee through Personnel.

Example of adding an employee through the Employee Panel Actions drop-down menu.

New employees may be entered into StaffScheduleCare using either the Personnel menu or the Employee Panel Actions option on multiple menus within the system, including the Personnel menu.
To use the Employee Panel to add new employees:
▪Open the Employee Panel. ▪Click on the Actions icon to open it. ▪Select Add Employee.
The system will provide the Add Employee template. Complete the fields in the template as required (described below).
You may also use the Actions menu on the employee header on the Personnel menu.
▪Select the Personnel menu.
▪Click on the Actions icon to open the drop-down list. ▪Select Add Employee.
▪Enter the employee's information.
▪Add all the employee's data. Drop-down menus will contain your facility’s pre-configured data where applicable. ▪If you miss any fields that have been configured as required fields, when you click save they will be outlined in red. ▪Click Save.
Optional Fields
Completion of these fields is optional. Use of them is dependent upon which fields have been configured as required fields in your system.
Holiday Group If you pay your employees holiday benefit time for non-worked hours, or your employees bank their earned holiday time when they work on a holiday then you must assign them to a holiday group.
Also, and equally as important, if your employees are paid differently for working on a holiday, for example the whole worked day will be overtime pay, the list of holidays associated with each group will let the system know when a day is to be considered a holiday, so this special type of pay is awarded. Holiday is a required field in the example above. Type Code This field may be used for additional Type (Full Time, Part Time, Casual, etc.) information.
Union Use this field if your facility is unionized. This field is mostly used for reporting. This field, while optional, is a critical field to define for systems configured to use supervisors. The supervisor configuration may be used to more specifically restrict access to only those employees assigned to each supervisor.
Security Access Group Assigns the employee to a security access group which determines their access rights if they use the Employee Self Service option of the system. This information can also be added through the login info section.
Adding an email address is optional but helpful if you are using the Employee Self Service / Manager Self Service options within the system. Should emails be included for employees, managers may acknowledge by email when a request has been processed. This field may be configured as a required field. When populated on the new employee template, it will also populate in the email field on the Login Info section.
If the employee's email address is provided and the employe notification option enabled, the system will send a welcome email to the employee that will include default login and password information. If your facility is using the two-factor authentication feature the employee's email address is required if they would like the verification code sent to them via email.
Adding Additional Information
Once an employee is added to your database, maintenance of their data is ongoing as personal information changes i.e., name change, address change, department, or class change, etc. There is specific data you MUST be sure to complete for new hires on the Terminals and Login Info Tabs.
Login Info Tab This is where you will designate the employee's login ID, password, and security access group for access to Employee Self Service (ESS). If this information has been entered as part of the template information, it appears here and does not need to be adjusted. If you will be utilizing the email notification feature of the software, the employee(s) will require an email address on their profile. If the email field was populated when you added the employee, it will also auto populate the email field on this menu.
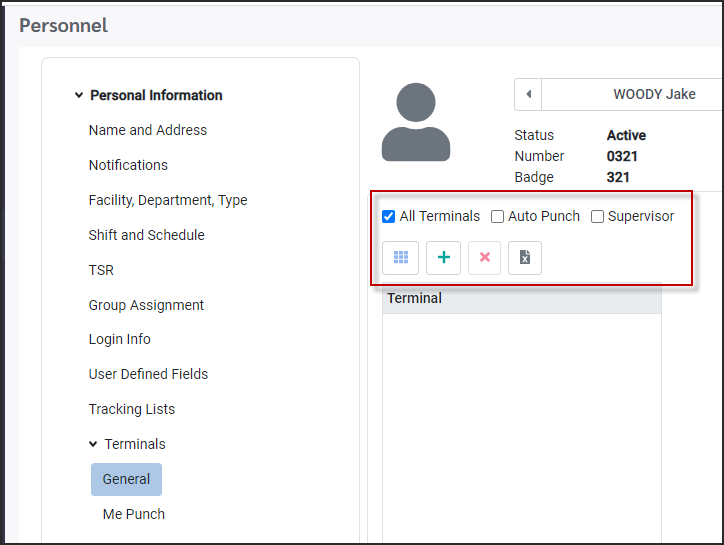
Terminals Tab / General Here you will designate which terminals, specific or all, an employee may have access to. You may click All Terminals, which means the employee may punch at any of the terminals in your facility. You may be specific by using the plus symbol (+) and tick only those terminals that you want them to use for in and out punches, e.g., the terminals closest to their work area.
Other Required Information
There may be other information unique to your facility that you must include such as:
1.The assignment of applicable Time Banks to the new employee to ensure that the employee’s bank is included in future updates. 2.The assignment of Skills, Units or Tasks to new employees if required for your Wizard configuration, so they appear available to accept unfilled shifts. 3.The assignment of Full Time Equivalency hours per day, if applicable for certain Time Banks or Holiday Updates settings.
|


An existing employee's information is modified from the Personnel menu.
▪Select the Personnel menu. ▪Navigate to the employee you wish to modify by using the Employee Panel.
Modify Employee Number, Badge Number or Status ▪Click on the Actions icon and select Modify Employee.
The following pop-up menu will appear.
Modify General Information
▪Select the option you wish to edit along the left side panel of the Personnel screen. ▪Expand the main option by clicking on the arrows shown below (both an expanded and a collapsed area are displayed).
▪Edit your data as required. ▪Click Save. To undo your changes click Refresh.
|


The employee Personnel menu can store photos of your employees.
▪Photos should be in a centrally located (accessible) folder. ▪The photo size will compress during the upload, but if it is too large the system will present a warning advising you of the maximum size you may use.
Follow these instructions to upload photos:
▪In the Personnel header click on the Upload Photo icon.
The navigation pane will appear.
▪Path yourself to the folder that contains your employees' photos. ▪In this image it’s Desktop / Employee Photos
.
▪To select the photo, double click on the file name OR click on the file name and select Open. The photo will now appear as shown:
|


We recommend that you change the status of employees as described in this section instead of deleting employees. Please see the Key Information box below for further details and recommendation on deleting employees.
▪Select the Personnel menu.
▪Click on the Actions icon and select the Delete Employee.
▪The system will pop-up a warning. Click Yes to proceed.
Next the system will display the alteration menu for status changes relating to scheduling. Please see instructions further down.
Once deleted by the manager, the system will present a Deleted and inactive employee status. Use your filter to include inactive employees (below).
Search for your deleted employee to see the new status.
Changing an Employee's Status
Please note that both alternation menus shown above will also appear when you attempt to change the status of an employee.To modify the employee's status (badge, or number), click the Actions icon and Modify Employee.
The following screen will appear. Select the employee's new Status from the drop-down options.
Selecting a Status that ends the employee's employment will enable the Termination Date field.The system will default the Termination Date to the current date. If you would like to enter a date other that the current system date, click in the date field and select a new date using the calendar.
The alteration menu will appear:
Alteration Menu Options
Whether you delete the employee (see warning above) or change the employee's status, there are several schedule alteration options available to you which will appear on the alteration pop-up menu prior to saving your changes. Please see a description of these options below.
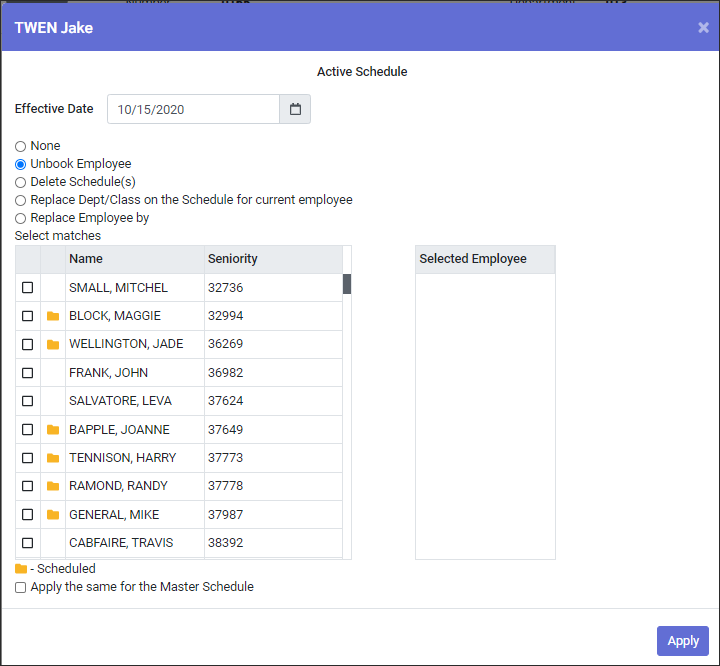
Effective Date This option allows you to select a date in the future for certain changes to take effect.
Schedule Options Once the employee's status is changed, you may choose to do nothing to this employee’s schedule, to show the employee as unbooked for the scheduled days, to delete this employee's schedules, or replace the scheduled shifts with another employee.
Master Schedule You may apply the options you selected to the Master Schedule as well by ticking the box at the bottom of this screen. If you do not tick this box, a separate pop-up will appear for the Master Schedule allowing you to select different options for this schedule as required.
Other Employee Modifications and the Alteration Menu
There are several other employee modifications that will trigger the alteration menu, as shown below:
Notes About the Alteration Screen
▪If an employee's status changes, normally the employee will no longer be working for the facility and therefore the option shown below will be greyed out. This option regarding current schedules applies to modifications to employees who are still working and will replace the Active Schedule with the requested modification. For example, if the employee is changing class, the new class will now appear on the Active Schedule. The Effective Date option may also be used in this case where the changes to the schedules will only apply from the effective date forward. Please note that the tick box Apply the same for the Master Schedule is not effective in this case.
▪The alteration menu will not appear if there are no Active Schedules for the employee. The modification will still take place, but the Active Schedules will appear as shown below. In this example the modification was made after the 15th and this employee's schedules for that period were not updated. The next Update From Master will cause this employee's schedules to appear as unfilled on the Daily Schedule although the employee will still appear as assigned to the Master Schedule line.
TSR Status Changes and the Alteration Screen
If an employee is booked to another employee's shifts using the TSR (Temporary Shift Replacement), the following options will be disabled on the Alteration Screen when changing the employee's status:
If you select Replace Employee by (above), the new employee you select will replace this employee on the Active and Daily Schedules. Please note that the employee whose status has changed WILL be replaced on the TSR list.
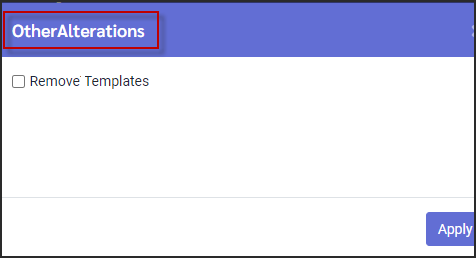
The third alteration menu will be the Remove Templates window.
▪Click on the check box beside Remove Templates. If left unticked (off) the employee templates will remain in the system. ▪Click Apply
|


You may remove an employee from a Master Schedule line by directly from the Shift and Schedule menu. Click the X on the Schedule Line window. This will remove the existing line from this employee.
The alteration menu will pop-up. Select the option Unbook Employee. The employee will be unbooked from the Active Schedule based on the date defined on the alteration window. The unfilled shift(s) will appear on the Daily Schedule. The employee will be removed from the Master Schedule line.
Changing an employee’s status, facility, department, or type will continue to open the two-window alteration process. |

 .
.To find out if a social insurance number is already in the system you may use the Validate SIN feature. The search is done against both the active and inactive employees. The search result will provide the employee name and number to help identify the employees.
Click on the Employee Profile Actions icon. From the drop-down list select Validate SIN.
To close the search window, click on the X in the top right hand corner.
In the SIN field, enter the SIN number. This field is case sensitive. Example: search ABC will include abc in the results. To close the search window, click on the X in the top right hand corner.
If the resulting search does not find any employees, the window will display “No Employee Found”.
|


See Also: