The Active Staff Requirements menu provides a broad view of the schedule requirements (complements) compared to the booked schedules, clearly displaying any schedule gaps. From this menu the scheduler may book or unbook employees to fill the requirements where needed.
You may configure this menu to compare to either the Master Schedule complements (default) or the Active Schedule complements.
The Census complements may also be selected. If the Census component of scheduling is enabled, the system will default to Census instead of the Master Schedule.
The term Complements in StaffScheduleCare refers to the required shift information (required fields) you see on your Master & Active schedules. The complement information would typically be department, class and Day Code (shift), but may be configured to include Facility, Position, Unit, or Task. |
▪Select the Schedules menu. ▪Select Active Staff Requirements.
The following menu will appear:
▪Click on the Options menu ▪Select the Active Staff tab. The following menu will appear:
Based on Active Schedule Ticked The total number of shifts required and filled is based on the Active and Daily schedules. This will include manually added shifts. The required shift number is based on the Daily Schedule shift count and the actual number is based on the number of employees currently scheduled.
Not Ticked The default setting applies i.e. the total number of shifts is based on the Master Schedule requirements. This will not include any manually added shifts. The actual number is based on the number of employees currently scheduled.
Based on Complements Ticked The Group By drop down menu on the Active Staff Requirements menu will only show mandatory complements (see above for description of complements).
Not Ticked The Group By drop down menu on the Active Staff Requirements menu will show all complements (see above for description of complements).
Group by Complements Ticked The Active Staff Requirements grid will merge all shifts that share the same mandatory complement into one row, even if the non-mandatory complements are different. For example if the mandatory complements (shift requirements) are Department, Class and Day Code (shift), and unit is also used but not mandatory, the grid will show all shifts with the same Department, Class and Day Code in one row, even if all the Units are different.
Not Ticked The Active Staff Requirements grid will show all shifts with unique complements in their own row. For example if the mandatory complements (shift requirements) are Department, Class and Day Code (shift) and unit is also used but not mandatory, the grid will show all shifts with the same Department, Class and Day Code in one row but if the Unit is different, it will be on a separate row.
Choose Colour to Display Select the colour you wish to use to display under-booked, over-booked and correctly booked schedules, on the Active Staff Requirements grid.
Click Apply to save all your settings.
|


Active Staff Requirement Menu
▪Select the Schedules menu. ▪Select the Active Staff Requirements menu.
This will open the Active Staff Requirements menu.
▪Use the Date/Calendar field to select the start date for viewing schedules. The arrows will move the start date ahead or back based on the time frame option selected (one week above), which determines how far out the schedule view will be.
Group by Levels The Group option (green blocks) is used to define the sorting levels displayed on this menu to a maximum of four levels. If the configuration Based on Complement is enabled, and there are three complements configured, you will be restricted to only these grouping options.
In the example below, the Group by Levels are set to three. Group 1 (first level) is set to Department. Group 2 (2nd level), is set to Class. Group 3 (3rd level) is set to Day Code. The Grouping is now done by Department, Class and the Day Code. ▪Click on the Group icon (green blocks). ▪Click in the Group by Levels field and the number of levels you would like to display. ▪Click on the drop-down arrow of each group and select the complement you would like to use. ▪Click Apply.
The system will display the shift count as the Required number and what is booked on the Active Schedule or Master Schedule (depending on configuration) as the Actual number. ▪Shifts in red are under staffed ▪Shifts in green are meet the staffing requirement ▪Shifts in blue are over staffed
If a grouping level has shifts without the grouping level populated, the system labels those shifts as Undefined. In this example the grouping levels are by Department and Task. In Department 13 there are shifts without a task assigned. The system shows these as Undefined.
|


Booking Shifts when Under Scheduled
The system will validate all schedule rules when scheduling from the Active Staff Requirements menu.
▪Click on the shift to highlight it blue. The shift highlighted below is an under-booked shift. ▪Click on the Actions icon to open the drop-down menu. ▪Click Book Schedule(s). This will bring up the Employee Panel window.
Use the filter option to show only employees who are in the department and/or class matching the unfilled shift requirements.
▪Click in the check box beside the employee's name to select. ▪You may double click on the employee or click Apply to make the selection.
The Actual amount has now increased by one, compared to the shift highlighted blue above.
The shift is now on the employee's Active Schedule. The Hand icon indicates the shift was manually added. Using the Active Staff Requirements does not notify the employee. It is up to the employees to check their schedules.
|


Selecting Multiple Shifts for Booking Option Only
Selecting Individual Shifts To select individual shifts, hold down the CTRL key then click on the individual shifts.
Selecting Shifts in Sequence To select individual shifts, hold the SHFT key, click the first shift and drag to the last shift.
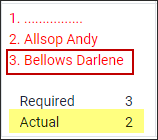
Unbooking Overage
Unbooking over booked shifts may be done from this menu.In the example below the shift only requires three employees but four are booked. Eric Winters will be unbooked.
▪Click on the shift to highlight it. ▪Click on the Actions icon and select Unbook Schedule(s).
▪On the Unbook Schedule(s) window select the employee(s) to be unbooked by clicking in the check box beside their name(s). ▪Click Submit.
Employee Eric Winters has now been removed and the Actual amount reduced by one. The schedule is now green, indicating that it is correctly booked.
Modify Existing Shifts
▪Click on the day you would like to modify. ▪Click on the Actions icon and select Modify Schedule(s).
You can edit the fields by doubling clicking in them or by selecting the desired option from the drop-down list as shown.
Adding New Shifts
To add a new shift, you may use the Modify Schedule(s) option.
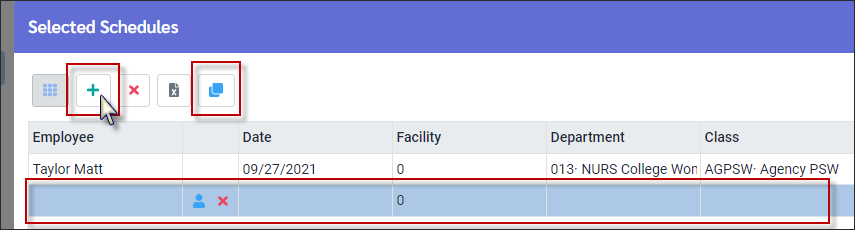
▪Click on a shift and select Modify Schedule(s) from the Actions drop-down list. ▪In the Selected Schedules window, click on the plus symbol (+) to add a shift. ▪Similarly you may click on the Clone icon to copy the shift in focus.
The new line will appear at the bottom of the grid.
▪Click on the Employee icon to open the Employee Panel and select the employee to book into the shift. Use the X icon to delete a selected employee.
Populate the details for the shift. You may select any date, department, class, position etc. In our example the new shift is a new complement. We are creating a new shift for the class APSW for September 28th.
▪Click Save.
If the new shift is part of a complement that didn't exist previously, you must leave Active Staff Requirement and return before the complement option appears on the list on the left.
Our new shift is now showing on September 28.
|