The government of Canada requires a Record of Employment (ROE) be issued when there is an interruption of earnings.
The StaffScheduleCare payroll system can create the ROE and provide a digital file to upload to Service Canada.
Issuing an Employee ROE
Whenever an employee's earnings stop the ROE must be issued or for an employee who wishes to receive EI (employment insurance) while on a leave of absence. Making an employee active in StaffScheduleCare will not remove the terminated status in Payment Evolution. It is a two-step process.
▪Log into Payment Evolution and select the Employees menu.
▪Find the employee using the Search / Find option at the top of the list. Select the Terminate icon on the far right.

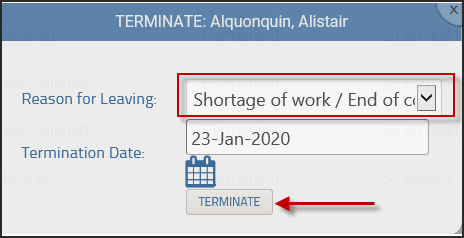
▪When you have selected the Terminate icon, a pop-up menu will appear. Select the reason for the ROE.
▪Using the drop-down menu you can select your reason. If it’s because of a leave, select Leave of Absence. Change the date (if not present day) to the date of termination.
▪Select the Terminate button at the bottom.

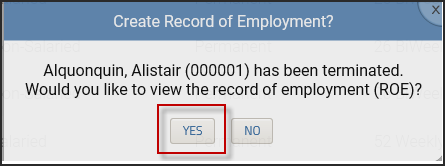
After you click the Terminate button you will get the Create Record of Employment pop-up menu.
▪Select Yes to view the ROE.
.
▪After you click Yes you will be directed to the employee’s ROE. Scroll through and verify that the correct number of pay periods have been entered.
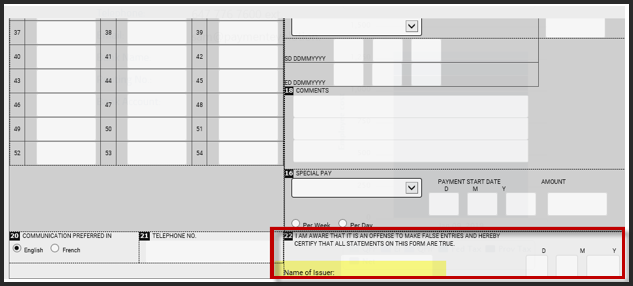
▪At the bottom of the ROE you will fill in your name (Name of Issuer) and the date of issuing the ROE.

▪Scroll to the top of the ROE and select Validate and Save. This will update the ROE with the information you have entered (name and date). After you have validated and saved, an option to Download will appear.
▪Click this to download for the digital file you will use to upload to Service Canada. A digital copy is kept in Payment Evolution. A copy of the file may be saved as required.

The ROE is complete. If a hard copy if required select the Print icon. When / if employees return to work, they will need to be rehired. This will avoid any conflicts when they return and continue with their regular pay.
Rehire An Employee
▪Click the Employee menu on the top right.
▪Select the Terminated option for employees.

▪Find your terminated employee and click the Rehire icon on the right.

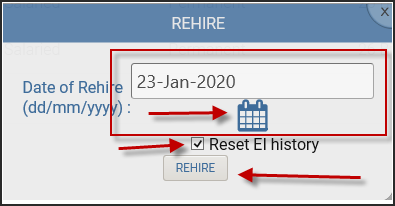
Once you click Rehire, a pop-up menu will appear to enter the date of return. If unknown enter the next day after the date of termination.
If Reset EI history is checked (see below) this will reset the EI amount for the year. When the employee returns it will start over. For accurate EI records make sure this box is checked on.
▪Once you’ve selected your dates click Rehire.

The employee has now been successfully rehired and will continue accumulating year-to-date data when they return.