Departments are used to define areas in which employees are designated to work in.
To access:
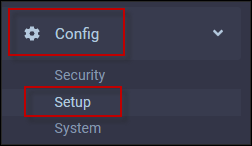
▪Select the Config menu.
▪Select the Setup menu.
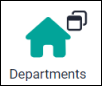
Select Departments.

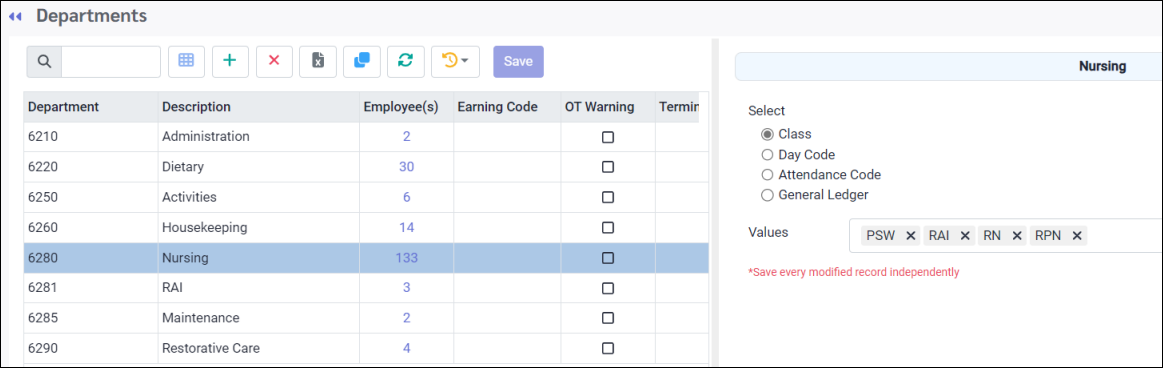
Left Side Section
Create a department:

▪Click on the plus symbol (+) or clone an existing, similar department using the Clone icon. A new line will appear at the bottom of the grid.
▪Enter the six (6) character code.
▪Enter a description.
▪Complete the remaining fields as required. See descriptions below.
▪Click Save.
Earning Code
This field is used in conjunction with certain payroll interfaces.
OT Warning
This field is used in conjunction with the schedule module to warn you when overtime is being scheduled. If you would like the system to prompt you when overtime is being scheduled, select the check box.
Supervisor
This field allows you to assign a specific supervisor to the department. You must create your supervisor list before you can assign them to this field.
UDF
Complete this field with the department description to be used on the Daily 1-on-1 Report.
Select options
This section allows you to associate the department with specific Classes, Day Codes, and Attendance Codes. You may assign these fields to multiple departments.
The settings on this menu are linked to your manager security access configuration. For example, if you have been granted access to the nursing department, you may also have access to all the classes that have been associated with this department.
To assign these fields:
Click in the circle beside the field you would like to associate with the department.
▪Click on the drop-down arrow.
▪From the drop-down list make your selections.
▪If the department should have access to ALL options on the drop-down list, you may click on check mark to select ALL.
▪Click on Save.
Repeat to add all the fields to be associated with the department.