To install, enroll either facial recognition or biometric, follow the instructions provided below.
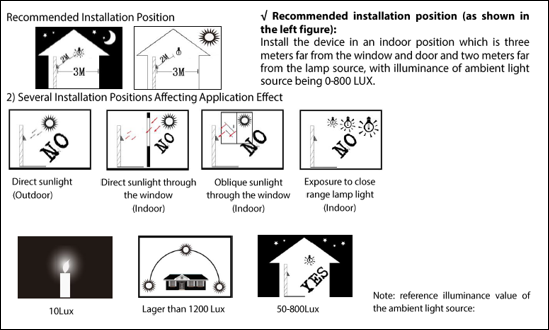
Clocks should be installed for the average employee height. (1.1m 110cm from ground. Min. 1.5m 150cm from the closest wall). Use the measuring template and Mounting Paper provided as your guideline. Install clock in a dry, bright area (natural sunlight or ambient light provides more consistent results).
|
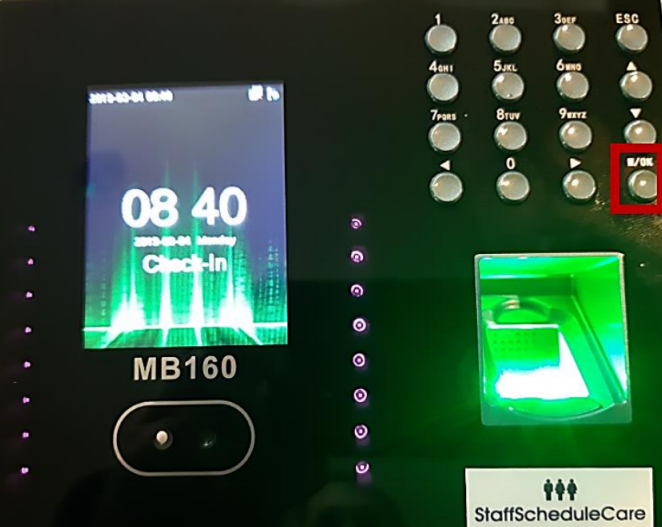
1.Press the M/OK key.
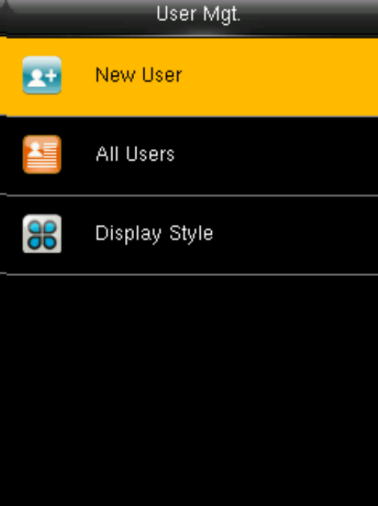
2. Verify that User Mgt. is selected and press M/OK .
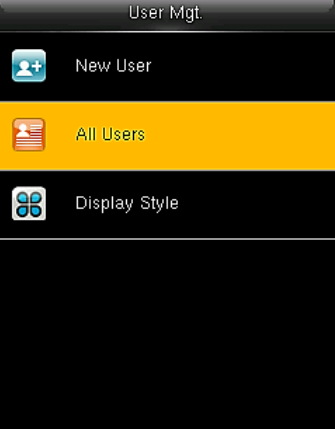
3. Verify that New User is selected and press M/OK .
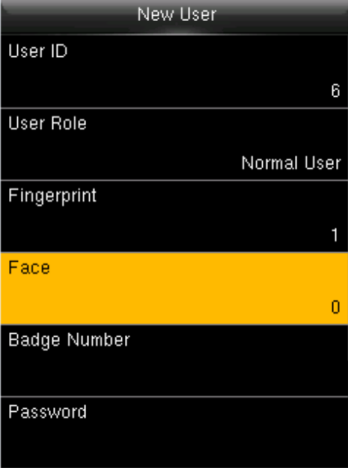
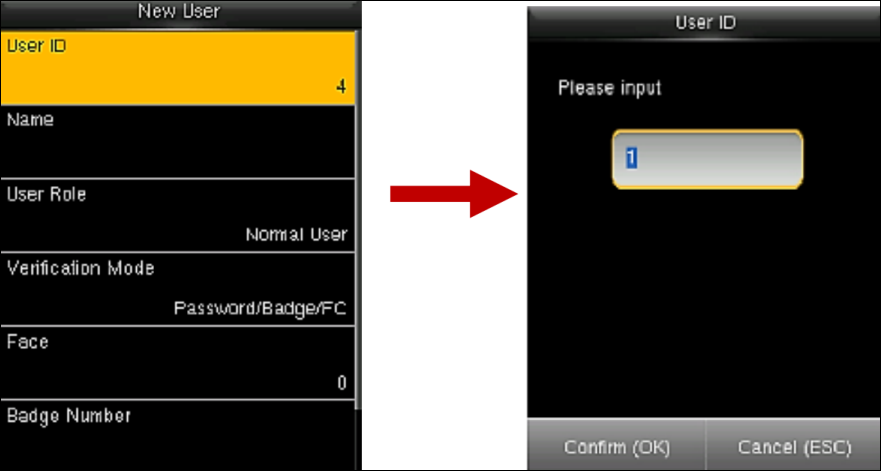
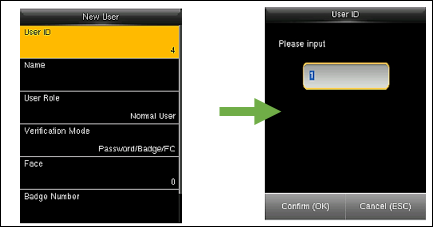
4. Verify that User ID is selected and press M/OK , enter the employee’s number and press OK.
5. Press the down arrow (5 times) until Face is selected and press M/OK .
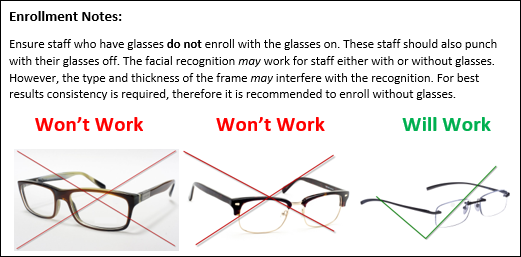
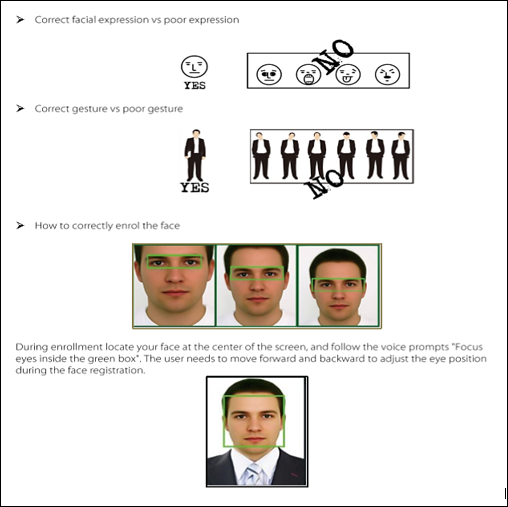
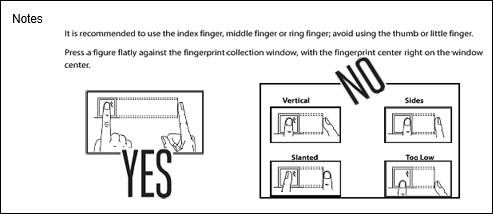
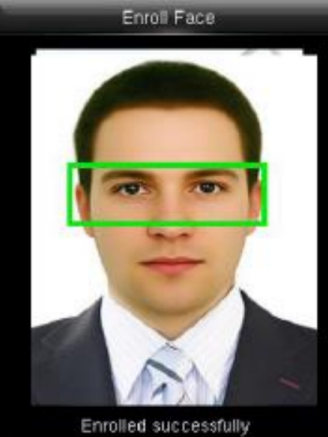
6. The scanner will prompt the employee to focus eyes inside green box. After a few seconds the green box will move and the employee will have to reposition. Please follow the guidelines listed under notes below for best results. Once the face is successfully enrolled a prompt will read enrollment successful and you will hear,“Thank You”.
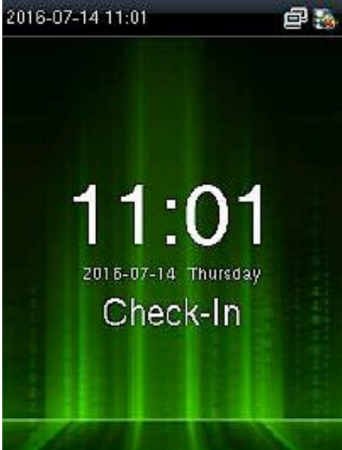
7. Press the ESC button (3 times) until you reach the check-in screen. Have employees test their scans by positioning their faces inside the green box. You will hear a “Thank You” message if the scan was successful. We recommended that you test the enrollment 6-10 times to insure a good template).
|


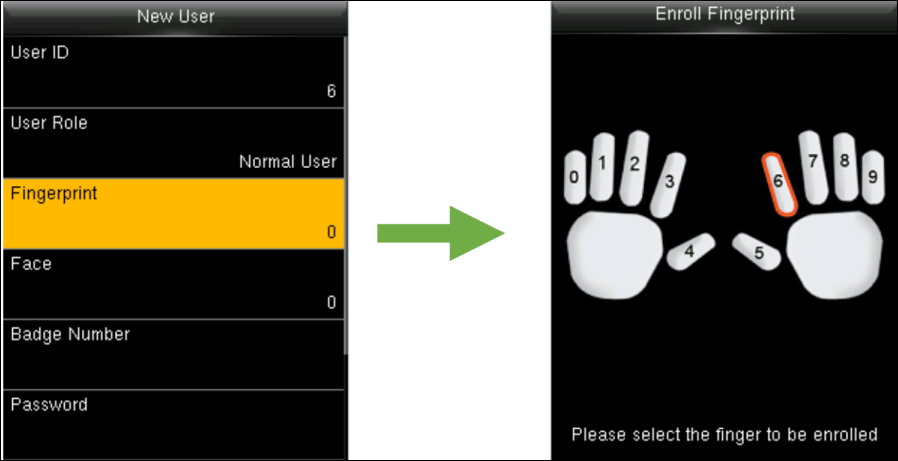
1. Press the M/OK key.
2. Verify that User Mgt. is selected and press M/OK .
3. Verify that New User is selected and press M/OK.
4. Verify that User ID is selected and press M/OK , enter the employee’s number and press OK.
5. Press the down arrow (4 times) until Fingerprint is selected and press M/OK. Then select the finger which the user wishes to enroll. This should default to the right index finger (6) and press M/OK.
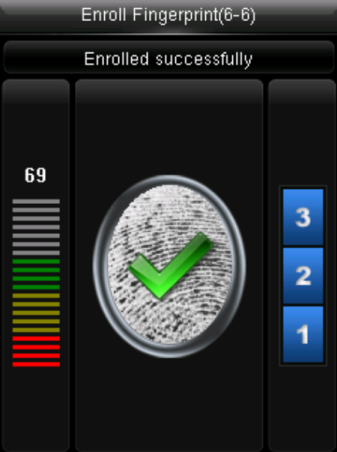
6. The scanner will prompt employees to place their finger on the sensor three times. After each successful verification the scanner will beep and allow employees to lift their finger then place it on the scanner again. After three scans of the finger, when the finger has been successfully enrolled the screen will display a check mark.
7. Press the ESC button (3 times) until you reach the check-in screen. Have employees test their scan by placing their finger on the sensor. You will hear a Thank You message if the scan was successful.
|


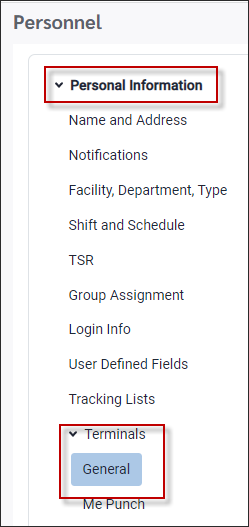
First, Log in to StaffScheduleCare and navigate to the Personnel menu.
▪Select the employee you would like to setup as a Super User (able to access clock menus). ▪Under Personal Information expand the Terminals section and click General.
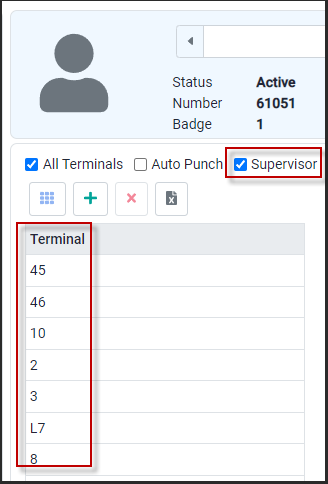
▪Click on the Supervisor check box.
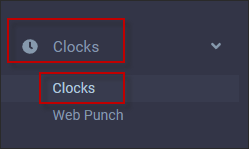
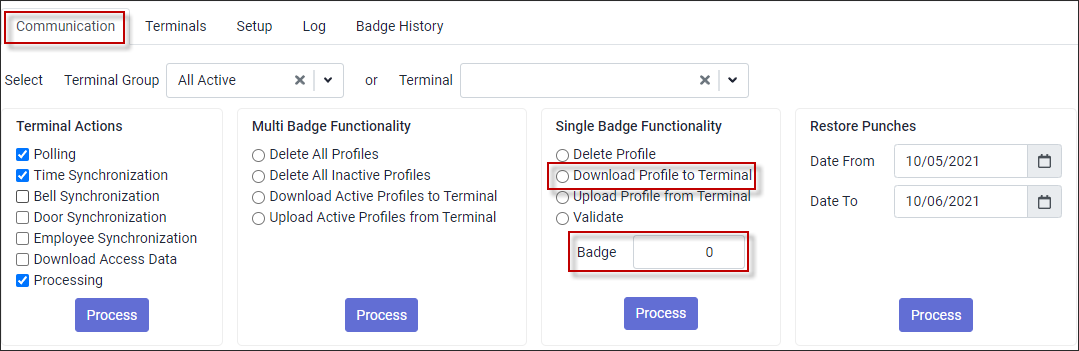
Once the Profile settings are complete, you need to update the clocks. ▪Select the Clocks menu. ▪Select Clocks.
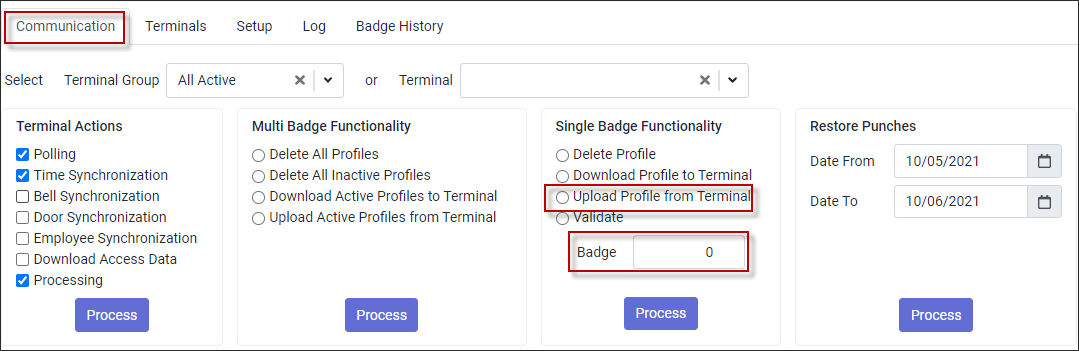
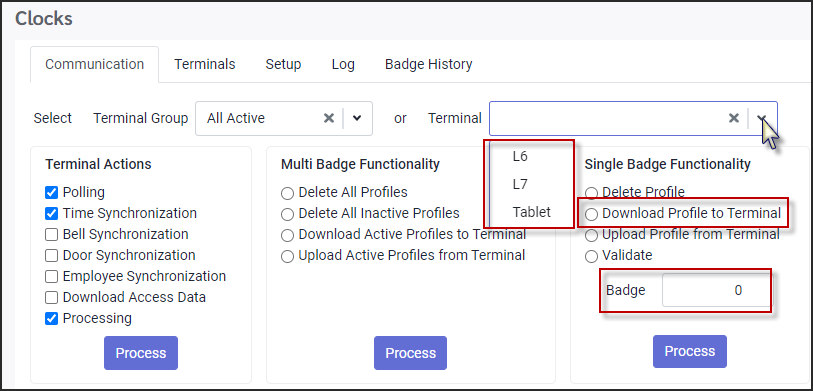
In the Single Badge Functionality section: ▪Tick on Download Profile to Terminal. ▪Enter the Badge # for the employee you set as a super user. ▪Click the Process button. ▪Repeat these steps for any additional supervisors.
If restricting clock menu access, it is suggested to enroll a minimum of 2 super users per clock to avoid lockouts. |
First, Log into StaffScheduleCare and navigate to the Personnel menu. ▪Select the employee you would like to set up as a Super User (able to access clock menus). ▪Under Personal Information expand the Terminals section and click General.
▪Select the employee you would like to remove as a Super User. ▪Tick the Supervisor check box to remove the check mark.
Once the profile settings are complete you need to update the clocks by downloading the changed profile. ▪Select the Clocks menu. ▪Select Clocks.
In the Single Badge Functionality section:
▪Select Download Profile to Terminal. ▪Enter the Badge # for the employee you set as Super User. ▪Click the Process button. ▪Repeat this step for any additional supervisors.
|
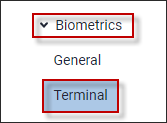
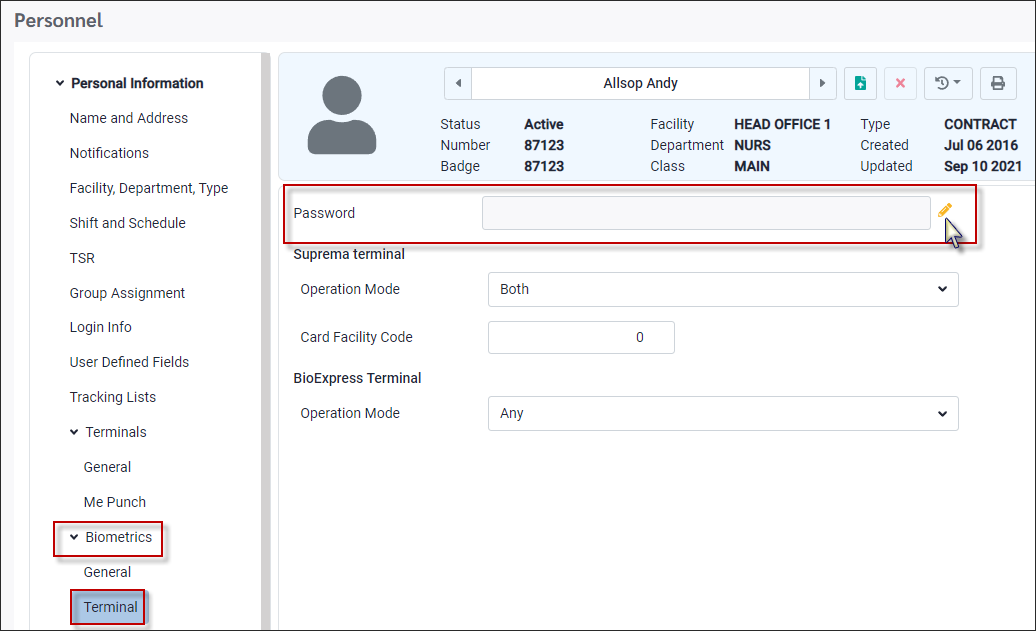
Log into StaffScheduleCare and navigate to the Personnel menu. ▪Select the employee you would like to set up as bio-impaired. ▪Select the Biometrics menu. ▪Select General.
▪On the Biometrics / General tab tick the Bio Impaired button.
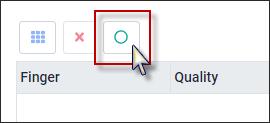
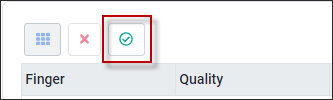
The check mark in the circle indicates the feature is active.
▪Click Save. ▪Move to the Biometrics / Terminal tab.
▪Click on the Pencil icon to open the Confirm New Password window. ▪Enter the PIN number in the Password field (must be numeric). ▪Click Save.
Once the profile settings are complete you need to update the clocks. ▪In the Single Badge Functionality section select Download Profile to Terminal. ▪Enter the Badge # for the employee you set a PIN for. ▪Click the Process button. ▪Repeat this step for all bio-impaired badge numbers.
Once Bio-Impaired is checked for an employee on the Biometrics menu, the software will only sync the PIN number with the clocks. If finger or facial recognition is desired in addition to PIN these must be set up first.
|

Log into StaffScheduleCare and navigate to the Personnel menu. ▪Select the employee you would like to remove the pin for. ▪Select the Biometrics menu. ▪Select General.
▪Click on the Bio Impaired button and remove the check mark.
▪Click Save.
|
1. Press the M/OK key.
2. Verify that User Mgt. is selected and press M/OK.
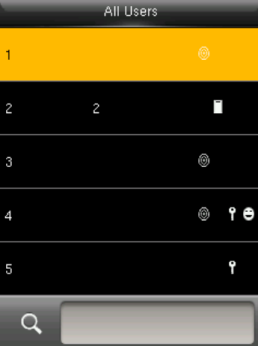
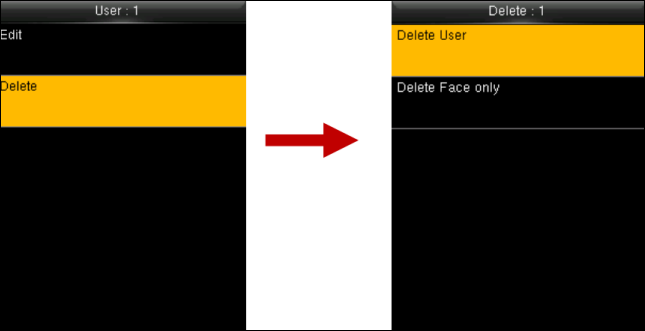
3. Push down and verify that All Users is selected and press M/OK.
4. Push down until you have highlighted the user you would like to re-enroll and press M/OK.
5. Press down to select Delete and push M/OK. Ensure Delete User is selected and press M/OK. Press up and ensure OK is selected, then press M/OK.
6. Press ESC to return to the User Mgt. menu, then push up and ensure New User is selected and press M/OK.
7. Verify that User ID is selected and press M/OK, enter the employee’s number and press OK.
8. Press the down arrow (5 times) until Face is selected and press M/OK.
9. The scanner will prompt the employee to focus eyes inside green box. After a few seconds the green box will move and the employee will have to reposition. Please follow the guidelines listed under notes below for best results. Once the face is successfully enrolled a prompt will read enrollment successful and you will hear,“Thank You”.
10. Press the ESC button (3 times) until you reach the check-in screen. Have the employee test their scan by positioning their face inside the green box. You will hear "Thank You" if the scan was successful. We recommended you test the enrollment 6-10 times to ensure a good template.
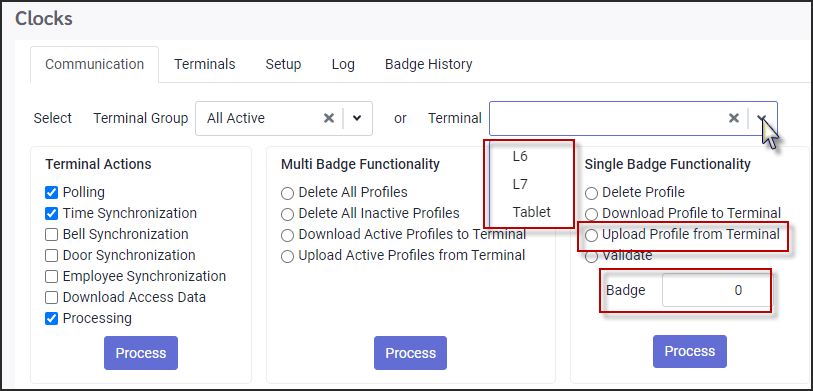
11. Log into StaffScheduleCare and access the clocks menu from the Welcome menu. Select Clocks / Clocks. Ensure that the terminal used for the enrollment is selected. Select Upload Profile from Terminal. Enter the employee’s badge number and click Process. This will bring the re-enrolled template from the clock to the software.
12. To fully sync the template with the software, the profile will now have to be downloaded to each clock that the employee will be punching from today.
Note: there is an automatic process that will perform this sync nightly. To download the template to a clock first, select the terminal the template should be downloaded to.
Select Download Profile to Terminal. Enter the employee’s badge number and click Process. This will sync the employee’s template and other information to the clock.
|

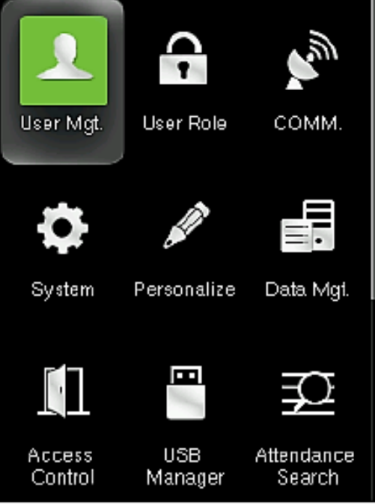


1.Press the M/OK key.
2. Verify that User Mgt. is selected and press M/OK.
3. Push down and verify that All Users is selected and press M/OK.
4. Push down until you have highlighted the user you would like to re-enroll and press M/OK.
5. Press down to select Delete and push M/OK. Ensure Delete User is selected and press M/OK. Press up and ensure OK is selected the press M/OK.
6. Press ESC to return to the User Mgt. menu then push up and ensure New User is selected and press M/OK.
7. Verify that User ID is selected and press M/OK. Enter the employee’s number and press OK.
8. Press the down arrow (4 times) until Fingerprint is selected and press M/OK. Then select the finger which the user wishes to enroll. This should default to the right index finger (6) and press M/OK.
9. The scanner will prompt employees to place their finger on the sensor three times. After each successful verification the scanner will beep and allow employees to lift their finger then place it on the scanner again. After three scans of the finger when the finger has been successfully enrolled the screen will display a check mark.
10. Press the ESC button (3 times) until you reach the check-in screen. Have the employee test the scan by placing finger on the sensor. You will hear a "thank you" message if the scan was successful.
11. Log into StaffScheduleCare and access the clocks menu. Select Clocks / Clocks. Select the terminal that the enrollment was performed on. Select Upload Profile from Terminal. Enter the employee’s badge number and click Process. This will bring the re-enrolled template from the clock to the software
12. To fully sync the template with the software, the profile will now have to be downloaded to each clock that the employee will be punching from today.
Note: there is an automatic process that will perform this sync nightly. To download the template to a clock first select the terminal which the template should be downloaded to. Select Download Profile to Terminal. Enter the employee’s badge number and click Process. This will sync the employee’s template and other information to the clock.
|


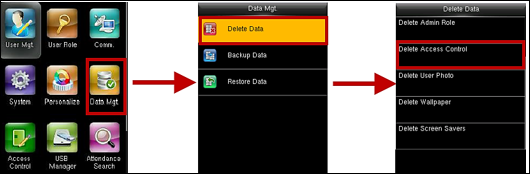
Invalid Time Period (small terminals only) Unlock the menus and select Data Mgt. / Delete Data / Delete Access Control. Alternatively, a download program and access data task may be set up to run daily.
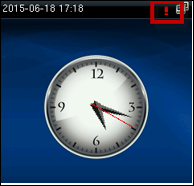
Red Exclamation Mark on Main Menu (small terminals only) This is an indication that the tamper detection switch on the back of the clock has become raised. Ensure the clock is securely attached to its backing, which should depress the tamper detection switch. Once the backing is securely in place, power cycle the clock. The red exclamation mark should disappear.
Illegal User Role / Access denied when accessing menus The user who is attempting to access the clock is not a super user. Ensure that the enrollment / Super User steps have been followed, and that the profile has been re-downloaded to the clock.
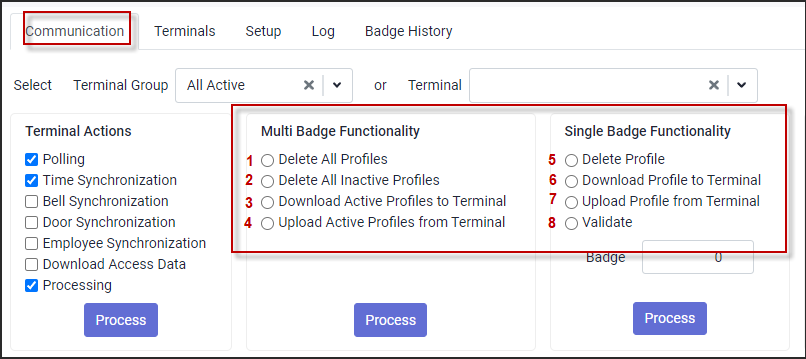
Single/Multi Badge Functions
1 - Used to remove all profiles and associated templates from the clock. 2 - Used to remove all inactive profiles (i.e., terminated employees) and associated templates from the clock. 3 - Used to push all profiles and associated templates from the database to the clock. 4 - Used to bring all templates from the clock to the software and associate the template with the corresponding badge number. 5 - Used to delete a specific profile from the clock. This can be useful when re-enrolling a bad template. 6 - Used to download a specific profile to the clock. This can be useful when enrolling new hires. 7 - Used to upload a specific profile to this clock. This can be used to bring a new hire’s template into the database after having been enrolled. 8 - Used to verify that a badge and associated template exist on a clock. This can be useful when dealing with errors while punching in/out relating to a single user.
|