Availability Overview & General Information
General Information
Employee Availability is used to define which shifts an employee can work. Employee availability requests may be made by the employee or by the manager on the employee's behalf.
Availability may be configured in the following ways:
1.Availability by Date
2.Availability by Week
3.Default Availability
Employees can submit their availability either through the employee self service or the mobile app.
Approving availability is an optional manager feature. If availability is not configured to require approval, the availability changes made by the employee will take immediate effect. If manager approval is required, changes to employee availability must be approved before they will take effect.
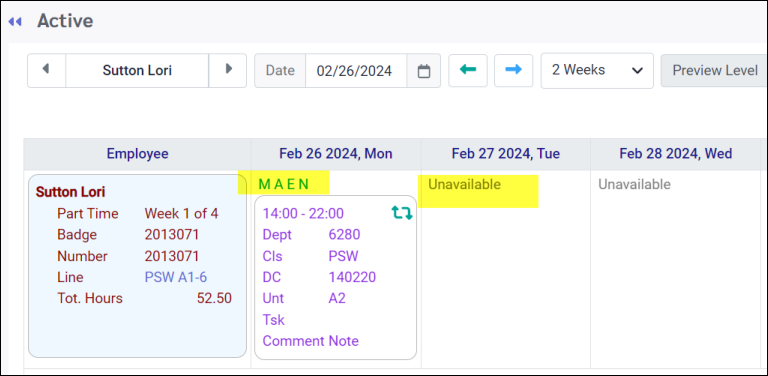
When defining Availability by Date or Availability by Week, employees or managers may apply different availability to each day of the week, i.e., a combination of Morning, Afternoon, Evening and Night (MAEN) shifts.
Availability Order of Priority
Where more than one type of availability is used, the order of priority of availability is as follows:
1.Default Availability is the lowest priority
2.Availability by Week overrides default availability
3.Availability by Date overrides Availability by Week and Default Availability.
4.Where there are multiple entries for the same date, the most recent date entry within the same type of availability takes precedence.
There are two ways Availability may be entered, through the Requests menu and through the Personnel menu.
New Request by Date
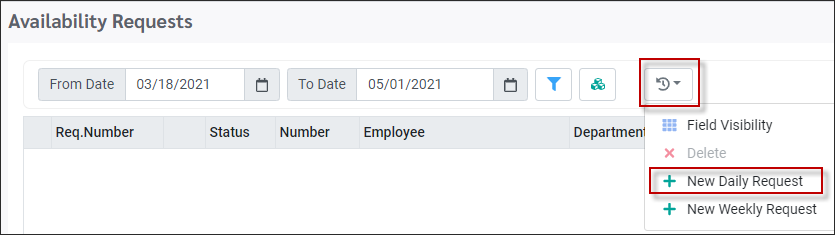
▪Select the Requests menu. ▪Select Availability Requests. This menu is used to define Availability and/or submit requests to change Availability.
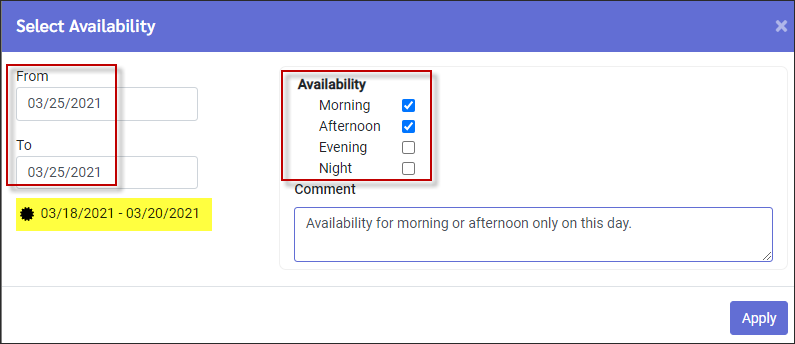
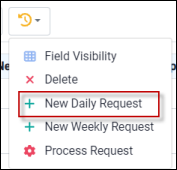
On the Availability Request menu select the Action drop-down menu and New Daily Request.
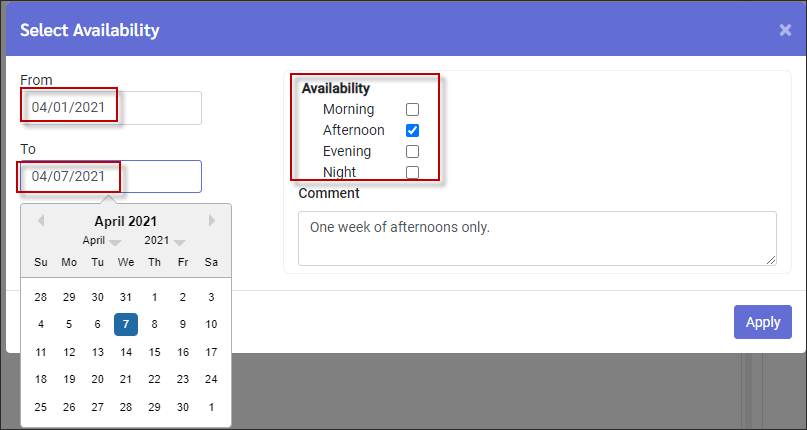
This menu allows availability to be defined for a single day:
▪Click in the date window to open the calendar. ▪For a single date selection, start with the From date. The To date will auto-populate with the same date. ▪Under the Availability section, tick the types of shifts you wish to be available for. More than one option can be selected. ▪Click Apply.
If your facility uses blackout periods, the date range will be indicated with a black asterisk (above). Once the changes are made, the new availability will appear on the employee's Active Schedule.
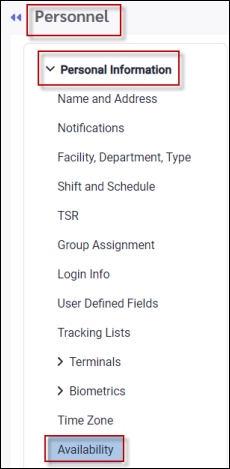
Availability by Calendar Date in Personnel
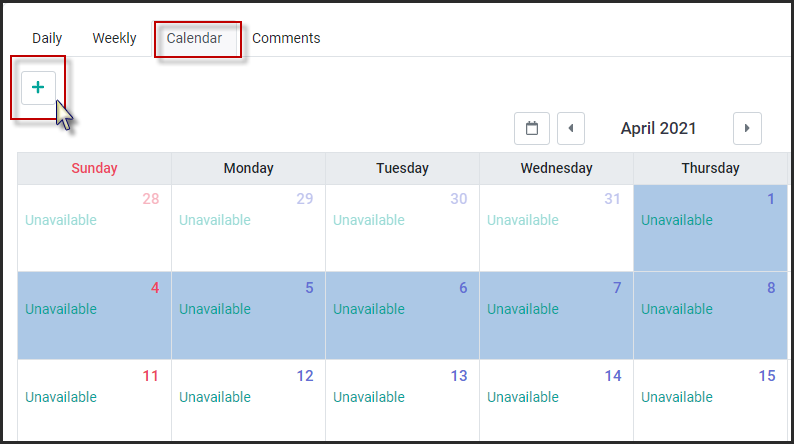
Employees may view their Availability by Date, and edit their Availability through Personnel / Personal Information / Availability.
▪Click on the Calendar tab. The employee's current availability displays in a calendar format. ▪Click the day(s) you wish to submit availability for. ▪Click the Plus icon.
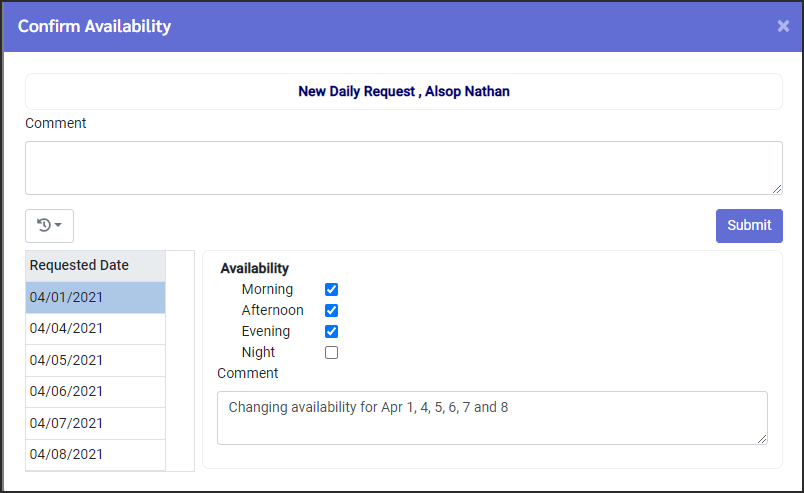
▪Review your selection in the Confirm Availability window. Modifications were made to April 1, and April 4 through April 8. ▪Click Submit.
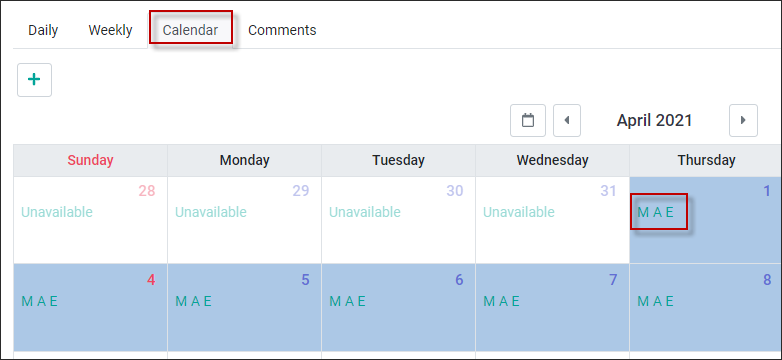
▪The new availability will be displayed. Availability of M A E now appears for the dates requested.
|

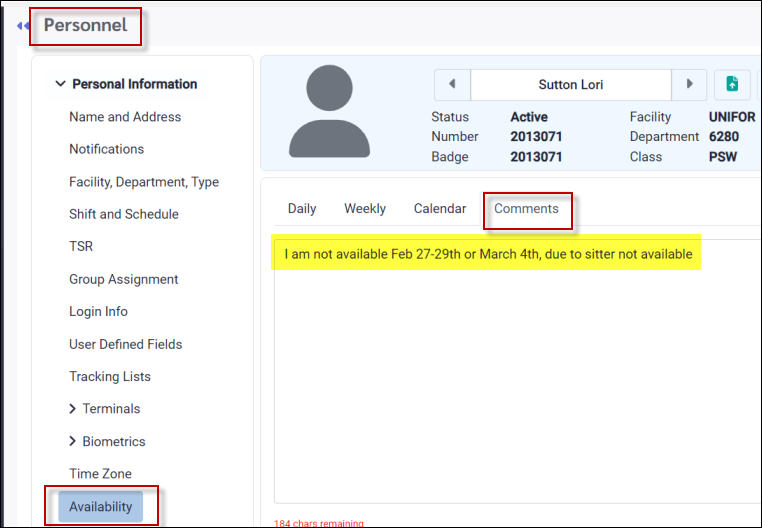
1.Comments are normally used when availability approvals are turned on. 2.Employees may add a comment in the Comment section of the availability request. 3.When making a request for a range of dates using Availability by Date, a separate comment may be added for each date within the same request. The availability setting for each day may also be different. 4.Employees can see feedback from the manager once the request has been processed, by expanding the processed request to see additional details. 5.Employees who would like to make general availability comments for managers to see on the Wizard and the Daily Schedule for call ins, must use the separate Comments tab in Personnel / Availability shown below.
If Availability is not configured to require approval, the Availability changes made by the employee are immediate. Otherwise, if approval is required, changes to employee Availability must be approved by a manager before they become effective.
|
The availability for multiple dates and date ranges can be configured in a few different ways:
1.As consecutive days with the same availability for each day. 2.As consecutive days with different availability for each day. 3.As a combination of consecutive and individual days.
Consecutive Days with the Same Availability
▪Select New Daily Request.
▪Select a date range by using the From / To date fields. Any time a range is selected, the availability that is configured will be the same for each day within that range. ▪Apply the Availability (Morning, Afternoon, Evening, or Night). ▪Click Apply to save your settings.
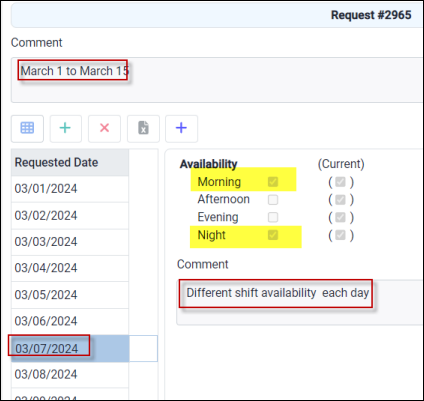
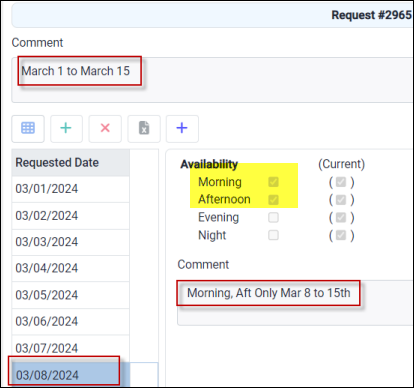
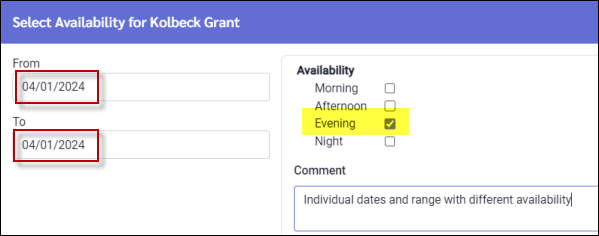
Consecutive Days with the Different Availability
▪From the New Daily Request menu, select your date range, availability and comment (optional).
▪Click Apply (not shown). A second pop-up menu will appear where you may edit the daily availability and comment as needed. ▪Click Submit (not shown) to save your additional changes.
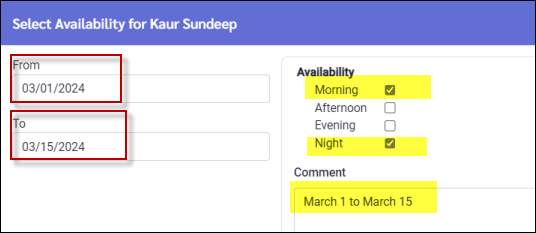
Notice Sundeep has different availability and a different comment on March 7th and 8th.
Availability for Consecutive and Individual Days
▪From the New Daily Request menu, select a date range or start with an individual date depending on your availability needs. ▪Add the required availability and comment (optional). ▪Click Apply (not shown).
From the second pop-up menu you may add individual days or ranges of days as needed.
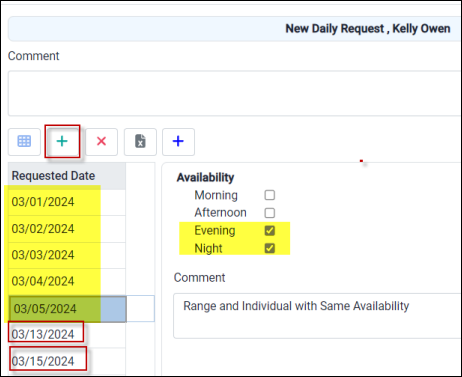
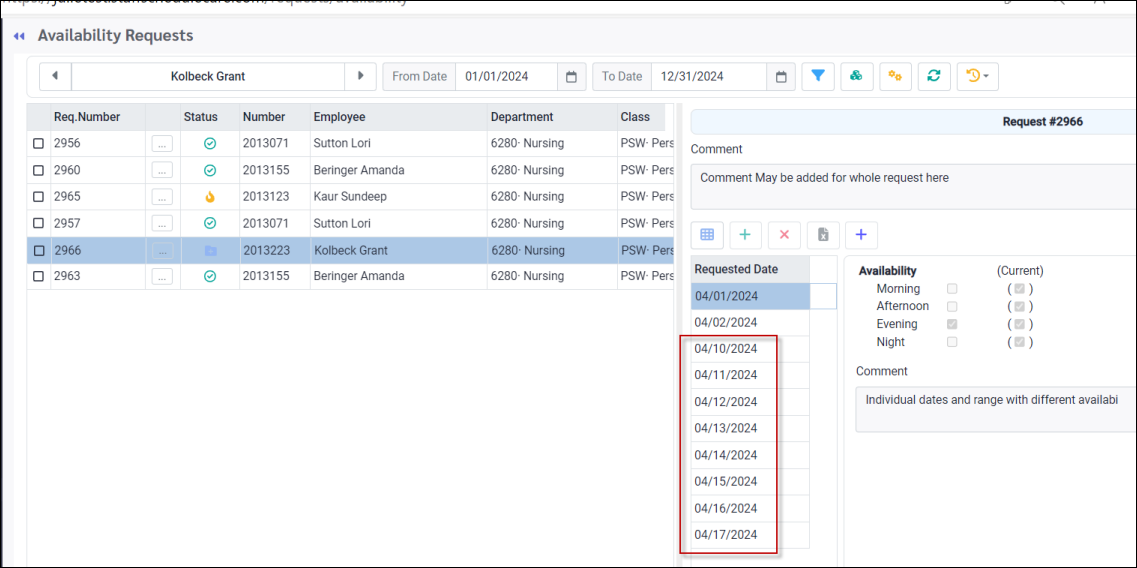
Adding Individual Days to a Range: ▪To add individual days click the plus symbol and add the required availability to each new day. March 13th and 15th have been added below. ▪Although ranges of dates will have the same availability (March 1st to 5th below) when adding individual days, you must enter the availability separately for each day. ▪Click Submit (not shown) to save your additional changes.
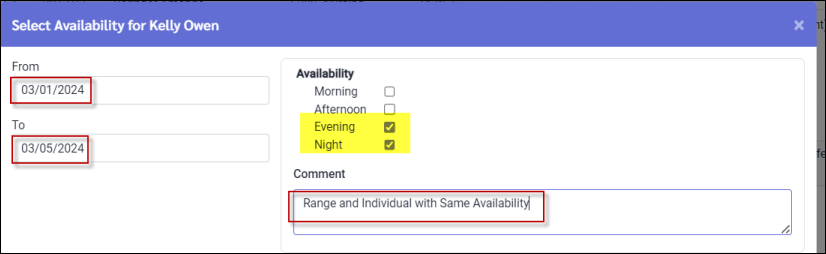
Adding a Range to Individual Days: ▪From the New Daily Request menu, select a single date, availability and comment (optional). ▪Click Apply (not shown).
▪From the second pop-up menu you may add a date range to your individual day selection(s) by clicking the plus symbol on the right to access the date range pop-up window. ▪Click Submit (not shown).
▪Select your date range, availability and comment (optional).
The date range of April 10th to 17th will now appear as part of this request (below) with availability configured for Night shifts (above).
If availability is not configured to require approval, the Availability changes made by the employee are immediate. If approval is required, changes must be approved by a manager before they become effective.
|


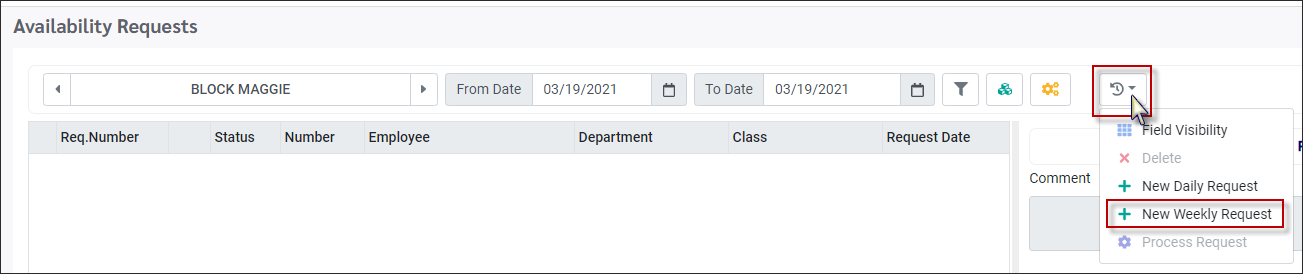
▪Select the Requests menu. ▪Select Availability Requests.
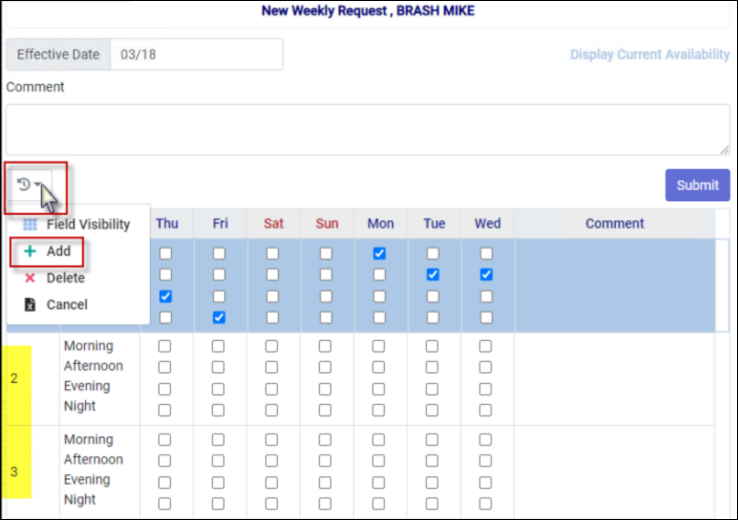
▪Click the Action drop-down menu and select New Weekly Requests.
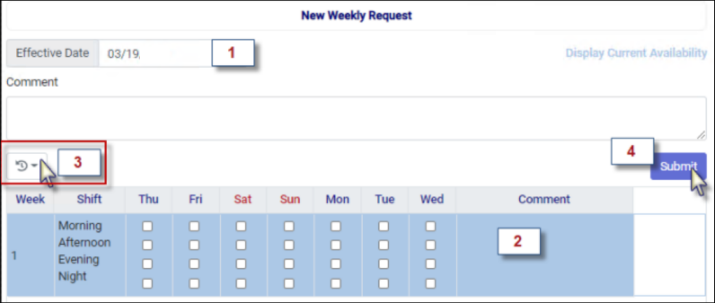
On the right the system will display a default week’s Availability template using the current date as the default date. The system will default to Week 1.
To add / edit availability: ▪Select the week start date which should match the employee's schedule week start date. ▪Tick the applicable Availability boxes for the days of the week and the shift types (M, A, E, N). ▪To add additional weeks, click the Action drop-down menu and select Add. Then repeat step two for the new week. Continue adding weeks as needed to logically match the employee schedule configuration. ▪Click Submit to complete your request.
To view the current Weekly Availability, click on the Display Current Availability link pictured in blue below.
In the example below weeks two and three have been added.
|
Default Availability by Shift
Employees can set up Default Availability through their Personnel menu.
▪Select the Personnel menu. ▪Select Availability.
Employee Default Settings This section defines employee default availability. These settings will be used during the Call-In process to determine an employee’s eligibility for unfilled shifts.
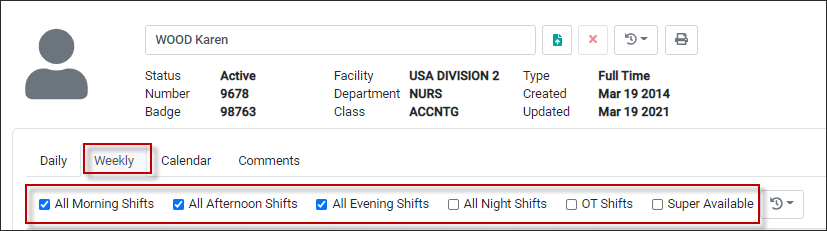
Select the Weekly tab and check the applicable default availability options as shown.
By checking the OT Shifts option, employees define their willingness to work shifts above their regular schedule and / or maximum hours in a pay period. If the Wizard and / or Mass Messaging are configured to validate this setting, only employees who have enabled this field will be called for certain levels during the call-in process. If the employee checks the Super Available option, and the Wizard and / or Mass Messaging are configured to use Super Availability, employees will appear available to be called in for a shift, regardless of what their Availability is set to in Personnel.
Default Availability by Week
Please see Availability by Week above
|