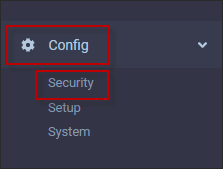
The Security Access Groups menu is where the access rights to the software is configured:

▪Select the Config menu. ▪Select the Security menu.
▪Select Security Access Groups.
▪Select the Advanced Access tab as shown below:
Manager Functions This option allows access to the following options on the Time Card menu: Reset Manual, Worked lunch, Change Day Code, Move punch to prev day, Move punch to next day.
Access to Closed Pay Periods Tick the Closed payroll access box to allow access to closed payroll periods for this Security Access Group.
Time Card Approval Modifications Here you will see the previously defined levels of approval. The number of levels defined will determine how many check boxes you see here. All of these check boxes determine what each user in this Security Access Group will be able to do on the Time Card menu when reviewing data. Submit is the lowest level of access which may be used by an employee or supervisor and Approve is the highest level which may be used by a manager or administrator.
Submit The ability to submit data on the Time Card menu.
Review The ability to review data on the Time Card menu.
Undo Review The ability to deselect the Reviewed option after it is ticked.
Approve The ability to approve data on the Time Card menu.
Undo Approve The ability to deselect the Approved option after it is ticked.
Approve Selected Employee(s) The ability to approve ALL of the selected employees on the current Employee Panel.
Approve Employee for Pay Cycle The ability to approve ALL of the selected employees on the Employee Panel for the current pay cycle.
▪Tick the box beside the applicable approval level to allow access to this level for the group you have selected. ▪Remember to click Save to apply your settings.
|
Once you have defined your Security Access Groups, you will need to assign different levels of access to the menus found within StaffScheduleCare for each group.
▪Select the Config menu. ▪Select the Security menu.
▪Select Security Access Groups.
▪Click on the Security Group you would like to define. ▪Click on the Security Functions tab.
The Security Function List appears below (the image on the right includes the remaining options when scrolled down fully).
Each parent function (root function) contains child functions (subtopics). The root function lines displayed above are the headings of each section.
When you expand that section, the first line under the expanded section is the root function and all the subtopics appear below it. The access rights assigned to this line affect the subtopics in this category, for example, if you set the first line to No Access, all the subtopics, regardless of their setting, will be inaccessible. The number of items in each expanded section is indicated in brackets beside each root function heading.
To view the topics within each section:
▪Click the arrow on the left of the function heading for the section you wish to expand OR ▪Click on the Actions icon and select Expand All to see ALL root and subtopics.
▪Click on the arrow to collapse your current section OR select Collapse All from the Actions list.
Setting Access Rights
▪Expand the function which requires the Security Level to be set / edited (Attendance Menu in the example below). ▪Access levels for each function are defined in the drop-down display box which will appear when you click beside the access level displayed. ▪Click Save when done editing.
Setting Access Levels for Multiple Functions at the Same Time
You may add / edit the access level for multiple functions at once. In this case, you must choose the same access level for ALL the functions you have selected e.g. all levels for the selected functions will be changed to View Only or View and Modify but not a combination of both levels.
You may edit the access level for either ALL the functions within the current Security Access Group or just SOME of the functions within a group:
▪Expand the menus, click on the tick box(es) to the left on the function you would like to set the access for. ▪Click on the Actions icon and select your access level.
The access for only those functions ticked, will be changed. The system will automatically save the changes. You may use this method for modifying functions within multiple groups.
|


