Personnel Configuration
Before filling shifts using Mass Messaging, the employees must be configured to receive either text messages or phone calls. Employees will be required to add their mobile numbers and provide permission to receive notifications. They also have the option of defining Do Not Disturb time periods for when they do not wish to receive notifications.
Other Configuration
The following additional items must be configured prior to using Mass Messaging.
▪The Call Responses configuration.
▪Sorting Level rules.
▪Call In rules (seniority) for phone calls, texts (with and without text identity).
▪Custom system responses.
Access to the System Rules option is determined by your security access level.
Continuous Rotation Configuration with Mass Messaging
This option will cause the list of employees to rotate based on a combination of Type (full-time, part-time, casual etc.) and Class (PSW, Dietary Aide etc.) configuration. The system will maintain a continuous list order that may span multiple levels consisting of the same type / class combination. This list will include employees who may not have appeared on one shift call-out list (because they were already been scheduled for the same shift, for example), on the next shift call-in list. Each time an employee is called, regardless of the call response, he / she will move to the bottom of the list until the list has fully rotated bringing the employee back to the top of the list.

When Mass Messaging broadcasts have been scheduled in parallel for the future, the levels will have the same employee order. As employees at the time of scheduling, have not been messaged yet, so the Continuous Rotation order is not changed. If a new broadcast is scheduled AFTER employees have been messaged, then the list of employees will be reordered by Continuous Rotation.
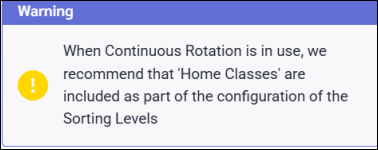
When Continuous Rotation is used with the Mass Messaging sorting level configuration, the employee home class should be specified under the Home Class List column in order to maintain a correct, continuous list. |
When Continuous Rotation is used with the Mass Messaging sorting level configuration, the employee home class should be specified under the Home Class List column in order to maintain a correct, continuous list. The system will generate a warning if this field is empty. |
To configure employee notification options:
▪Select the Personnel menu. ▪Select Notifications. ▪Select the Mass Messaging tab.
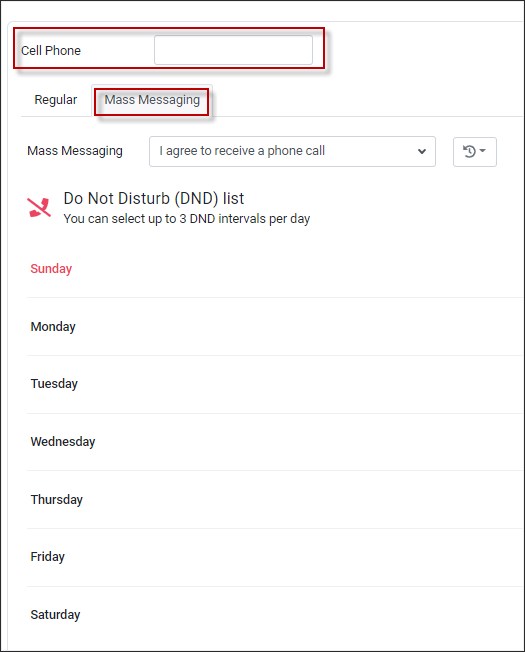
The following menu will appear. For configuring the Mass Messaging notification options, we will only use the Mass Messaging tab.
Mobile Number
Employees must enter their cell phone numbers in the appropriate box as shown. The system will allow multiple formats:
(416) 555-5555 Permission The permission options define how the employee will be (or will not be) contacted by the Mass Messaging system. If the employee would like their supervisor to receive the text messages be sure that the Scheduler feature has been configured. Please contact your StaffScheduleCare client care team to have this set up for you. ▪Click on the drop-down arrow in the Mass Messaging window and select the appropriate permission. ▪Click Save at the bottom (not shown).
Do Not Disturb Employees may then define the day(s) of the week as well as the time period(s) for each day that they do not wish to be disturbed. ▪Click on the Actions icon and select Add from the drop-down list.
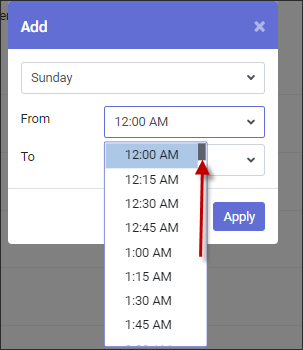
▪Click on the drop-down arrow and the applicable day of the week. ▪Click in the From / To windows to select the times. Use the scroll bar to move up/down the time list. Up to three entries may be done for each day. ▪Click Apply.
When done entering all DND time periods click Save. .
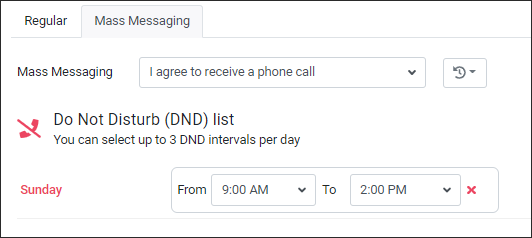
Once you click Save, the screen will refresh with the DND you entered. In this example the DND period is for Sunday, from 9:00am to 2:00pm.
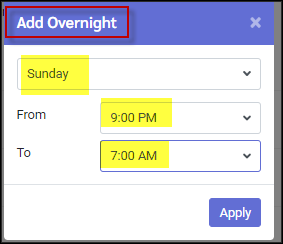
Do Not Disturb for Overnight Periods ▪Click on the Actions icon and select Add Overnight.
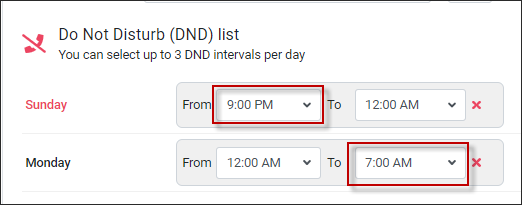
In this example we are going to setup a DND period from Sunday at 9:00pm to Monday at 7:00am.
▪Select the start day (Sunday). ▪Select the From time (9pm Sunday). ▪Select the To time (7am Monday) ▪Click Apply.
The period will be divided into two blocks, Sunday from 9:00pm to 12:00am (Midnight) and Monday from 12:00am (Midnight) to 7:00am.
Alternate Do Not Disturb Period Methods DND periods may also be added by clicking on the week day.
▪Click on the day of the week to add the DND. A DND template is opened. Populate the template using the drop-down arrows to select times.
▪This method may be repeated up to three times per day.
Clearing DND Periods
▪On the Actions icon and click Clear All or Click the red X to remove individual ones. ▪Click Save (not shown).
|
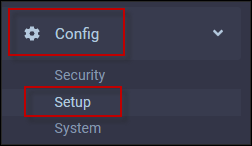
You may define the call response for text and phone replies that employees will use to accept or decline shifts. ▪Select the Config menu. ▪Select the Setup menu.
▪Select Call Responses.
The following menu will appear:
For Mass Messaging, you will only need to complete the SMS section by entering a numeric value for both the Accept and Decline fields (above). Mass Messaging also allows employees to reply to shift offers in a random order by using a shift identification number. The employee may respond to any shift by referring to this identification number, instead of just responding to the shift most recently offered.
To enable this option (recommended), tick Use text identity (texting only).This feature is only available with either First in First (Sliding) and Broadcasting dispatch methods.
|
To configure the levels and schedule rules for Mass Messaging, navigate to the Schedule Rules menu as follows: ▪Select the Config menu. ▪Select the Setup menu.
▪Select System Rules.
The following menu will appear:
From the Schedule Rules menu, you will be required to set up any Call In rules and Sorting Levels that will be used for Mass Messaging, if applicable. Call in Rules Please see Call in Rules for configuration.
Sorting Levels The second Schedule Rules option is Sorting Levels:
The following menu will appear. Select Mass Messaging from the drop-down list to configure the levels for this option.
Please see Sorting Level Configuration for column heading information. If you wish to copy the previously defined Wizard levels to the Mass Messaging levels: ▪Select Wizard from the drop-down list. ▪Highlight the level(s) you wish to copy. ▪Click on the Copy icon. ▪Select Mass Messaging in the Copy Levels window and then click Apply.
The new level will be added in sequence to the bottom of the Mass Messaging Sorting Levels.
|
In Custom Templates configuration section, there are ShiftBookingLate, and ShiftBookingMissed templates. The text message the system sends out are the same by default but will appear for two different scenarios as shown below (yellow).
When a shift is booked through Mass Messaging all employees who were scheduled to receive an invitation or had already received one are disabled.
At this time, any employee who already received an invitation, are sent the ShiftBookingMissed template response. Since the employees are then disabled, the system stops looking for a response for that particular shift.
In the screen shot above. If employee TEST TEST were to respond to the message, the system would not acknowledge the response since it has been disabled.
The ShiftBookingLate template is used when the broadcast for the shift has been started but the shift was booked through other means e.g. Daily Schedule or Wizard.
Conclusion If the shift was booked through Mass Messaging the system stops waiting for responses from the employees. It also automatically sends the ShiftBookingMissed message to employees who received the invitation that the shift has been filled.
If the shift was booked outside of Mass Messaging while the broadcast was on going, the system will wait for responses from any employees who had received the invitation. The system will send the ShiftBookingLate message if the employee tries to accept.
|
See Also:
Filling Shifts Using Mass Messaging

