|
»Click here to display Table of Contents«
|


Mass Messaging |

|

|

|
|
Mass Messaging |
|
|

|
|
»Click here to display Table of Contents«
|
Mass Messaging |
|
|
|
|
Mass Messaging |
|
|
|
Mass Messaging is a two way messaging feature which allows managers to send notifications of unfilled shifts to multiple employees simultaneously.
Employees can accept or decline the shift directly through the same mode of notification. Mass Messaging is initiated and processed one shift at a time.
▪Select the Schedules menu.
▪Select the Mass Messaging menu.

Use the Mass Messaging main menu to access the dispatch menu: ▪Select the Schedules menu. ▪Select the Mass Messaging menu.
The following main menu will appear displaying the unfilled shifts for the selected date:
Click anywhere on the line displaying the unfilled shift you wish to fill.
To access the Mass Messaging dispatch menu, click on the unfilled shift reference number link as shown:
The following menu will appear:
1 - Level Selection You can base the priority order of your messaging on either the Employee List as currently ordered (filtered, sorted etc.), or on the Levels defined during configuration.
2 - Levels - Column Descriptions The columns are described as follows:
Level Displays the predefined levels. If the Employee List is specified instead as per #1 above, the predefined levels will be grayed out but still visible.
Feedback collecting time, % Displays the defined time period during which messaging will be sent, and the percentage of time allotted to each level. The total time will be divided equally among the levels. In the screen capture below, each of the two levels will be allotted 8.33% of the total time.
Employee(s) Displays the total number of employees who will be messaged for this level. The percentage of time allotted for this level will then be further divided between the total number of employees in this count. To view the employee(s) who are part of the current level count (9 below), click on the corresponding number and the employee detail window will appear:
The employee(s) will appear as shown. If they have already responded to an earlier message dispatch for this shift, the response code will appear under the Earlier Feedback column.
Disabled Tick this box to disable (skip) this level when sending out messaging. Each level will default to Disabled as shown if no employees are available. The Feedback percentage time will adjust for the change in the number of employees.
Pause Double click in this field to activate the Pause time option. Populate this field with the length of time the system should pause before initiating this level. This will allow employees who are part of the previous level, additional time to respond to their unfilled shift notification, before messaging is initialed for the next level.
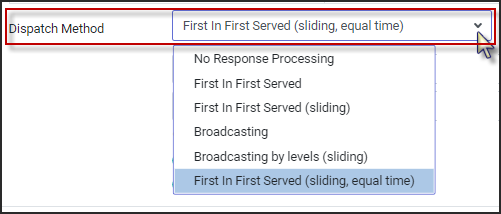
3 - Dispatch Method Select a Dispatch Method from one of the four options described below:
No Response Processing Employees receive a message notifying them of an unfilled shift, with no option to reply. This option can only be used in the Configuration à Setup à Custom Templates menu.
First In First Served Messages are sent in order based on the pre-defined levels. Employees who received the message first must reply (accept or decline) before the next employee will be messaged. Employees who attempt to respond after their Level’s response deadline has passed will not be able to.
First In First Served (sliding) Messages are sent in order based on the pre-defined levels. Employees can accept or decline a message on a first-come-first-served basis, even when employees who received the message first have not yet responded. . Employees who attempt to respond after their Level’s response deadline has passed will not be able to.
Broadcasting Messages are sent to all employees (on the first level) at once, and the first employee who accepts the shift will be booked. If no “Accept” response is received, the system will message all employees on the next level after the pre-defined response deadline for the first level has passed. Employees from the first level will no longer be able to respond.
Broadcasting by levels (sliding) Messages are sent to all employees (on the first level) at once, and the first employee who accepts the shift will be booked. If no “Accept” response is received, the system will message all employees on the next level after the pre-defined response deadline for the first level has passed. Employees from previous levels can still respond until the final response deadline has passed.
First In First Served (sliding, equal time) Messages are sent in order based on the pre-defined levels. Time is redistributed among the levels based on number of employees per level after the duplicates are removed. Employees can accept or decline a message on a first-come-first-served basis, even when employees who received the message first have not yet responded.
4 - Messaging Times Enter the Start Messaging date and time:
5.Enter the Response Deadline date and time.
6.The Time Left indicates the hours, minutes and seconds left before the Response Deadline ends and this dispatch session expires.
7.The Shift's Time Zone will compare the shift time zone to the server time zone.
8.The Disable All button will flag all levels as disabled; meaning they will be ignored. Use this feature if you would like to disable most levels and they uncheck those levels you would like to use.
9.Hide empty levels - ticked on, levels without available employees will be hidden. Use the Mass Messaging Configuration window to set the default.
|
▪Select the Schedule menu. ▪Select the Mass Messaging menu.
The Mass Messaging menu will appear displaying the unfilled shifts for the selected date.
The icon to the left of the reference number will provide additional information regarding the status of the shift. Hover over the icon and the tool tip will appear (e.g. Processing):
Click on the reference number and further detail about this booking will appear at the bottom right section of your screen:
Toolbar Descriptions Hovering over the icons will provide a hint.
1.Displays selected date (default is current date). 2.Calendar to select new date. 3.Back and forward arrows to navigate to previous or next day. 4.Configuration is used to select options to apply to the screen and messaging defaults. Click on the drop-down arrows to select from the drop-down lists.
▪Send Full Department/Class Description - Will send the full name of the Department and Class to the employees when messaged. ▪Hide empty levels - Tick to hid the levels without available employees on the Messaging Dispatch screen. ▪Deadline Before Shift Starts - Allows you to set a standard response deadline (in hours) before the shift start. This will apply to all future messages unless changed. ▪Dispatch Method - Allows you to set a Default Dispatch Method for all future mass messages.
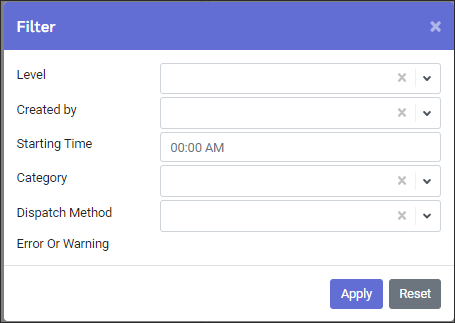
5.Filter option for shifts displayed in this window. 6.Refresh data in this window. 7.Data engine to view historical messaging data. 8.IIS Trace will display the dates and times of operations performed using the Internet Information Services (IIS) Manager. This will allow you to trace service interruptions if messaging was not dispatched.
9. The Legend provides a description of the icons which may appear on the main menu beside the unfilled shifts.
10. The Scheduler can be configured to allow a manager to receive text message notification in the place of employees who are in the facility working at the time the messaging is dispatched. Activate the Scheduler option by ticking Use Scheduler and completing the information.
If client is using the Mobile Scheduler then the cell phone field should be blank. Untick on the Expect follow-ups option to stop follow up messages being sent to the Scheduler.
11. Use the Field Visibility option to either hide columns and/or change column headers.
12. Use the Expand option to open the grouping set using the Group By options.
13. Use the Collapse option to close the grouping.
Group By You may group the shifts using the Group By level.
Viewing Historical Messaging (Mass Messaging Monitor)
From the main Mass Messaging menu, click the following icon to access historical messaging data.
This icon is linked to the Mass Messaging Monitor module. You will be re-directed. The Monitor screen can be accessed by clicking the icon link or selecting it from the Welcome menu.
Mass Messaging Monitor Options
The Mass Messaging Monitor screen is divided into two panels.
Left Side - Displays the dispatch information by level. - The date is the dispatch date and time, not the shift's schedule date.
Right Side Displays the employees who were messaged for that level.
Mass Messaging Monitor - Left Panel
1.To view messages sent for a specific period use the Date From and To Date fields. The default date is your most recent unfilled shift date.
2. To view the shifts by their schedule date tick on Based on Schedule option.
3.You can filter your message history by these options. Click on the drop-drown arrow in each field and select from the list provided. To save your filter selections click Apply.
4. Click on the Statistics icon will provide a summary of the messaging.
5. To delete, click on the red X.
6. To cancel, but not delete, click on the Cancel icon.
7. Click the Refresh icon to refresh the screen.
8. You can select a specific unfilled shift by entering the reference number and Enter. Please note that you cannot filter by reference number.
Hovering over the Reference number will provide the shift details. The date provided under the Reference is the date the shift is scheduled for.
9. Click in the Sort by window to sort by Sent time or Reference number. Use the arrow to sort ascending or descending.
Mass Messaging Monitor - Right Panel
Queue (server time) The server time when messaging was dispatched for the current unfilled shift.
Send and Wait for Reply period Displays the Messaging Time period setting up the messaging. A blue arrow can occur when the employee gets their message earlier than originally scheduled (could be a couple of minutes or mere seconds earlier). This is due to an employee higher on the list responding quickly/before the message goes out to the lower down employee, which triggers the message to send to the next employee slightly sooner.
Status An icon will appear in this column indicating the messaging status for the employee. If additional information is required, hover over the icon and a tool tip will appear.
After DND If employees have defined Do Not Disturb periods which correspond to the time messaging is dispatched, and they receive a message following this period, the box in this column will be checked.
Sent/Answered This column will contain the date and time stamp indicating when the message was sent to the employee and when the employee replied to the text (if applicable).
Accept / Decline Use these responses for supervisor override. See Supervisor Override.
|
The Mass Messaging widget will be added when you configure your Welcome menu. To add the Mass Messaging Widget see Welcome Menu (Manager). The Widget links will take you directly to Mass Messaging information.
Levels Processing ▪Click on the number to the left of the Levels Processing when there is a number displayed. This open the Mass Messaging Monitor screen. The Statistics ▪Click on Statistics to view a chart of the messaging history. ▪Select your date range and click Apply. ▪In the Type window, click on the arrow and select the type of statistics, SMS, Phone or Both.
|
Cell Phones There are warning messages that an employee may receive on their cell phone when sending or receiving texts.
Message service would like to send a message to 15432. Allow? This message is from the cell phone provider. Please note that the message appear differently depending on the cell phone.
The 15432 number is the short code phone number for our Mass Messaging Texting. There are apps that use the short number method for sending texts which could incur a charge when replied to.
The carrier is warning that it is possible, however, there is NOT a charge for replying to the StaffScheduleCare text.
Employees can select the Remember My Selection option to stop the message from occurring for StaffScheduleCare text messages. This will NOT suppress it for other apps or texts using the short code phone number method.
|